UPDATED - January 10, 2012

My first hank drum was completed in February 2007

HI -

Pre note: I'm liking this thing a lot more now that a hang drum sold
on E-bay for nearly $10,000 !! You could have well over 300 of these
propane tank hank drums for that price!

A few words about my propane (LP) tank HANK-DRUM
("hank drum" -- Hang + Tank)
PS: Much thanks to "Cheapbastid" on the Hang forum for coming up with
the name "hank drum")

I invented this instrument because of a love for the sound, music
and idea of the hang drum created by two dedicated artists at PANArt
company in Bern, Switzerland.

In lieu of not being able to procure such a hang drum from Switzerland,
I'm having a WHOLE lot of improvisational fun playing away on this simple
tank drum. As humble as the idea is, it plays very much like the real thing
& has a somewhat similar and quite pleasing sound. It is very responsive,
requiring only a light, one-fingered tap to start it singing nicely.

>>>>>>>>>>>>>>>>>>>>>>>>>
PLEASE NOTE: Pantheon Steel, maker of beautiful steel drums (aka "steel
pans") is now making and selling their version of the Hang - called "Halo"
A truly beautiful instrument every bit as capable and pleasing as the Swiss
Hang. Please contact them at pantheonsteel.com  I have one and recommend
the Halo highly!!
>>>>>>>>>>>>>>>>>>>>>>>>>

>>>>>>>>>>>>>>>>>>>>>>>>>
PLEASE NOTE: if you like the idea of my hank drum but don't want to make one
yourself. I am far too busy to make them commercially (aside from my intense
dislike of "production work") A number of other folks are making hank drums in
various forms. The one I am most familiar with, the one I obtained is called
a "Zen Tambour" and I am liking it very much (see YouTube video at
http://www.youtube.com/watch?v=E1KzKI1YiDc).
Please see http://exoticvessels.com/zentambour/ for much more info on this
fascinating instrument. Unlike my "rough-and-ready" propane tank conversions,
The Zen Tambour is drop-dead beautiful to look at as well as play. Along with
the Pantheon Halo, this Zen Tambour is a prized possession.
>>>>>>>>>>>>>>>>>>>>>>>>>

NOTE: Many people have built hank drums from my plans here but of those I've
heard played (youtube and otherwise), a lot of them are quite out-of-tune!!
I am at a loss as to why this is!! If you can tune a guitar, you can properly
tune this Drum. Please do not get impatient and settle for bad tuning --
for one thing, I am proud of my hank drum invention and it gives it a bad name
for people to be hearing (sometimes) WAY off tuning on the things! Take the
extra time to tune it right -- it truly is NOT hard.

Another LATER NOTE: Nice to see a lot of home-made hank drums popping up on YouTube.
I do notice that quite a few folks are not hitting the tongues "properly".
It makes a LOT (repeat LOT) of difference in the tone/sound/volume WHERE on the tongues
you hit. Try to hit the higher notes about a third of the way up from the base of the
tongues instead of near the tip - EXPERIMENT. Lower notes aren't so fussy. Also, a far
better tone is obtained if you hit very quickly - not allowing your finger to rest on
the tongue even for an instant -- tap it as if you were testing a stove burner to see if
it's hot.  Also, I still see people not using the highly recommended bungee cords to
mellow out the tone. These may seem like small points, but they're not.
CLICK
HERE to see a short YouTube video of me playing this instrument
CLICK
HERE to see a second video of me and this instrument
PS: The tiny, tinny speakers in most laptops do a very poor job of
representing the real sound of this instrument. Desk-tops do a far better job.
>>>>>>>>>>>>>>>>>>>>>>>>>>>>>>>>>>>>>>>>>>>>
There is NO doubt that you can build this hank drum if:
a- You know how to use an electric drill
b- You know how to use a pipe wrench
c- You know how to use a saber-saw (only a few mins practice needed if you don't)
d- You know how to use a pair of Vise-Grips
e- You know how to use a file
f- You can tune a guitar
g- You can get a friend to help you with a-f above
As you can see, basic stuff!
- V E R Y IMPORTANT: USE ONLY NEW - NEVER-BEEN-FILLED - 20 pound propane tanks.
Input keywords such as - propane tank explosion - into YouTube to see
the reason why!! These new tanks cost $27 or so at Home Depot stores
(I've been told that they're as low as $19 in big city discount outlets).
Even if you hear and feel no liquid in a used tank, there may still be
gas inside - which can be very explosive. Then too, valves have been known
to jam and the newer type LP valves can more easily fool one into believing
that a tank is empty. Heed this caution: use a NEW tank.
- Remove the valve mechanism using a Plumber's pipe wrench. A 3 or 4 foot long "extender"
is almost always needed to get the screw-threads to start turning (it's glued-in/sealed
at the factory and can take some determined convincing to unscrew). One
sure-fire trick is to very tightly clamp a 2' long hefty (1" D.or so) length
of water-pipe vertically in a vise, then holding the tank on it's side, slip
the handle-holes over the pipe. Now with the tank resting on the vise, use
the pipe-wrench/extender. This method works largely becasue it keeps the
tank stable -- keeps it from rolling around.
LATER NOTE -- THIS REMOVING METHOD WORKS LIKE A CHARM - EVERY TIME - EASILY.
IF IT DOESN'T WORK FOR YOU, YOU'RE DOING SOMETHING WRONG!
PLEASE READ THE ABOVE INSTRUCTIONS CAREFULLY.
- The metal ring that is welded to the tank's bottom also has to be removed.
It comes off quite easily with a sharp chisel. LATER NOTE (9/2/07): A far
easier and quicker way to remove this ring is to clamp Vise-Grip pliers
onto the ring, 1/4 inch from the ring/tank weld then worry it back & forth
a few times til it breaks free. Repeat with the other 3 welds. I just
de-ringed a tank this way in less than a minute. The welds usually break off
flush with the tank, but if not simply file off any leftover bumps. This
ring can be cut, re-formed and bolted onto the tank's carrying-handle ring
(creating a complete circle) -- this makes an excellent base that keeps the
tank from tipping over when set bottom-side up for playing.
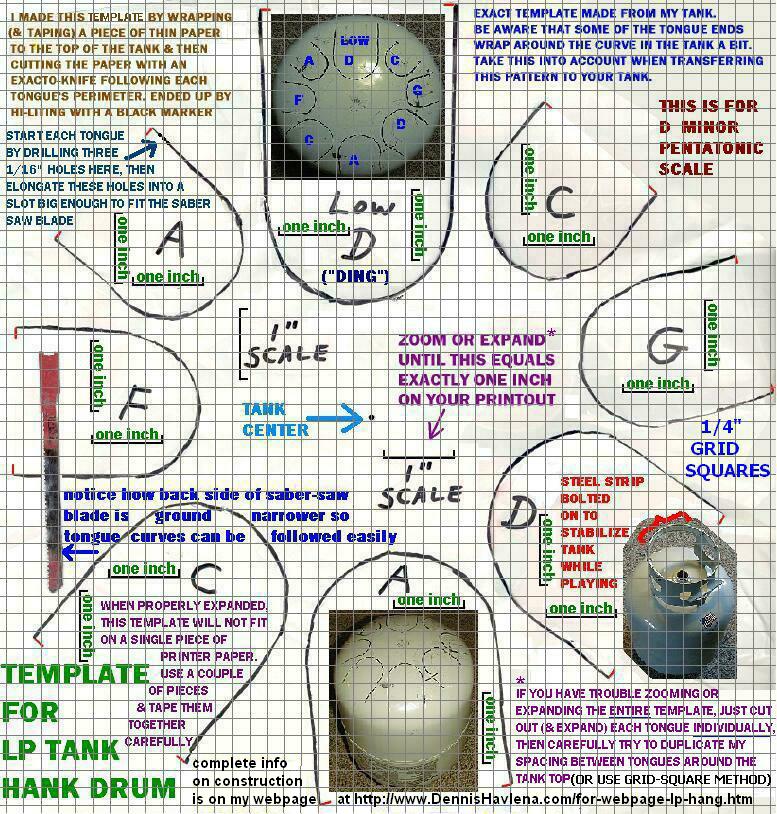
- To make the small slot that the saber-saw blade will fit into,
I drill three fairly closed-spaced 1/16" holes - positioned about 1/4 inch from
the end of one of each tongue's legs. I then carefully (wear goggles!!) "worry"
these holes into one long hole that will fit the saber-saw blade. Crude -- but
works fine.
LATER NOTE (1-10-2012): a Dremel tool with 1-1/4" reinforced "cutoff wheel" works
better for making these slots. I didn't have this setup until recently.
- I use a regular off-the-shelf saber-saw to cut the tongues. The saw-blade
has to be ground-down so the back-side is half as wide, in order to follow
the curves of the tongues. WEAR SAFETY GOGGLES -- the less-wide blade can
break all the easier with possibly disasterous results to eyes. I use
hearing protection too --- look like a Martian! I prefer cheaper saber saws.
They're lighter, easier to use and usually do NOT have this silly "no-screw"
spring-loaded blade "quick" attachment (which I find works very poorly). I
just bought a nice Black and Decker for $20. Also, small, cheap grinding
wheels, that are used with a regular electric drill, work nicely to grind
down the saw-blade. Home Depot and Walmart sell these wheels inexpensively.
I must confess that this cutting of the curved portion of each tongue is by
far the part of making a hank drum that I least like. Even having built wuite
a few of these jobbies, I still break probably 4 or 5 saw-blades as well as a
similar number of 1/16" drill bits! After a LOT of trial and error,
the saw blade that seems to hold up best is Vermont American brand bi-metal,
fine tooth. Rounding these curves has ceased to be fun!
- I always cut the tongue lengths a good 1/4 inch shorter than I think will
produce the desired note. After saber-sawing, the tongues are fine-tuned
using a bare hack-saw blade with the end wrapped in duct tape to keep from
cutting my hand. GO VERY SLOWLY -- it's FAR easier to flatten a note than
to sharpen it (to sharpen it, you have to run the saber-saw blade along the
perimeter of the tongue, seeking to nibble away a fraction of metal & reduce
the mass of the tongue - & thus raise the pitch --- this wearying process goes
very slowly in comparison with how lightning-fast the tongues can be flattened).
- The scale I used is D minor Pentatonic: (I fell in love with this scale after
hearing a fellow in Pennsylvania's beautiful youtube uploads in this scale).
(low to high) Low note ("ding") is D. Circle-notes are (running up the scale
& alternating right-left-right-left etc) A, C, D, F, G, A, C . You can make this
drum in any key/scale you'd like. Just use my template dimensions as a starting
point. For example, if you'd like to include an E note, refer to my F note and
just (carefully & slowly) lengthen each leg of the tongue until the E note is
achieved.
- The fact that the Low D note is NOT in the center, but instead is located
between the two highest notes, does not seem to be much of a liability. It IS
however, the closest note to the center. I'd LIKE to have put it in the center,
but after doing so on an experimental tank, it confounded the other notes
considerably -- thus this "off-center" placement. I'm sure hang players would
have little trouble playing this slightly off-center Low D "ding".
- The saber-sawing process magnetizes the filings to a point where they're
quite pesky! While sawing and tuning, I find that taking an old towel and
forcefully whapping each tongue dislodges these filings nicely. Once all cut
and tuned, I insert a garden hose under high pressure into the tank and let
it run for about ten minutes while rotating and swishing around the tank.
This gets rid of the metal filings.
- Tuning the beast:
I rough-tune each tongue by ear to just a bit higher-pitch than desired,
then use a simple electronic tuner to fine tune each tongue to pitch.
Here are a few tricks I have found to be quite useful in the process.
I start with the low A tongue, silencing all the other tongues by
sticking a pea-sized glob of �Mortite� brand window-caulking �rope�
(actually very clay-like), available at any hardware store, across the
top of the roundy end of each tongue (masking-tape works too). Thus silenced,
the overtones and harmonics of these notes don�t confound the electronic tuner.
For reasons I don't understand, (stringed and wind music generation I DO
understand -- but the best I can do with this musical-steel stuff is to
take my best guess, then launch into a barrage of adjustments & experimentation
until I find something that works to my liking. There are lots and lots of
variables with musical-steel methinks!!) the two highest notes tune (& sound)
noticeably better with NO Mortite silencing the other notes. For fine-tuning,
lengthening of the tongues, I only use a hacksaw blade itself. An observation:
Please take the time and care to tune this thing properly. Quite a few folks
have built one of these hank drums & several have sent me sound samples while
others have uploaded to YouTube. While many of these sound quite nice, in far
too many cases, it's obvious that their tongues are not tuned properly -- one
or more note(s) being out of pitch! It's not that hard at all to get it right --
CLOSELY follow my tuning instructions (do not "wing it"), go slow and you won't
go wrong.
- A bungee-cord or two (or even three) wrapped around the tank just down from
the tongues really does do wonders in helping control any excessive tank ring as
well as undesirable overtones. I can't imagine playing one of these instruments
with no bungees. LATER NOTE (8/23/07): Just discovered that black rubber bungees
work FAR better than round, multi-color, cloth-covered ones -- must be due to more
contact area. Here again, videos sent me and on YouTube show people playing these
drums without bungees -- far too ringy & brash a sound!
- Later note: I just had occasion to play this drum with the thing's base resting
on concrete & was amazed to hear just how much the sound suffered - lower notes
were muffled. I'd only played it on carpet, grass or in my lap previously.
Must be that the sound conducts into the concrete & acts similarily to a mute
on a fiddle. This problem was completely solved by taking a short length of
discarded garden-hose, splitting it lengthwise & working it onto the base,
securing it a few times with colored duct-tape. Also has the advantage of not
scratching any surface that the drum rests on.
Later note: An alternate method of expanding the above digitalized template to
proper size is to use the old "grid-square" method. I have applied grid squares
to the template -- each square on the template represents a quarter of an
inch -- even though it obviously does not measure 1/4" on the computerized
template. Carefully tape together several sheets of 1/4" graph paper taking care
that where sheets overlaps, all lines line-up. Look carefully at a square on a
tongue -- count where the corresponding square should be on the blank graph
paper & carefully draw in the tongue line. It's not that critical so long as
when it comes time to actually cut the metal, you leave each leg of
the tongue amply long (at least a quarter inch) for fine-tuning. Crafters -
quilters, rug-weavers all use this simple "grid-square" method to expand small
magazine designs to whatever size they wish.
This instrument is not especially light -- an off-the shelf tank weighs 17 pounds
(a pound or two less with the bottom ring and valve mechanism removed) but it does
have a comfortable built-in carrying handle. In my case, the weight has not been an
issue. I cart it around to all sorts of places quite easily. Think of a piano!
A later note: a lot of people desiring to make a hank drum but living outside of
the United States have reminded me that "20 pound propane tanks" are not available
in their country! I have been trying to determine just what type of tanks ARE
available overseas, with limited results. In any event, as evidenced by seeing very
successful hanks made using other types of tanks on YouTube, if you've got one of
these other type of tanks, give it a try! You might consider not using my template,
but instead using my tongue shape & dimensions applied to your tank BUT with the legs
of each tongue initially cut MUCH shorter. See what pitch this shortened tongue
produces & carefully adjust accordingly. PLEASE LET ME KNOW how this goes so I can
include more detailed info in this article. Thanks
If more "would-be-hang-drum-players-who-can't-obtain-a-PanArt-instrument" saw how
easy this thing is to make, how good it sounds in person & how much GREAT fun it is
to play, I think that they'd be more around.
But please TUNE the contraption properly!!
LATER NOTE (1-10-2012): After recently conducting a hank-drum (& other instrument)
making workshop in Africa, where things like saber-saw blades were very hard to find,
I (admittedly reluctantly) opted to use rectangular tongues instead of my usual
"tongue-shaped", roundy tougues. Have to say that I noticed no (zero) difference in
tone, volume or playability. I did notice that with three straight sides per tongue,
the instruments were MUCH easier to build. So - hopefully I will soon add a
rectangular-tongue template to this web-page. In the meantime, if you'd rather make
the easier rectangular-tongued hank, I might suggest still using my roundy-tongued
template above to get the general idea of width and length. Using same width, plan on the
rectangular version being shorter than the roundy. Try locating the top of each the
rectangular tongue 3/16" down on the tank from what the above template shows and then stopping
your right and left cuts WELL before what is shown above. Then carefully work their lengths
to pitch. PLEASE LET ME KNOW HOW THIS GOES. I have been so busy that since I got back
from Africa, I have not had the chance to do this myself yet. I DO have a rectangular
template for SENEGALESE tanks (see elsewhere on my webpage here) but their tanks are
much thicker than US tanks & unsure how that template would work. Kindly share your
thoughts and ideas with me please. Thanks dhavlena@gmail.com
PS: I still like the LOOKS of roundy tongues better! Hard for an old fart to change!
Another idea/observation -- I recently (2011) made a few hanks from well-water air tanks.
They worked fine but ringy overtones were an issue. Instead of the bungee-bands, on a whim
I stuffed half of an old t-shirt into the tank & it worked!! Mellowed it right out.
Lemme know if you repeat this experiment.
CLICK
HERE to see Jim Doble's neat thick- metal, BIG-tank playground drums!
Dennis Havlena - W8MI
dhavlena@gmail.com
Mackinac Straits, northern Michigan
Originally posted July 3, 2007