2-1/2 OCTAVE CHROMATIC CONDUIT-TUBING XYLOPHONE

My daughter having gotten interested in marimba playing at
school, I came up with a two and a half octave
xylophone fashioned most inexpensively and easily from
lengths of electrical conduit tubing suspended and held in
place by rubber bands fastened between double-headed
cement (aka "duplex") nails, driven into 3/4" plywood
basses (I used an old bed headboard).

I realize this is not a marimba, but I've set it up like
one so my daughter can practice and it is quite
serviceable for this purpose.

The thing sounds very nice -- the only objection might be
the extended sustain, which can be much lessened by using
softer whappers instead of the more normal wooden ones.
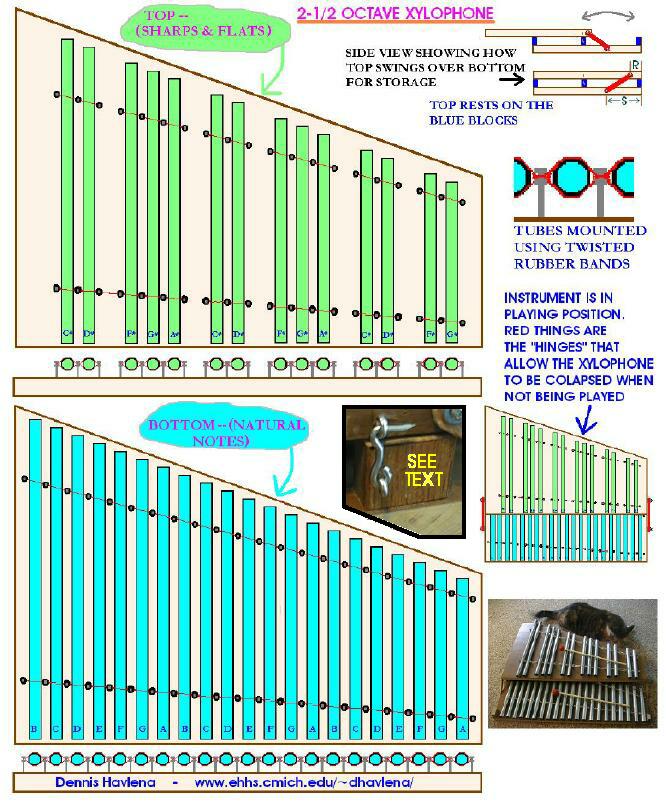
Two plywood bases are needed -- one for the naturals
(corresponding to a piano's "white keys") and the other
for the sharps & flats (corresponding to a piano's "black
keys") (the thing is set up just like a piano keyboard).
The "black key" base is positioned above and to the rear
of the "white" keys and "hinges" forward (and rests
squarely atop the natural notes base) to conserve space
when not being played.

A note about metric measurements -- for someone who much
dislikes the metric system of measurements, I must admit
that in certain cases metric measurements make more sense
than otherwise. Such is the case here where most
measurements are in millimeters. The metric system of
itself makes fine sense, what I find objectionalbe is that,
because of the push to metrics, we've now got a totally
confusing and silly hodgepodge of two dissimilar measuring
systems in this country -- necessitating things such as the
purchasing twice as many tools -- not to mention that the
metric system was, for all practical purposes, essentially
shoved down our throats! Gee -- you'd think I was a grump to
read that.    I'm not.


CUTTING AND TUNING THE TUBES:
Standard galvanized steel 1/2" electrical conduit tubing
in used throughout & produces a very nice musical note.
Here are the dimensions that mine worked out to. Please
note that different brands and batches of this conduit may
produce slightly different musical pitches. I offer the
dimensions here as a guide. It's far best to use a
chromatic tuner to assure right-on pitch. Also, when
cutting and tuning the tubes, always start with the lowest
pitched note -- that way, if you goof up and cut off too
much (you will!), you can still use the tube for a higher
pitched note. I rough-cut with a hack-saw and grind to
pitch with a grinding wheel. Don't allow the tubing to
become too hot while grinding lest it affect the pitch --
I had this happen noticeably.

LOWER HALF (NATURALS) DIMENSIONS IN MILLIMETERS (from low to high):
B - 469.5
C - 458.5
D - 432.5
E - 408.5
F - 397
G - 374
A - 351.5
B - 332
C - 323
D - 301
E - 286.5
F - 275
G - 259.5
A - 244
B - 230
C - 224
D - 210.5
E - 199
F - 193.5
G - 180.5
A - 169.5

TOP HALF (SHARPS & FLATS) DIMENSIONS - IN MILLIMETERS (from low to high):
C# - 444
D# - 418
F# - 384
G# - 359
A# - 338.5
C# - 313.5
D# - 292.5
F# - 267.5
G# - 251.5
A# - 237
C# - 217
D# - 205.5
F# - 188
G# - 176


BASE-BOARD DIMENSIONS (both halves are the same dimension):
Left edge - 490
Right edge - 146
Bottom edge - 710
Top (slanted) edge - 784
Material used - 3/4" plywood of any sort


NAIL PLACEMENT:
This type of vibrating pipe has nodes 2/9 of the way from
either end. This is important because, there being little
or no vibration at these nodes, they are the places where
the mounting rubber-bands should go. By the way, when
cutting the tubes to proper length, grab them at these
nodes or else your fingers will muffle the tone. These
dimensions take this into account. On the left side of
each half mark a point 105 mm up from the front edge and
another point 367 mm up from the bottom edge. On the right
side of each half mark a point 32.5 mm up from the front
edge and another point 118 mm up from the front edge.
Connect the four sets of dots - left to right. The nails
are installed on these four lines. #8 (2-1/4 inch)
"Duplex" nails (aka double-headed nails) are used
throughout. They work perfectly because they also keep the
rubber bands from migrating downward. The bottom part of
each nail has to be hack-sawed off so that only 27 mm of
the nail sticks above the board. Be sure to file off any
sawn rough edge. I predrill holes for each nails using a
7/64 inch drill-bit. Try to keep the nail-heads more or less
level with each other.

As for location of the nail-holes along each of the four
lines -- here are my measurements:

BOTTOM half (naturals) holes (by number - measured from
left edge (& in line with the angle of the nail holes)

Upper line:
Hole #:
1  - 30.5
2  - 63
3  - 94.5
4  - 127.5
5  - 157.5
6  - 187.5
7  - 220
8  - 253
9  - 284.5
10 - 317
11 - 349
12 - 382
13 - 413
14 - 446.5
15 - 477
16 - 403.5
17 - 541
18 - 572.5
19 - 604
20 - 637
21 - 670
22 - 702.5

Lower line:
Hole #:
1  - 28.5
2  - 65
3  - 100
4  - 133.5
5  - 168
6  - 200.5
7  - 236
8  - 270
9  - 305.5
10 - 338.5
11 - 371
12 - 404
13 - 439
14 - 472.5
15 - 507.5
16 - 540
17 - 574
18 - 608
19 - 642.5
20 - 675.5
21 - 710.5
22 - 743.5


TOP half (sharps & flats) holes (by number - measured from
left edge (& in line with the angle of the nail holes)

Upper line:
Hole #:
1  - 84.5
2  - 117.5
3  - 151
4  - 185
5  - 219
6  - 253.5
7  - 287
8  - 320
9  - 354
10 - 387.5
11 - 422
12 - 455
13 - 489
14 - 523
15 - 556
16 - 590.5
17 - 624
18 - 657.5
19 - 692
20 - 727

Lower line:
Hole #:
1  - 77.5
2  - 111
3  - 142
4  - 174
5  - 205.5
6  - 237.5
7  - 269
8  - 300.5
9  - 332
10 - 364.5
11 - 395.5
12 - 427
13 - 459
14 - 491.5
15 - 523
16 - 554
17 - 588
18 - 619
19 - 649.5
20 - 681

In general, tubes are positioned 1.25 inched apart.
This ass isn't super critical.


RUBBER BAND PLACEMENT:
I use 3 inch by 1/8 inch rubber bands & span every 5 nails. When
inserting the tubes into the bands, I found it best to grab the
bottom part of the band, stretch it horizontally towards the rear
of the instrument, then upwards to make a loop through which the
tube passes. The twist in the rubber bands nicely keeps the tubes
from rattling against the nails.


JOINING THE TWO HALVES:
A simple "hinge" affair enables the two halves of the
instrument to not only be positioned correctly for
playing, but also to enable the top part to be folded
forward to lign up vertically with the bottom half - for
storage. Note - With this hinged affair, the left side of
the top half tends to tip backwards due to balance (when
opened)-- I completely solved this problem by installing a
small (1") hook & eye (screen-door type catch). See photo.


FINAL NOTES:
Of course, if you prefer not to have sharps & flats, you
can simply build the bottom half - but you'd be limited to
playing only in the key of C.

This thing is fun to build (despite the seemingly endless
hack-sawing/grinding!) and surprisingly nice sounding.
It's a whale of a lot cheaper than anything you can buy
and gives you a much better understanding of music,
acoustics and the like than you'd get by buying a similar
instrument.

Click here to access
my webpage
Dennis Havlena - Cheboygan, Michigan