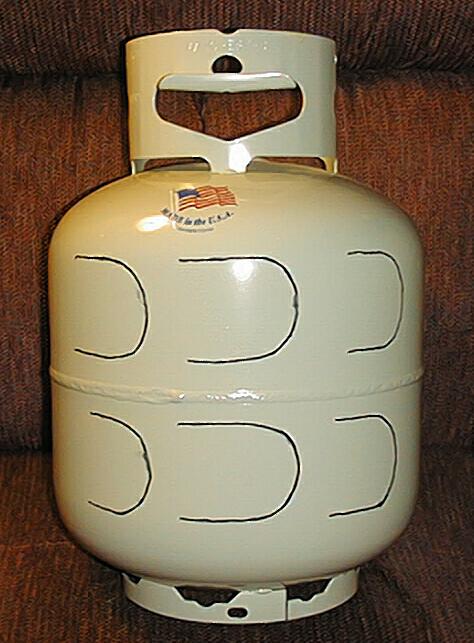
This thing is safe because it is made froma NEW, NEVER-BEEN-FILLED
twenty-pound (that can hold 20 pounds of liquid propane) LP tank that our
local HWI hardware store sells for about $30. Later note - Home Depot has
them for some $26.
Click HERE to see a short YouTube video of me playing a few instruments, including this one
Because of the possibility of an explosion and/or fire when tinkering with
a previously-filled LP propane cylinder, DO NOT MAKE THIS INSTRUMENT FROM
A PREVIOUSLY-FILLED PROPANE TANK! Use only a NEW, never-been-filled-before
tank.

So - down to business. The thing is constructed in a very similar manner as the
helium-tank tambiro. The tongues are larger and the cylinder metal is a lot
thicker which makes for more difficult saber-sawing. Otherwise it's much like
making the helium-tank version.
Click here to access my helium-tank tambiro article
Immediately below is a template showing the placement, pitch
and size of the six tongues (notes). When you print it out,
make sure that the 1 inch scale on the drawing measures an inch
on your print-out -- if not, adjust your printing process
until it does. Now lay a piece carbon paper (or simply heavily
blacken the back-side of each tongue on the paper using a #2
pencil) then tape on the template and transfer the template tongue
layout & size to the actual tank.
Click here to see this template - and also a small photo of the completed instrument
To lessen weight and to provide a bit of a "sound-hole", I removed the valve
and associated piping - this was not easy as the valve assembly is screwed very
tightly into the tank. A short length of threaded pipe screwed into the valve
assembly and  wailed on with a hammer did the trick.

I've found that the thick metal of this heavy 20 lb tank makes it hard for
a "regular" type saber-saw metal-cutting blade to negotiate the curved part of the
tongues. I modified an off-the-shelf blade by clamping it tightly in a vise-grip
and slowly grinding off about half the width of the back side of the blade, taking
care that the mounting end remained untouched. Obviously, the narrower blade could
break more easily but with much care and EYE GOGGLES (for both the grinding and the
subsequent tongue-cutting), this method makes a blade that easily follows the
tongue's curves. I reverted to a regular, unmodified blade to cut the straight parts
of the tongues.

Note: even though the tank is new and has never been filled, you should do whatever
is necessary to be abslolutely certain there is nothing whatsoever in the cylinder
before poking any holes in it. Bear in mind that with the newer type tanks, when you
simply turn the valve, nothing will come out -- this might lead you to wrongly
believe that it is empty! Anyone at any propane filling business would be able to
tell you in a minute whether the tank is indeed completely empty. I recommend this route.

Drill three 1/16" (or so) holes about 3/8 inch from one of
the tongue line's ends -- carefully tilt the drill to elongate
the 3 holes into a slot into which a metal-cutting saber
saw blade can pass. Carefully cut along the line to within
3/8 inch or so of the other end of the tongue's line.
Repeat for the other 5 tongues.

Try your best NOT to cut too much and have a note lower-pitched than desired,
but if you do do this, it's not fatal. I've had fine luck raising a tongue's
pitch by temporarily wedging the tongue open 3/16" or so then carefully (using
a small grinding wheel clamped into an electric drill) grind off some of the
length of the tongue until the pitch is raised the desired amount. This grinding
process takes considerably longer than the initial saber-saw pitching mentioned
in the above paragraph -- all the more reason to go slowly and get the pitch right
the first time (with the saber-saw).

One more (later) comment: occasionally the end of a tongue will "sink" below the
overall level of the tank once cut. I fix this by prying up the tongue with small
screw drivers, inserting a metal wedge (I use a mason's chisel) & hammering in the
wedge until the tongue is about 3/8" above the surrounding tank surface. With the
chisel removed, the tongue will spring-back some, but should remain at or slightly
above the surrounding tank surface. You may have to do this a few times until
you get it right.

Tuning is easy, but somewhat critical (the pitch moves quite fast).
Starting from the lowest pitched note (center column, bottom row),
I just slooowly lengthened each tongue (in very small increments
-- testing CONSTANTLY) until it matched the desired notes as
compaired to a piano. The trick here is to CUT SLOWLY and check
the resultant pitch VERY often.

The notes sound best if you sharply slap the tongues as quickly
as possible without much dilly-dallying. It takes a few
minutes of experimentation to get this hitting bit right.
Also, just where on the tongue you tap is important. Experiment.
I should note that you don't seem to have to be as careful slapping
this instrument's tongues as you do with the helium-tank version --
probably due to the thicker metal, however you should still try
not to linger too long when whapping a tongue.

These tanks are considerably heavier than the helium or freon cylinders,
but are not that unwieldy when played, handle-end down (resting on the ground or a
support), nestled between your legs, while sitting on a porch-step or other low seat.

Concerning "key" -- I pitched mine in the key of G -- the lowest note (middle
column, bottom row) sounds the G note in the octave below middle C on piano.

Dennis Havlena - W8MI
Mackinac Straits, northern Michigan
4/10/07
Click here to access my webpage