Click here to access
my webpage
More info/details/illustrations will follow as I get time to
add it here.
I obtained this bolt-on neck for $5 at a local resale shop.
E-bay often offers bass necks inexpensively.
The bottom & the sides are built from a four-foot long, 3/16"
thick "handy-panel" of luan mahogany that cost about $4 at
Home Depot.
Before we even start, let me say that the info below sounds
considerably more complicated than it actually is.
BODY CONSTRUCTION - SHAPE OF SOUNDBOARD AND BACK:
- I lightly traced the shape of my Harmony Soverign
guitar onto the luan, then carefully added an inch
to the tracing all around. To this, I added about
a 1/4" "overhang" to allow for slop etc. My overall
dimensions are:
length of body = 21-7/8 inches
width of body at lower bout = 18-1/4 inches
width of body at upper bout = 14 inches
depth (thickness) of body = 5-3/8 inches
string length = 34-1/4 inches
string spacing at bridge = 2-3/8 inches
string spacing at nut = 1-5/16 inches
overall length of instrument = 4 feet, 4 inches
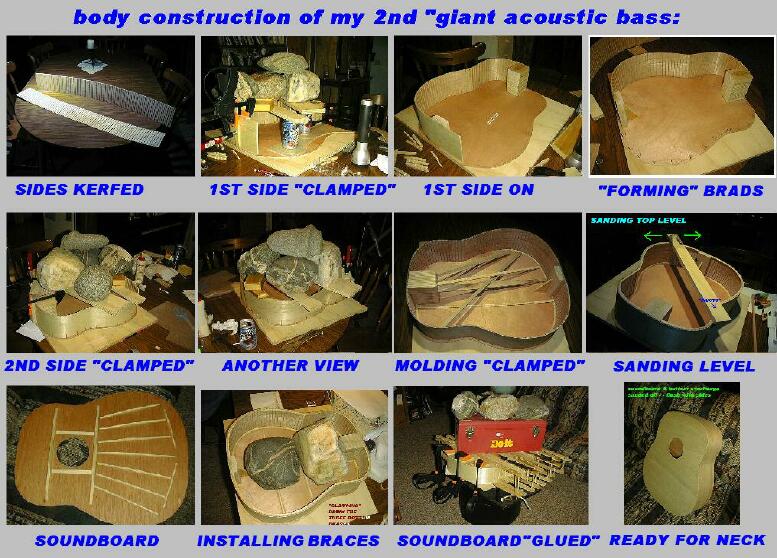
BODY CONSTRUCTION - CUTTING & KERFING THE SIDES:
- I was given an old table saw (for years, I resisted
getting a table saw because of it's finger-eating
reputation) & this saw facilitated cutting and kerfing
the sides. First, cut two strips of the luan, in my
case 5-1/2 inches by 2 feet long (I left the sides a
few inches long - to be trimmed off later).
- Then, to cut the kerfs, adjust the blade depth
experimentally until it cuts through all the plywood
thickness except for one layer. I made my kerfs about 3/8"
to 1/2" apart. Make them as parallel as possible.
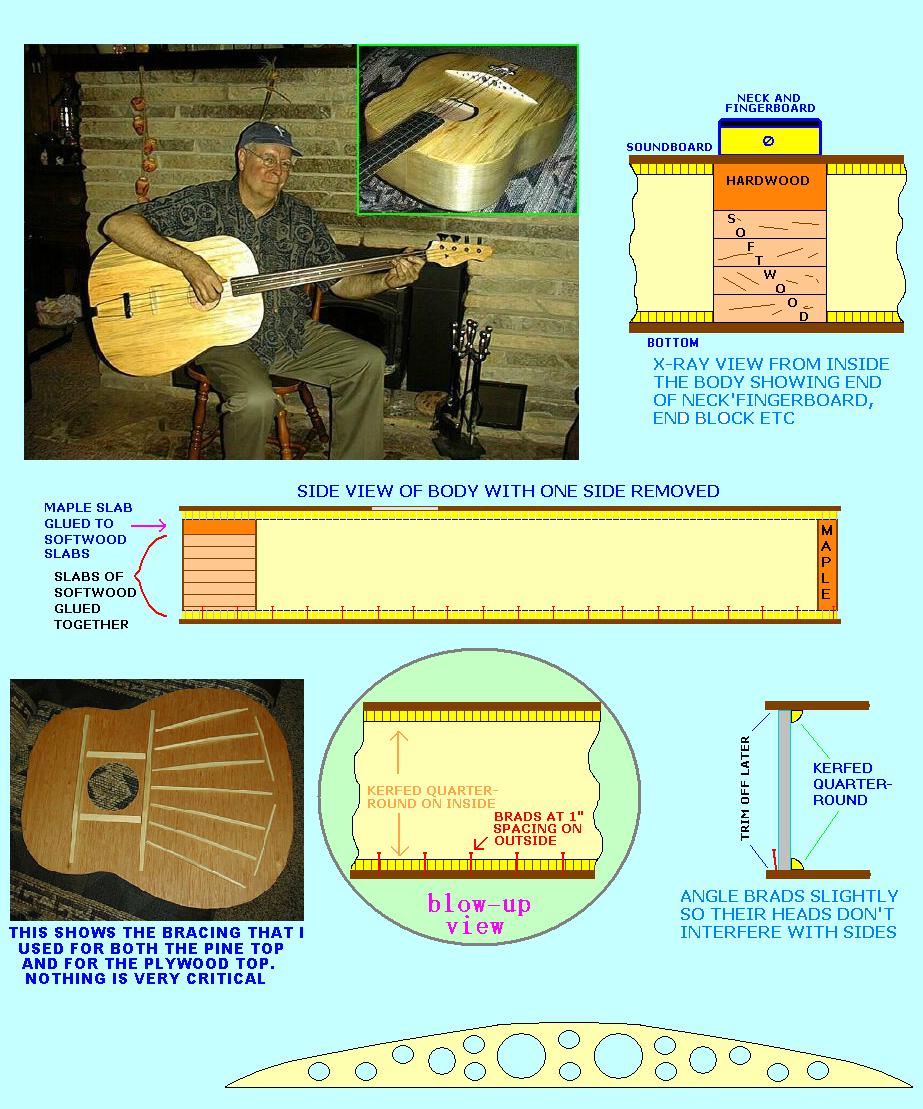
BODY CONSTRUCTION - INSTALLING THE FIRST SIDE:
- I first determined just where the INSIDE of the sides
should be positioned & carefully drew a line
representing this. Then I kerfed several lengths of
1/4" quarter-round molding and glued this to the inside
of this line, clamping with many, closely-spaced spring
clothes-pins.
(Jumping way ahead here, I similarily glued 1/4 inch
quarter-round strips to the top, inside of the sides
-- once the sides have been attached to the bottom --
where they will meet the soundboard. Spring clothespins
work fine as clamps here too.)
- To secure the OUTSIDE of the sides against the 1/4
inch quarter-round molding, I simply drove
small copper brads at about 1" interval along the outside of
where the sides will sit. I toke care that the sides
wouldn't be
pinched by the brads (allow enough clearance). These brads
serve as guides for the easily bendable kerfed side's bottom.
- Determine & mark (on the kerfed sides) that part of the
side, where the instrument's waist occurs. Even with
the kerfing, it seemed that this "reverse bend" would
break the side at the waist, so I eliminated any
problem here by boiling a pot of water, taking a paint
brush and briefly "painting" the hot water just in the
area where the waist is -- on the inside and the
outside of the wood -- be sure to soak the grooves
(kerfs) well. Towel off as much water as possible
before proceeding. This amply softens up the wood for
the waist bend.
- After first checking that the sides fit nicely in the
quarter-round/brad-wire "form", slather the side's bottom with
Titebond glue, align one end of a side with the center-line at
the small-bout end of the instrument's back, align between the
quarter-round molding and the brads then, using a straight plank
and some weight (I used rocks), let the glue dry at least
overnight.
BODY CONSTRUCTION - FIRST END-BLOCK
- I made the small bout end block from a simple laminate of
several 1/2" thick slabs of softwood -- with the top piece
being a similarily dimensioned chunk of 1" thick rock
maple. I did this because I wanted the "bolt-on" bass neck
to be screwed into hardwood, but wanted the softwood
because of it's lightness. Glue this block in the
appropriate place. Once dried, coat the joint between this
block and the end of the side with Titebond and clamp
securely overnight.
- For the large bout end of the instrument, I used a 1"
thick by 2-1/2" wide piece of rock maple. I added a small
angle brace for increased stability.
- The small bout end of the side now has to be carefully
trimmed. I did this with a t-square and multiple passes
with a sharp handy-knife. Make sure this cut is made
squarely and right at the center line. Glue the side to
the block like with the other block.
BODY CONSTRUCTION - INSTALLING THE SECOND SIDE
- Use the same "brad-form/quarter-round molding" method
as described above. Square up the side's end. Check
for fit, then repeat the above bending/hot-watering,
glueing and weighting. Make sure BOTH ends of the side
are squared up and meet the ends of the other sides
flush -- this was the most difficult part of my
instrument, but it just took time. It's FAR better to
ascertain this all before any glue is applies. Don't
worry if heigths are not exact - this can be dealt
with easily later. Use C-clamps for the end
block/side's end joint.
BODY CONSTRUCTION - BACK BRACES ETC
- I braced the back with three strips of wood, about 3/8"
wide by a half inch tall, pointed somewhat at the top and
tapered down somewhat near the ends. Exact position does
not seem too important. I glued mine to the inside of the
back -- at the big bout, at the small bout and just
"small-bout-side" of the waist.
BODY CONSTRUCTION - "REFINING" THE BACK & SIDES
- No matter how carefully I tried, the side's/endblock's tops
weren't quite the same heigth -- a simple matter of
wrapping some sandpaper around a straight piece of wood
and rasping away carefully (I found it helpful to use a
stick long enough for the un-sandpapered end to rest on & ride
along the opposite side of the instrument. This helps keep the
sanding part at the proper angle).
- Similarily, the kerfed quarter-round strips had to be made
the same level with the sides/blocks
BODY CONSTRUCTION - SOUNDBOARD
NOTE: You can go a couple of different routes with the
soundboard (in my experimenting I did both):
a) Use a piece of the same 3/16" luan plywood (easiest)
b) Make a spruce, cedar or (in my case) pine soundboard
(arguably better sounding but more difficult to make)
A) PLYWOOD
- You only have to cut the soundhole (mine was 4-7/16
inches in diameter) and glue some bracing to the
inside of the soundboard, before gluing the whole
affair to the back/sides. For bracing, I chose simple
"brace either side of the sound-hole" & radiating
braces in the big bout. There are many ways to brace a
soundboard - just input "guitar bracing" or "+guitar
+bracing in Google "images" to see your options. All
braces were made as described above. Heavy rocks
weighted these braces while the glue dried.
- Check everything over a few times (It's far easier to fix
problems with the soundboard off), then apply Titebond
atop all sides, cubes & end blocks. Weight heavily.
B) SPRUCE, CEDAR OR PINE
- A friend planed/sanded up some knot-free pine to 3/16"
thickness. As these panels were 5-1/2" wide, I had to glue
four of them together to make the soundboard. This proved
quite easy. After first assuring that all edges were
straight, with minimal gaps, I just used several big,
stiff rubber bands around each set (2 sets of 2) of panels
at the same time that heavy weights were used to keep the
bands from "buckling" the two boards. Next step was to
join these two sets together. As the rubber band method
doesn't work with something so wide, I laid out the two
sets as they would be for the soundboard then elevated the
un-glued middle joint by laying a 3/8" high strip of wood
under/along the joint.I then clamped two wooden strips to
the worktable that just slightly "squeezed" the width of
the two sets. Titebond glue was applied then the 3/8"
strip was removed, causing the joint to drop and tighten
for glue drying. I applied lots of weight (heavy
rocks/wood planks) over the joint. Waxed paper was used on
both sides of the joint.
JOINING TWO PANELS - TO MAKE A DOUBLE PANEL
_____________________
| ! ! ! ! |
| ! ! APPLY HEAVY ! ! | PANEL
|_!_!_____________!_!_|
| ! ! ! ! |
| ! !WEIGHTS HERE ! ! | PANEL
|_!_!_____________!_!_|
\ \ HEAVY / /
RUBBER BANDS
GLUEING THE TWO DOUBLE PANELS TOGETHER:
_________________________
|_______________________ _|
| |
| soundboard panel |
|_____________________|
| | --->
_| soundboard panel |______
| |_____________________| | This stick "elevates" crack.
|_| |______| Remove it once glue
| soundboard panel | is applied
|_____________________|
| |
| soundboard panel |
_|_____________________|_
|_________________________| Clamp these two wood pieces to
work table. They keep soundboard
strips from seperating once the
"elevating stick" is removed
REINFORCING THE WHOLE SOUNDBOARD BLANK:
_____________________
| H . . . H |
| H . .. . H |
|_H_________________H_|
| H . . H |
| H H |
|_H__.____________._H_|
| H H |
| H . . H |
|_H_________________H_|
| H . .. . H |
| H . . . H |
|_H_________________H_|
Securely glue on a 1/2" x 1/2" (or bigger) strip of wood
("H) near both ends of the joined-together soundboard.
These serve as temporary strengtheners - until the
soundboard is cut out. Cut soundhole & glue on all braces
before cutting out the soundboard's shape.
BODY CONSTRUCTION - CLEANUP
- I used an orbital, hand-belt sander & hand sanding block
to carefully trim away all overhangs. Use extra care here,
as the edge of the plywood chips very easily and ugly
voids might result.
This process makes a very solid and soundworthy
instrument body.
MOUNTING THE NECK
- Being addicted to the fretless bass, the first thing I did
was to rip out the neck's frets, fill in the resulting
grooves and smooth things out some. You could just as
easily keep the frets in -- bridge placement would just be
a bit more critical -- & on the plus side, the bass should
be louder with frets.
- Although this may sound crude, I very effectively mounted
the bolt-on neck to the body by carefully drilling through
the neck and the fingerboard at the existing screw holes,
enlarging the holes carefully (counter-sinking at the
fingerboard's surface) and screwing the neck to the
body with four large sheet-metal screws (carefully
experiment with scrap maple first to determine the best
pilot hole, etc). I applied a small amount of Titebond at
the joint for added stability. Once mounted, I covered up
the screw-heads with small circles of wood, cemented in
place with a wood-dust/Elmer's white glue mixture (for
easier removal if ever required. If you play up this high
- 22nd fret (I don't), take pains to ensure that these
plugs are smooth & flush.
- One benefit of this "raised fingerboard" method is that the
bridge has to be higher, which I believe adds to the
loudness. Also, with a higher bridge, there's more of a
"break" as the strings ride over the bridge on their way
to the tailpiece. By the way, I used an inexpensive
modified commercial guitar tailpiece.
BRIDGE CONSTRUCTION
- Mock up a trial bridge using wood scraps and popsicle
sticks. This is a great way to determine where the bridge
should go, how high it should be etc. Once satisfied, make
a permanent bridge out of any hard or even softwood.
The bridge need not be glued down -- string pressure is
enough. String up the animal and you're in business!
- Instruments that utilize tailpieces exert more downward
pressure on the soundboard than do the more commonly
seen bridge/pin affair. This, coupled with the fact
that on this bass the string height is considerably
higher above the soundboard than normal, means that
the string's pressure over the bridge might better be
spread out over a wider area of the soundboard.
Maccaferri guitars have just such a elongated bridge
plate. After a lot of experimentation with different
types & lengths of bridges, I've settled on one 11-1/2
inches long, 1/4 inch thick (tapered to 3/32"= inch at
the top) and 1-1/2 inches high in the middle (tapering
off to 1/8" tall at each end) to work very nicely. I
"swiss-cheesed" this bridge for lightness. Even with
this fairly large mass of maple, the thing weighs FAR
less than say an upright bass bridge.
- I use Fender light-gauge flatwound electric bass guitar
strings -- they play and sound great.
Illustrations, etc forthcoming
Dennis Havlena - W8MI
Mackinac Straits, northern Michigan
5/25/05