AN $8 FULL STRING-LENGTH (40"*) "DOODLE-BASS"
NOTE: 22 additional photos
and two sound samples of this instrument are available. Click here for information. If you've ever wanted to learn to play the stand-up string bass, this instrument is ideal for doing just that. If you learn to play on this simple doodle-bass, without any doubt you'd be able to walk right up to a standup bass and play it immediately -- even if you've never even touched a big standup bass before. This thing is a LOT of fun to play. It has the same 40" string-length as a big standup bass and is perfect for noodling around and figuring our bass runs, slides etc. Unlike the big standup bass, you can even lay-back & play the thing. It cost me under ten dollars, all new prices, to build (I had a stock of various gauge weed-whip line - so the cost for a few feet of each gauge, off the reel, was just a few pennies). Of all the instruments on my webpage, this doodle-bass is by far the one I find myself playing the most. It's rather addictive. This doodle-bass is intended to be used for learning, tinkering and diddling and not in performance, but despite the tiny soundbox, it's sound is surprisingly loud and nice (see info later in this article about electifying the instrument). This instrument has four strings tuned (low to high) A,D,G,C (the A, D and the G being pitched exactly like on a 4-string, upright bass, while the C is pitched a few tones above the G). Anything played on this practice bass can be played on a standup bass --- although the key is different, the fingering positions remain the same. Another way of looking at it is that it's like the top four strings of a six-string bass. Later note: I see where Victor Wooten often plays a 4-string bass with this same A,D,G,C configuration which he calls a "Tenor Bass". Whatever you play on this simple instrument can be directly applied to the standup bass -- same relative fingering positions, same fingering intervals etc. The biggest plus is that it is a load of fun to play - very conducive to "inventiveness & improvisation". The smooth weed-whip monofilament nylon strings lend themselves very nicely to a "slipping and sliding" style of playing. Every bass player who has played this thing has been quite favorably impressed.
Click here for a sound sample of this instrument. The reproduction of this sample cuts out some of the lows, but not fatally.
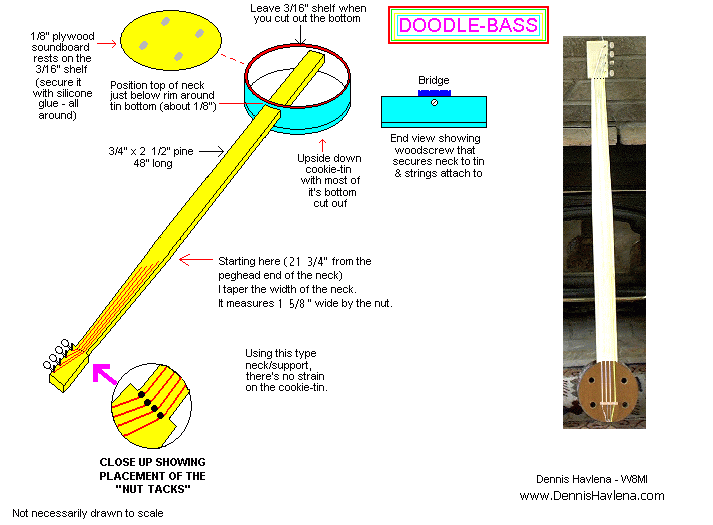
Parts:
- Four inexpensive regular guitar tuning gears (bass guitar tuners
  are not necessary).
- 4' of straight, clear pine - 3/4" thick by 2  1/2" wide
- A few feet of .050", .065", .080" & .095" monofilament weed-whip line
- A discarded 7  1/2" diameter by 2  3/4" to 3  1/2" cookie tin
  (soundbox)
- A small piece of 1/8" plywood. Old interior doors are a great
  source of this plywood (for soundboard)
- A scrap of any type of wood to use as a bridge
- Four 1/2" tacks (used instead of a conventional nut)

I built two of these things in one evening after work. They're
very simple to make.
Click here for construction details.
- Buy the straightest, most knot-free piece of regular pine
  that you can find (go at least one step up from "furring-strip
  quality"). In reality, it's difficult to find a piece that's
  absolutely straight. If there is a slight bow to the wood, I
  suggest orientating this bow upwards, as the pull of the
  strings will tend to cancel the bow. With these soft nylon
  strings there actually is very little string pressure of the
  sort that will bend the neck and my instruments show zero sign
  of trouble in this area. Of course you can use hardwood, but
  it makes for a heavier instrument.

- I know lots of folks would never think of using pine for a
  neck or fingerboard, but I have done so for years using nylon
  strings and have no fingerboard indentation on any of the many
  banjos or other instruments I have built. One banjo has been in
  nearly daily use for many many years.

- K-mart sells the best weed-whip line --- buy the round type
  (they're starting to make square, serrated & even pentagonal
  shaped line). I've used this type of line for all sorts of
  musical projects. Later note: Tru-Value stores generally
  have such line in many different gauges.

- The more I see of conventional type nuts, the less I like them.
  On this bass, four appropriately placed tacks serve the same
  purpose and are a lot less troublesome. Just make sure they are
  set at the proper spacing.

- Rasp/round off the bottom side of the neck and sand smooth.
  It need not be rounded off too much.

_ The thicker weed-whip line won't fit through the hole in the
  tuning-gear post, simply drill hole bigger.

- Very little in this project is critical or fussy. I made my
  bridge 7/16" square by 2  3/4" long. I try to make it so the
  strings are about 9/16" from the fingerboard at the point where
  the neck meets the tin body. Make the grooves for the strings
  (especially the two outer strings) quite deep to keep them from
  falling out of the grooves. I glue the bridge down. On my
  instruments the thickest string (A) is about 1 1/4" from the
  thinnest string (C) at the nut (2 1/4" at the bridge). Make all
  strings evenly spaced --- a bit more than 3/8" apart (at the
  nut). LATER NOTE: I now prefer to make the bridge taller, with
  holes drilled through for each string rather than grooves --
  more surefire and less trouble IF you get the holes (& spacing,
  string height etc) right (mock up a trial, grooved bridge first).

- Occasionally the thin metal of the bottom (lid) might rattle.
  This can be completely cured by silicone-glueing a "full-sized"
  disk of 1/8" plywood inside the lid.

Later note: Although I don't play any electric instruments, I have
added a simple acoustic pickup (made from Radio Shack components
for a few dollars) to this thing that make the thing play and
sound like a commercially-made fretless electric bass. It's loud.
Click here for information on very inexpensively electrifying the doodle-bass - adding a pickup.
Let me know if you build one. You'll be surprised at the results.
....................................................................

                     "VERSION #2"
          I just made a successful version
          of this bass with the IDENTICAL tuning
          configuration and pitch (& string-length) as a
          big standup bass -- It's low end is quieter, but
          otherwise it has all the qualities of the
          version described above - the difference being
          that it is strung and tuned EXACTLY like a big
          bass (EADG). The "breakthrough" came in using a
          larger cookie tin. The following short
          description should enable anyone to build one:
          - The neck and tuning head/gears are
            identical to the instrument described above.
          - I used a 10  1/2" diameter by 6  1/8" deep
            cookie tin that used to hold 80 ounces of
            cookies. Any similar tin sizes should do as
            well.
          - Instead of four small soundholes, I used
            two 1  3/4" holes centered 3  7/8" to the
            right and to the left of dead center.
          - String gauges: E=.105"  A=.095"  D=.080"
            G=.065" monofilament nylon weed whip line
          - Secure the lid onto the bottom using silicone
            sealant to help eliminate rattles. I had some
            trouble with the thin metal of the bottom (lid)
            rattling. This was completely cured by
            silicone-glueing a "full-sized" disk of 1/8"
            plywood inside the lid -- dampened all the rattle.
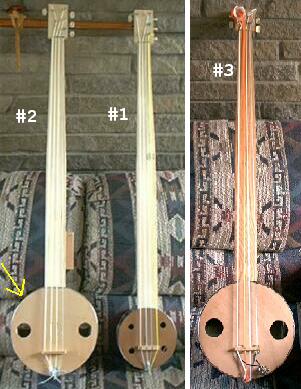
Click here for a photo showing this "late addition" (#2) alongside a conventional 4-string "Doodle-Bass" (#1).It also shows version #3.
            The small block of wood just above the tin on
            the right side of the neck serves as a
            "leg-rest" -- set this block on your right
            thigh so that the G string is elevated & thus
            not dampened. Later note: I removed this block.
            It wasn't that helpful.

            The yellow arrow in the photo points to where
            a 1  3/4" diameter hole is cut into the side of
            the tin (the African Kora routinely uses this
            type of sound-hole). This hole is centered
            1  3/4" down from the top of the soundboard.
            Because most of the sound in this bass is
            projected outwards, this hole makes it easier
            for the player to hear -- especially the low E.

....................................................................

                       "VERSION #3"

Click here, for more recent information
on turning this Doodle-Bass into a very effective
ELECTRIC UPRIGHT BASS

     I bought a copper-bottom, 6 quart stainless steel cooking
     pot at the local Salvation Army for a buck (one handle was
     broken). This is the kind of pot you'd cook spaghetti in.

     I also found a length of straight 3/4" thick by 2-1/2"
     wide oak.

     "Version #3 is a marriage of these two items. It is
     strung and tuned exactly as with "Version #2" above,
     that is, exactly like a big stand-up bass. It's sound is
     bassier than "Version #2".

     Because of the high, existing "lip" along the top, inside
     of the pot, (which is ideal for holding a soundboard) I
     resorted to using 3/16" thick plywood for the soundboard
     instead of 1/8".

     The soundhole layout is about the same as with the
     "Version #2" above, except a bit larger & no side
     soundhole (yet).

     Not wanting the top of the neck to touch the
     underside of the soundboard necessitated making the
     hole in the pot a bit lower. This posed no problem,
     but it's best to carefully calculate string height,
     bridge height etc lest the strings buzz when the
     bass is fretted up the neck.

     A word about cutting the rectangular hole in the
     stainless-steel pot's side -- whew! My new
     drill-mounted grinding wheel didn't touch it! The
     grinding wheel was disintegrating quickly. I dulled
     several brand new drill bits (I know better - but
     was desperate for the hole). Surprisingly, a regular
     file worked without obviously dulling -- but was
     painfully (ie: too) slow. What worked best surprised
     me - I used an off the shelf metal cutting saber-saw
     blade. It took considerable patience and care, but
     eventually I had my hole! I filed it to exact fit.

     Getting the handle brackets off is a bit of a
     challenge as well.

     Because of difficulties cutting the stainless steel
     hole, and working the oak, this instrument took me
     four days of sporadic evening work to complete.

     #3 is really good-looking and about twice the weight
     of #2 -- This is not objectionable though. My digital
     camera broke, thus no pics are available at this point.

     I have real low action on this instrument and it plays
     as smooth as silk.

...................................................................

  A CRASH-COURSE IN BASS PLAYING - FOR FOLK (AND SIMILAR) MUSIC:

With this type of accompaniment, the basic two notes of almost all
chords can be played in "parallel pairs". Consider this example in
the key of D (0 means play that string open - not fingered):

          nut
 G string  :--------------     (Notice what I mean
 D string  0--------------     by "parallel pairs":
 A string  0---------5----     The 0,0 being one pair
 E string  :---------5----     The 5,5 being another)

              key of D

One "parallel pair" utilizes the open D string, which is played first
and then the open A string (these two notes are repeated over and over
in time with the music). For the other "parallel pair" in the key of D
finger the 5th "fret" on the A string (played first) and then the 5th
"fret" on the E string (these two notes are likewise repeated over and
over).

You see that these two "parallel pairs" in the key of D sound
identical. The reason you'll find people preferring to play the "5,5"
pair is because for certain tunes, the open strings of the "0,0" pair
can sound too sustaining (ring too much).

Bass players usually play the higher note of a "pair" first, the
occasional exception being that when accompanying some 7th chords,
it sounds better to hit the low note first (as is the case in "You
are my Sunshine" - below).

These "parallel pairs" are just the basic "1st & 5th" of a chord and
are played over and over alternately - in time with the music --- but
with a working knowledge of these few pairs (once you get a feeling
for the sound of the pairs) it's easy to find other (ie "non-parallel")
notes to play within chords.

Short ascending or descending "Runs" at the end of one chord - leading
into the beginning of the next chord are a great way to keep things
lively -- as long as they are not over-used.

    "FRET" POSITIONS FOR BASS FOR COMMON CHORD PROGRESSIONS
     FOR THE LOWER END OF THE FINGERBOARD
     (see note about "frets" below):


 :--------------  0--------------  :---2----------  :-------4------
 0--------------  0---------5----  :---2--------7  :-------4------
 0---------5----  :---------5----  0-------------7  :---2----------
 :---------5----  :--------------  0--------------  :---2----------
        D                G                 A               Bm


 0--------------  :---------5----  :--------------  :--------------
 0---------5----  :---------5----  0--------------  :---2----------
 :---------5----  :-----3--------  0---------5----  :---2---------7
 :--------------  :-----3--------  :---------5----  :-------------7
        G                C                D                Em


 :---------5----  :--------------  0--------------  :---2----------
 :---------5----  :-----3--------  0--------------  :---2---------7
 :-----3--------  :-----3--------8 :---------5----  0-------------7
 :-----3--------  :--------------8 :---------5----  0--------------
         C               F                G                Am


 :---2----------   :--------------   :--------------   :--------------
 :---2---------7   0--------------   :---2----------   :-------4------
 0-------------7   0---------5----   :---2---------7   :-------4------
 0--------------   :---------5----   :-------------7   :--------------
        A                 D                 E                F#m


 :--------------   :---2----------   :-------4------   :-----------6--
 :---2----------   :---2---------7   :-------4------   :-----------6--
 :---2---------7   0-------------7   :---2----------   :-------4------
 :-------------7   0--------------   :---2----------   :-------4------
        E                 A                 B                C#m


The above short instructions apply mainly to bass playing for folk,
old-time, some basic rock and other types of music with definite,
laid-down rules, progressions etc. There are many other vastly
different types of playing. I'm not exactly sure what to call it, but
I also very much enjoy just playing - improvising - inventing - to no
particular song and with no "destination" in mind ---- if you're
lucky, the instrument will sort of start playing itself - with
often very pleasing results.

NOTE   Re "FRETS":
Of course this thing has no frets - being fretless allows for full and
unhindered slipping and sliding, which can make for wonderful sounds.
By "frets" here I mean where real frets WOULD go - if the instrument
had any. You can mentally imagine where these "frets" would be, OR you
can attach 1/8" strips of white paper (cut from gummed address labels)
to indicate exactly where your finger should go for a particular fret.
If you do this, number the paper frets 1-8, which correspond to the
"fret" numbers in the above charts. People learning the fiddle often
use this paper fret setup with much success. Very quickly you'll find
yourself not needing the paper frets at all.

Distance (in millimeters) from the center of the paper frets
to the nut (start of string):
1st fret:  58mm
2nd fret: 112mm
3rd fret: 165mm
4th fret: 211mm
5th fret: 263mm
6th fret: 341mm
7th fret: 416mm
8th fret: 451mm

Here's a brief example of how to put these simple concepts into
action (the first version using all open strings):

You are my sun----shi---ne     my on--ly  sun------shi---ne
           open   open    open    open    open     open     open
           D str  A str   D str   A str   D str    A str    D str

you make me ha------ppy        when skies are gr---ay
    open    open    open   open     open      open     open
    A str   D str   G str  D str    G str     D str    A str


And here's the same song, played using the 5th "fret" positions:

You are my sun----shi---ne     my on--ly  sun------shi---ne
           5th    5th     5th     5th     5th      5th     5th
           fret   fret    fret    fret    fret     fret    fret
           on A   on E    on A    on E    on A     on E    on A
           str    str     str     str     str      str     str

you make me ha------ppy        when skies are gr---ay
    5th     5th     5th    5th      5th       5th      5th
    fret    fret    fret   fret     fret      fret     fret
    on E    on A    on D   on A     on D      on A     on E
    st      str     str    str      str       str      str
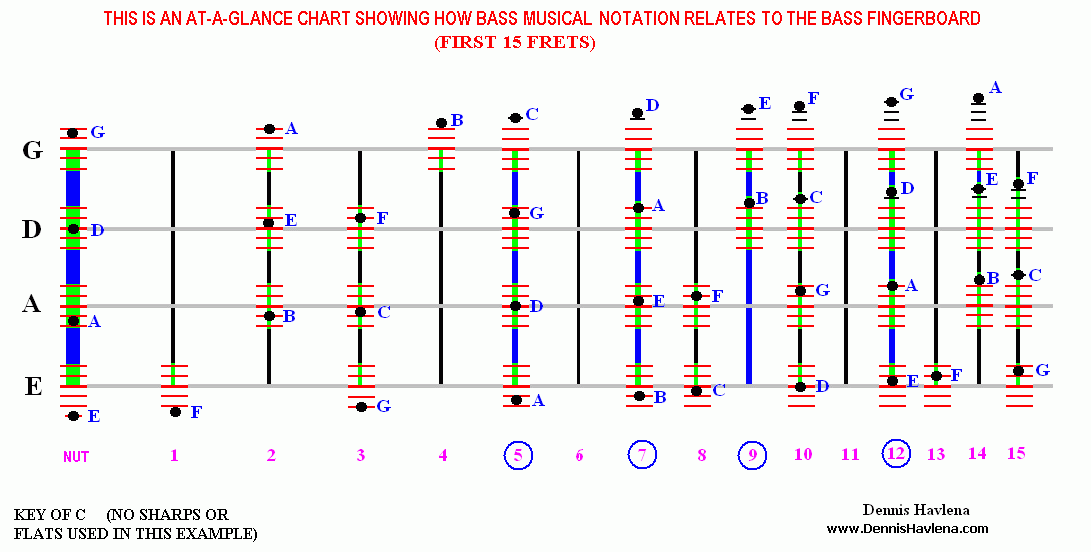
Click here for a chart showing how bass clef notes relate to the bass fingerboard.
PS:
A very effective way learn to play the bass is to simply put some
music on the player, turned on fairly low volume and play along
relentlessly. Some might consider this an "artificial" way to
learn, but many of us living in the sticks, far from other
musicians have little other recourse and have discovered this very
effective and fun learning technique. This method works for a wide
variety of instruments. Late Note here: Short of a personal
teacher or constant playing in a band, this method is THE way to
learn to play! I have never had an easier and more fun time
learning any instrument. The concept of "practice" doesn't ever
raise it's disciplined head! -- it's just all fun. My personal
favorite take on this method is a lazy one -- late at night I'll
simply lay back on the sofa, bass body sitting on the floor to the
right of me, CD playing in the headphones (cocked off a bit on one
ear to allow hearing my efforts). CDs breeze by as I play along.
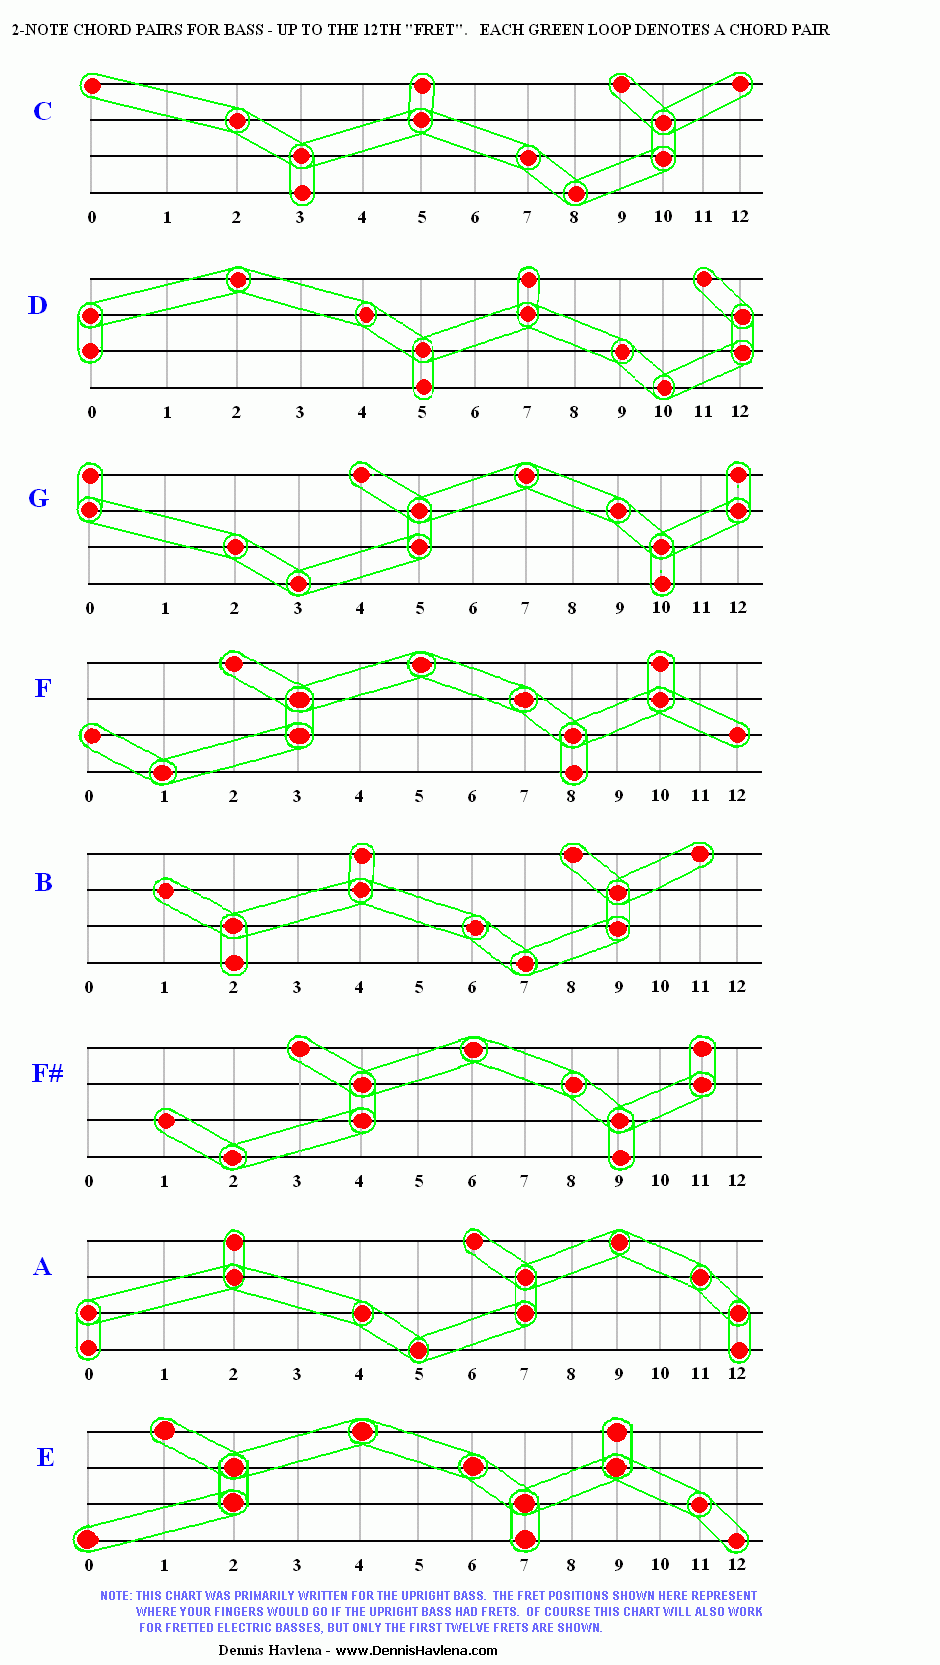
Click here for a chart showing simple 2-note chord positions for the bass
Dennis Havlena
Mackinac Straits, northern Michigan

* A few words about string length. I settled on a 40" string
length largely because that is what's played most in this part of
the Great Lakes. I've been trying to pin down what might be
considered a "standard" string length, but have become very
convinced that no such standard exists. Information from countless
sources shows no general consensus -- with string lengths varying
from 39-1/2" to 42"! In any event, this instrument can easily
accommodate whatever string length you desire -- just slide the
bridge forward or back.

:::::::::::::::::::::::::::::::::::::

A later addition -- about adding frets:

I know most bass players prefer frets. Frets undoubtedly make
for cleaner, more on-pitch notes, but I personally much prefer
the wonderful freedom of a fretless instrument. I so love
slipping and sliding that I don't think I could ever give it up.
Another advantage to fretless is that you can jump into any song
without having to worry about retuning like you would on a fretted
bass - so long as no open strings are played.

Having said this, a number of people who play fretted basses
have inquired about adding frets to the doodle-bass. Because of
this and to satisfy my curiosity, I recently very successfully
added frets to one of my "#1" (A-D-G-C) doodle-basses.


In my mind, one of the big advantages of the doodle-bass is that
it's string-length (and where you put your fingers for a
particular note) is identical to a big standup bass. If you learn
to play on the doodle-bass, you can play on the big bass.

Wanting to fully preserve this feature, a simple modification to
the fretted doodle-bass's string-length is necessary.

With the fretted doodle-bass, I wanted to be able to put my
fingers in the EXACT same position along the fingerboard as with
the fretless doodle-bass to achieve the same desired pitch, so
as to be able to pick up either instrument and play it with the
same fingering & no mental or mechanical adjustments.

This means installing all the frets 9/16" closer to the bridge
than where you would normally place your finger. Because of this
"shift" in fret positions, the string-length has to be shortened
9/16" - for an overall string-length of 39-7/16" instead of the
40" string-length of the fret-less doodle-bass.

Because I converted an existing fret-less doodle-bass to a
fretted one, I accomplished this string-length shortening by
installing a paper-clip "fret" 9/16" from the former nut
position. This paper-clip "fret" acts not as a fret, but as a
new nut.

If I were making a new fretted doodle-bass, I'd just make the
finger-board 39-7/16" long.

If you don't follow all this mumbo-jumbo, I don't blame you.
Don't worry, just make the nut-to-bridge string-length 39-7/16"
& proceed to install the frets according to this table (that is
calculated for a string-length of 39-7/16"):

Distance (metric) from nut (beginning of string) to:

Fret 1  =  56.22 mm
Fret 2  = 109.29 mm
Fret 3  = 159.38 mm
Fret 4  = 206.65 mm
Fret 5  = 251.28 mm
Fret 6  = 293.39 mm
Fret 7  = 333.15 mm
Fret 8  = 370.67 mm
Fret 9  = 406.09 mm
Fret 10 = 439.52 mm
Fret 11 = 471.07 mm
Fret 12 = 500.86 mm
Fret 13 = 528.97 mm
Fret 14 = 555.50 mm
Fret 15 = 580.54 mm
Fret 16 = 604.18 mm
Fret 17 = 626.49 mm
Fret 18 = 647.55 mm
Fret 19 = 667.43 mm
Fret 20 = 681.19 mm
Fret 21 = 703.90 mm
Fret 22 = 720.62 mm
Fret 23 = 736.39 mm

If you'd like to add additional frets, there are many
computerized, on-line fret-position calculators on the internet.

After a good deal of playing around with this fretted
doodle-bass, I can readily see the appeal of a fretted
instrument - so much so that I'm inclined to pull the frets back
out, lest I end up liking them. However, upon going back to a
fret-less instrument, there was a strong sense of relief to be
once again playing something that can be slipped and slid so
effortlessly between notes. The sense of freedom is, to me,
very tangible. Later note: I did pull the frets out.

:::::::::::::::::::::::::::::::::::::
Click here to return to my webpage