Click here to access
my webpage
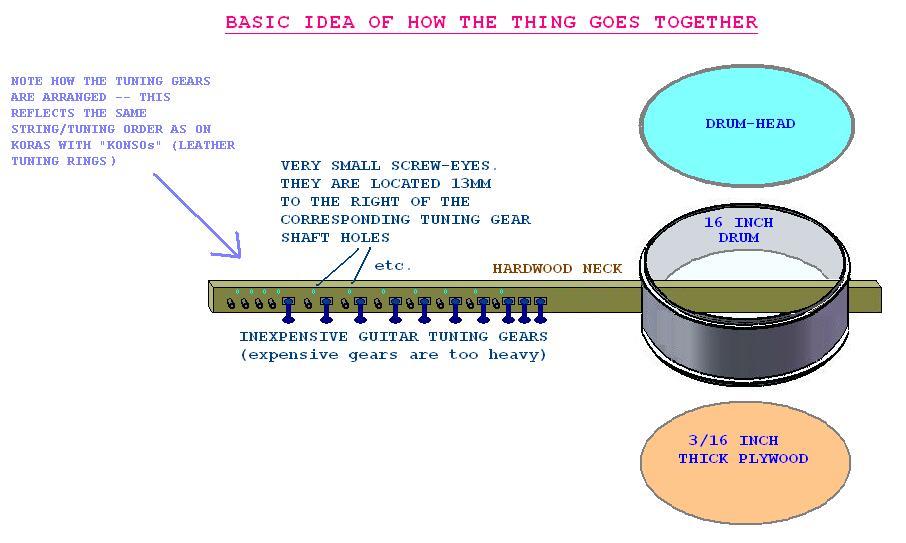
The neck is a single piece of any type of hardwood
fitted with 21 inexpensive guitar type tuning gears.
Cheap ones are actually better than pricey ones
because they're far lighter in weight -- I must
have used at least 500 inexpensive such tuners over
the years and have never had a single failure.
The strings leaving the tuning gears are routed
through tiny screw-eyes and on their way to the
bridge.
Most cabinet-making shop can supply you with the
neck you need. Also try High School shop Teachers
who often have tons of scrap pieces from kid's
projects that usually end up as firewood. They're
boundto be most curious & helpful about you
building such an oddball instrument.
Monofilament fishline & weed-whip line is used
for all strings.
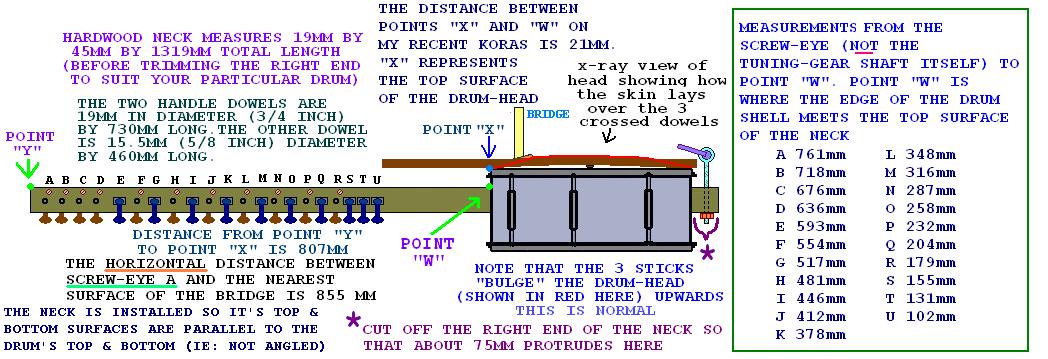
To mount the neck to the drum body, lay masking
tape over the area on both sides of the outside
of the drum in the area where the neck will pass
through. Draw a rectangle the same dimensions
as the cross-section of the neck, beneath the top
of the drumhead tensioning ring (the top surface
of the neck should be just a quarter inch OR SO
beneath the top of the drum's tensioning ring when
tightened --- because of several "variables" here,
it's nearly impossible to indicate this exact
measurement, so approach the cutting of these two
rectangular holes in the side of the drum very
carefully,taking into account everything mentioned
in the information below. Strive for a fairly
tight fit. Keep things square. The neck does not
have to be fastened to the drum -- the string
pressure keeps it in place.
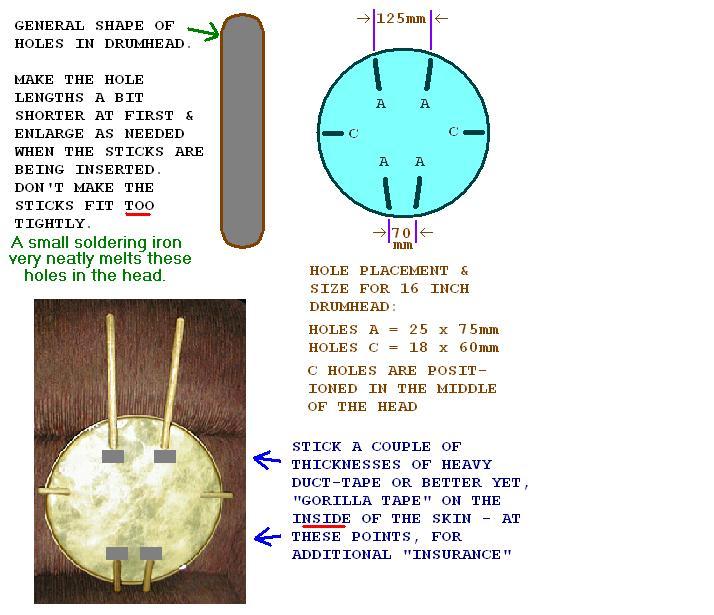
Drumhead modification:
Four holes must be melted into the 16 inch mylar
drum head to accept the handle and brace sticks,
the elongated holes in the mylar drumhead are made
by first plotting their position and then carefully
melting each hole using a small soldering iron
(don't breathe the nasty fumes!). This worked very
nicely on other Koras and the resultant holes never
show any sign at all of tearing once the two handles
and the brace are inserted. Nonetheless, it's cheap
insurance to put small patches of heavy-duty
duct-tape (better yet, Gorilla tape) on the
underside of the skin where the wood bears on it.

Because the commercially made drum-heads are not
as pliable as wet cowhide, I purposely looked for
BOWED (not straight) 5/8" dowels. Our local Home
Depot store had quite a selection of bowed dowel
rods to choose from. With this bowed dowel rod
inserted through the holes in the head and
underneath of the two handles, it is not hard to
draw down the head/handle/brace assembly fairly
tightly and evenly. If you can't find a
sufficiently bowed 5/8 inch diameter dowel,
it's easy to make one. Soak the piece for a few
hours and then (wearing heavy leather gloves)
evenly heat it over a kitchen stove - on high
- until you can bend it to what you want. It's
best to over-bend a bit as things usually
spring-back a little. Once you have the bend
you're after, quickly immerse it in cold
running water for a few seconds to cool it off
and set the bow.

Another possibility: I haven't yet had to, but
if the cross-brace fits too tightly, there's no
reason you couldn't shave down the spots a small
bit where the handle braces touch the cross brace
a bit.

The tensioned drum head, with the dowels inserted,
can not be expected to lay perfectly flat &
unwrinkled when properly tensioned. Wrinkly is OK
-- take a look at the many photos of African Koras
on the internet to confirm this.

The bottom of the snare drum is removed and
replaced with a disk of about 5mm (3/16 inch
thick) (or thereabouts) solid or ply wood.
This is an easily done procedure.

The two hand grips provide a very practical &
satisfying way to hold the instrument & position
the thumbs and index fingers properly for playing.
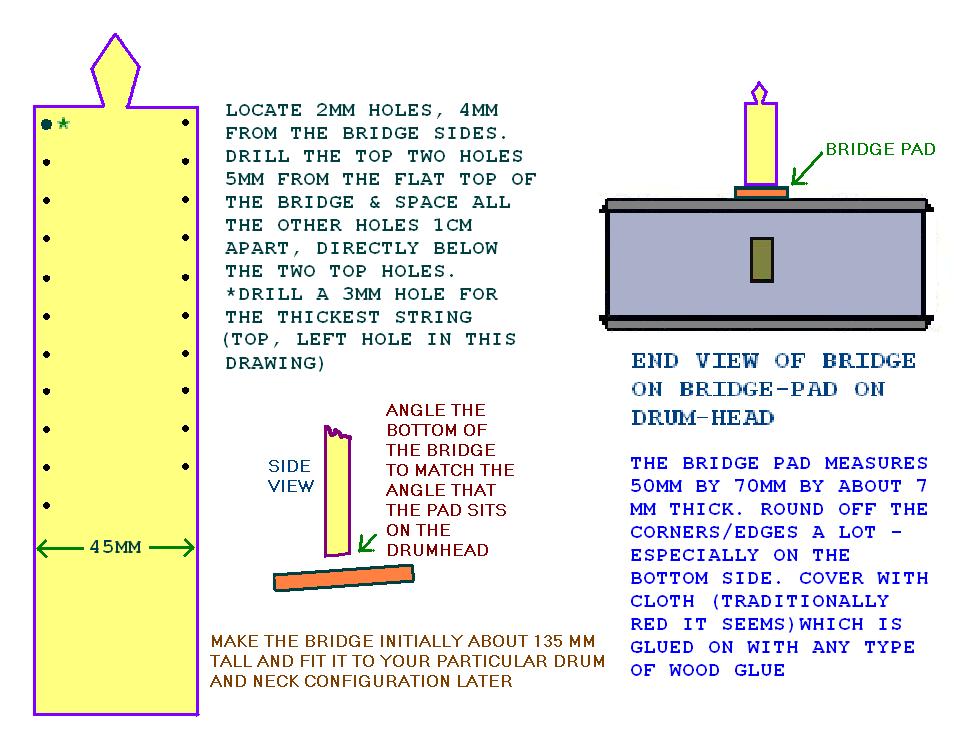
The bridge is simple and is made as shown.
Strings can either pass through a slot or go
through a hole. I somewhat prefer holes, as
they're less troublesome in the long run.
Note that the bridge is made taller than
necessary - due to a number of variables,
it is unwise for me to specify bridge height
dimensions. It's best if you fit your bridge to
suit your particular situation. Having said that,
here's what to aim for: the shortest string goes
thru the lowest slot on the right side of the
bridge. When all strings are at playing pitch,
it's imperative that this string does not hit
or buzz against the corner-edge of the drum rim.
This is the only string where this is an issue.
Adjust the bridge height (carefully) so that the
space between this string and the closest part of
the drum edge will be about 5mm (3/16 inch) (with
full string tension). If this space is too much,
it can make the lower-pitched strings hard to reach
while playing. If you goof up and cut too much off
a bridge's bottom,  a wood spacer glued to bottom
fixes things nicely. Remember that the bridge will
sink further once all the strings are on & tuned,
so take this into account when cutting.  I
recommend making the "final" bridge height cut a
bit taller - then, once all string tension is on,
carefully  away the bottom as needed. This isn't
easy with all the strings on  (loosen them first)
butcan be done - slowly & carefully.

The bridge rests on a "bridge-pad" -- a small
cloth-lined chunk of wood with very rounded corners
on the bottom (so it won't harm the drum-head).
I glue the cloth to the wood with wood glue.
Because of the "bulge" in the drumhead (as compared
to the flat head of the original snare drum)
some thought is needed as to how the bridge sits
on the bridge pad. With this type of modified
snare-drum head setup, the bridge-pad will tend
to angle towards the tuning gear end of the
instrument, meaning that the foot of the bridge
itself should be cut at a corresponding angle
so that it rests on the pad squarely. I put a
couple of small dabs of wood glue on the bridge
bottom to hold it in place.
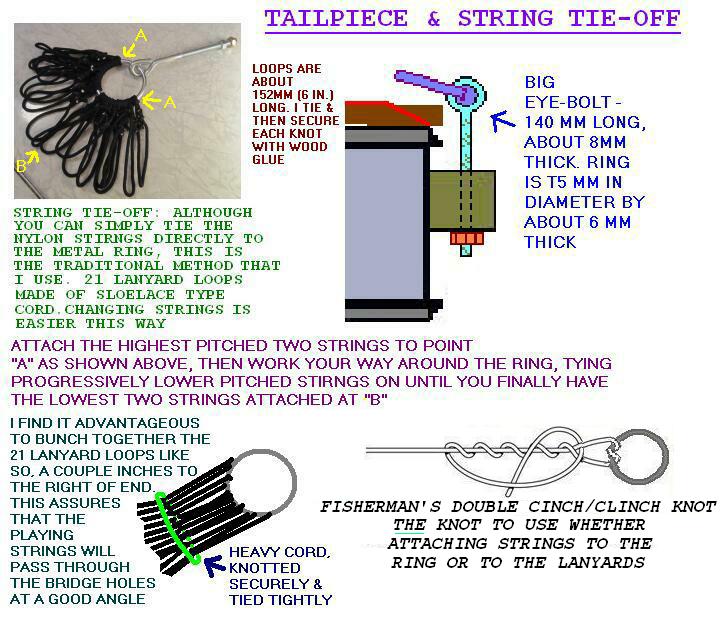
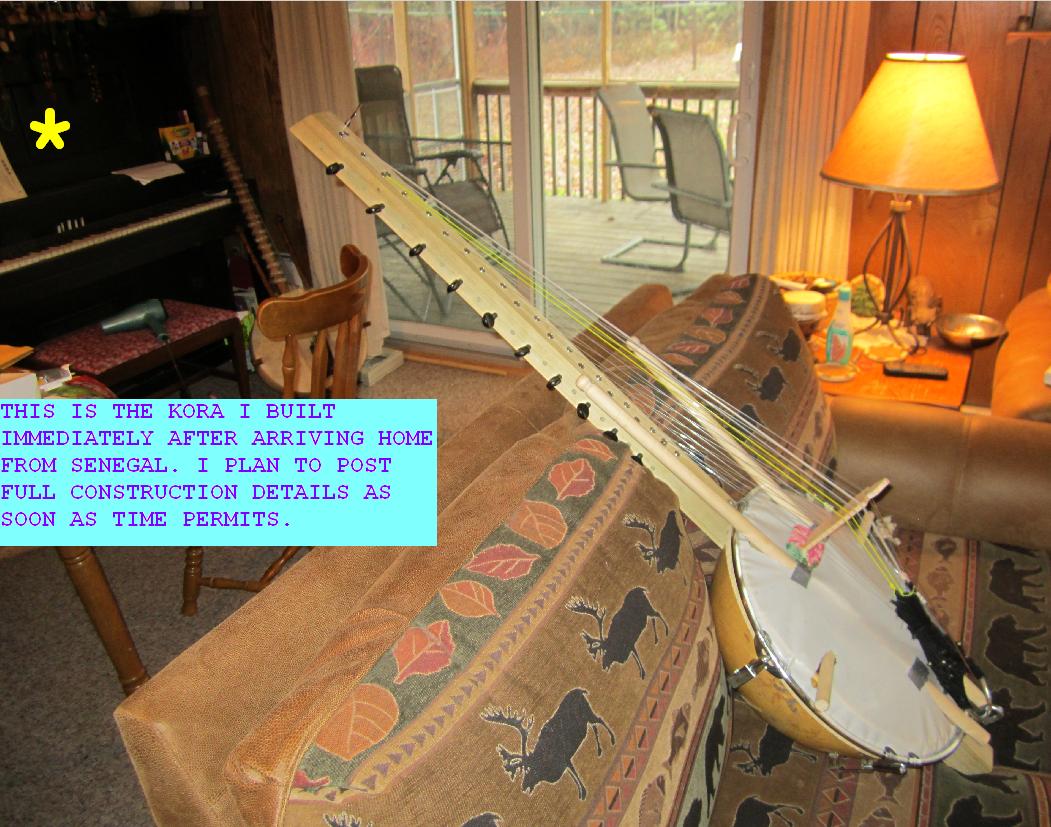
This illustration shows string tie-offs etc:

NOTES ABOUT OVERALL PITCH & TUNING:
In Africa, little, if any, attention is paid to
"absolute" or concert" pitch. in addition, I
find that one instrument might be based in the
key of F (the lowest string on each side being
tuned to "F"), while another Kora might be based
in the key of C (lowest strings tuned to "C").
I am by NO means an expert here, but I prefer
the D-based approach, and have used D on the
last few Kora's (& Kora-like instruments)
I have built.

  STRING GAUGES AND  TUNING:

                                                  HIGH-PITCHED END

    30 LB (.022 inch) fishing line    C#-| |
    30 LB (.022 inch) fishing line    A--| |--F#   20 LB (.018 inch) fishing line
    50 LB (.029 inch) fishing line    F#-| |--E    25 LB (.020 inch) fishing line
    50 LB (.029 inch) fishing line    D--| |--D    25 LB (.020 inch) fishing line
    60 LB (.031 inch) fishing line    B--| |--B    40 LB (.024 inch) fishing line
    60 LB (.031 inch) fishing line    G--| |--G    50 LB (.029 inch) fishing line
    60 LB (.031 inch) fishing line    E--| |--E    50 LB (.029 inch) fishing line
   .050 inch weed-whip line           C#-| |--C#   60 LB (.031 inch) fishing line
   .050 inch weed-whip line           B--| |--A    60 LB (.031 inch) fishing line
   .065 inch weed-whip line           A--| |--F#   60 LB (.031 inch) fishing line
   .095 inch weed-whip line           D--| |--D   .040 inch weed-whip line (or
                                                   100 LB fishing line)

                                                  LOW-PITCHED END

Regular monofilament fishing line is used for the higher-pitched strings.
Weed-whip (aka weed-whacker) line is used for the lower pitched strings.
Use ROUND, un-serrated weed-whip line. Lately ridged or square line
is being sold - avoid it.

NOTE: IF ANYONE ABSOLUTELY CANNOT FIND A PARTICULAR GAUGE OR TWO,
LET ME KNOW AND I'D BE HAPPY TO MAIL TO YOU.


STRINGS:

In my many years of diddling with the Kora,I have
found the following gauges/types of string to work
nicely on this Kora. I use a combination of various
gauges of both regular monofilament fish-line as
well as off-the-shelf monofilament weed-whip line.
See chart immediately above.

Fish-line:
"Strengths" (in pounds) of fish-line needed are;
20 LB, 25 LB, 30 LB, 40 LB, 50 LB, 60 LB (& 80 LB.
if you can't find .040 inch diameter weedwhip line).
This line is available in a wide variety of
strengths (rated in pounds). Wall-Mart & K-mart
carry many gauges. Cabela's big Sporting Goods
catalog carries all of the required gauges, but
I have found that their huge retail stores do not
always carry all the gauges that their catalog does.
Dunhams and other such sporting goods stores often
have what K/Wal Mart doesn't. It just takes a bit
of looking around. You can always go the Cabelas
mailorder route.

Weed-whip line:
Diameters of the weed-whip line needed are:.040",
.050",.065" and.095" K-mart and Wal-mart do (at
least sesonally) carry most of the gauges of
weed-whip line needed. Also, Tru-Value & Ace carry
a wide selection of this line. Try lawn-mower
specialty shops. One caution however is to avoid
buying grooved or square line. While these MAY work,
go for the regular round monofilament line. In the
winter, I have been able to have the people at our
local Tru-Value hardware store go into the basement
to get rolls of this stuff for me. If you simply
cannot find a particular gauge weed-whip or fish-line,
just use the next smaller size & get used to the
slight "looseness" & very slightly lower volume.

Over the years I've amassed a big Rubbermade tote tub
full of rolls of just about every gauge monofilament
fishing (& weed-whip) line available. I use this stuff
for all sorts of instrument (& craft) projects.
Having mentioned this, it's by no means necessary to
buy lots of rolls of this stuff if you know a
few fishermen.

This chart shows the diameter in inches of various
strengths of monofilament fishing line (note that
different manufacturers make slightly different
diameter line for a claimed strength):
20 LB = .018"
25 LB = .019"
30 LB = .020"
40 LB = .024"
50 LB = .028"
60 LB = .030"
80 LB = .037"(will work in lieu of .040" weed-whip line)


A NOTE ABOUT STRING STRETCHING:

Monofilament nylon line stretches prodigiously at
first - Not just on a Kora, but on any instrument.
This is an unavoidable but fortunately short-lived
situation. It takes about two or three weeks or so
before the things completely settle down. Once thus
settled, the instrument can go for months without
requiring retuning (or in the case of one Kora I
made ages ago, played for a while & then hung on
the wall - over TEN years - if you can believe
that! Stayed tuned for over 10 years. I'm NOT kidding)

It's not only the strings that stretch & settle --
the drum head does so as well. Also, the bridge
settles down into the head & various other wrinkles
will likely appear. This is all normal and this all
settles down in about the same amount of time that
it takes for the strings to settle.

My procedure is to tune up the instrument right after
it's made. Then keep retuning it a couple of times daily
(it will drop in pitch regularly). After a day or two
it's playable, so long as you realize that strings will
have to be retouched quite often, until it's completely
settled (in a few weeks).

During this settling-in process, remember to not just
tune the instrument to itself, but tune it up to pitch.
Day by day the thing holds it's tune better. In a
week's time, you scarcely notice that it's going
out of tune & after a couple more weeks, it's
all settled.

There's an up-side to this 2 to 3 weeks of string
stretching/numerous retunings -- during the process,
you'll invariably become quite familiar with the string
layout, pitch, tuning, intervals etc.
PLEASE LET ME KNOW IF YOU BUILD
ONE OR HAVE ANY QUESTIONS.
dhavlena@gmail.com

Dennis Havlena - 1/22/2012
Webpage at www.DennisHavlena.com

updated 3/28/2012

Key words: build make diy kora west africa gambia
senegal construct homemade home made
Key words: build make diy kora west africa gambia
senegal construct homemade home made