Click here for a photo of this instrument (29k JPG)
Build a conduit-tubing hammered dulcimer.NOTE: 12 additional photos and a sound sample of this instrument are available. Click here for information.
This purports to describe the construction of a sort of
hammered-dulcimer utilizing peices of metal conduit pipe in place
of more conventional strings.
Such an instrument is very pleasing to the ear, plays the same as
a stringed hammered-dulcimer, can be built in a few hours for a
few dollars & is most forgiving in it's construction -- the only
critical element being tube length. It is pitched same as a
conventional instrument, playing in the keys of D, G and C.
One look at the beast would impart enough info to build it, but
failing that here, will do my best to twist words to accomplish
the same end.
MATERIALS NEEDED:
- Two ten-foot lengths of regular electrical conduit tubing (just
under 3/4" outside-diameter)
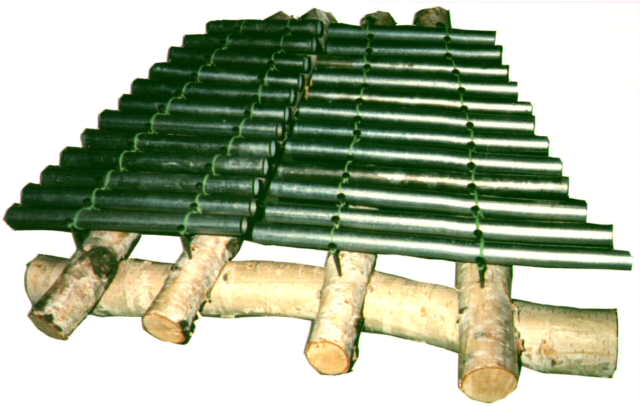
- six birch sticks, 20" long or so. Two should be about 2" to 2
1/2" in diameter & the remainder about 1 1/2" diameter. You may
note that absolutely nothing is critical as pertains the log
"frame". I left the rather handsome birch-bark intact -- makes
for a pleasingly rustic appearance. 2 1/2" long "drywall" type
screws were used to build the log frame. Logs can be a bit
twisty, so long as they are reasonably straight in one plane.
Obviously woods other than birch will work nicely -- birch just
looks prettier.
- Several large rubber-bands for mounting pipes
BUILDING THE FRAME:
Cut one of the thicker logs to about 15", the other to about 22".
Lay them parallel, about 14" apart, the shorter one behind the
other. Turn each til they sit the flattest. These two logs are the
"base".
/ \
------------- <-- thick log
/ \
/ \ <-- thin logs
/ \
/ \
----------------------- <-- thick log
/ \
(hi tech - eh!)
Lay one of the thinner logs across the left side of the "base" &
another across the right side. Position their centerlines 15 1/2"
apart in in front (directly over "base" log) & 9" in back. Where
the thinner logs cross the "base" saw/chisle notches (make half
the thinner log's thickness). Precision is obviously not important
here. Try to adjust depth of notches so that the top "plane" that
the thinner logs describe is somewhat flat. When notched &
satisfied, secure with 2 1/2" screws. Best to build this on a flat
surface so that the instrument will not rock.
In like manner notch & secure the remaining two thinner logs.
/ / \ \
----------------
/ / \ \
/ / \ \ <-- note position of two remaining
/ / \ \ logs between outer logs
/ / \ \
--------------------------
/ a / b \ c \
Distance "a" (centerline to centerline) = 4 1/2"
" "b" " " " = 6"
" "c" " " " = 5"
NAILING IN THE PIPE-HANGERS:
Draw a dot 1/8" in front of the right and left front securing
screws (assuming these screws were installed through each top
log's centerline & into base log's centerline). Lay a yardstick
along the leftmost log's centerline & proceed to mark a dot every
1 1/8", starting at the front and working back. Repeat process on
rightmost log's top. Make 13 dots per log. At each dot, pound in a
2 1/2" nail leaving 1 1/4" exposed. If nails don't pound-in
straight, use pliers afterwards to straighten.
Now lay a yardstick alongside front two nails & while making sure
the yardstick is still touching the nails, pound nails similarily
into the two middle, top logs. Repeat this process for each of the
13 "courses". 54 nails in all should be installed.
CUT CONDUIT TUBING TO THESE DIMENSIONS:
5 1/4" D - --- G 7 13/64"
6 1/32" C -- ---- F 7 1/2"
6 1/4" B --- ----- E 7 53/64"
6 11/16" A ---- ------ D 8 1/4"
7 13/64" G ----- ------- C 8 13/16"
7 5/16" F# ------ -------- B 9 1/16"
7 53/64" E ------- --------- A 9 5/8"
8 1/4" D -------- ---------- G 10 9/64"
8 5/8" C# --------- ----------- F# 10 1/2"
9 1/32" B ---------- ------------ E 11 1/8"
9 5/8" A ----------- ------------- D 11 45/64"
9 59/64"G# ------------ -------------- C# 12 3/32"
PLEASE NOTE THAT THESE DIMENSIONS SHOULD NOT BE CONSIDERED
ABSOLUTE. I NOTED FOR INSTANCE THAT THE WALL THICKNESS OF CONDUIT
TUBING IS NOT NECESSARILY EXACTLY UNIFORM - EVEN FROM ONE END OF
THE SAME 10' LONG PIPE TO THE OTHER, SO SOME EXPERIMENTATION HERE
WILL LIKELY BE NEEDED. A SUGGESTION IS TO START CUTTING THE LONGER
TUBES FIRST -- THAT WAY YOU CAN STILL UTILIZE ANY "TOO-SHORT"
TUBES FOR A HIGHER NOTE.
HOW TO USE LONG RUBBER-BANDS TO MOUNT PIPES:
5 or 6" diameter (relaxed) rubber-bands are ideal, requiring only
four. If you are unable to obtain these, several smaller ones can
be used. Bands that are not too wide (ideally square in cross
section) seem to dampen vibration least.
Loop one end of band around an end nail then twist band 180
degrees (or if possible, 360 degrees). The twists keep pipes from
hitting the nails). Insert pipe then twist band another 180 (or
360) degree before positioning it around next nail & proceeding to
mount the next pipe. Once one half of the course of pipes is thus
mounted, secure the other half with another long rubber-band. Do
likewise for other course of pipes. When all pipes are mounted,
even them out by repositioning where band mounts on nails til they
are in same plane as much as possible & ends more or less describe
a line. It's best if similar lengths of each pipe extends to right
& to left of the rubber bands (make pipe/rubber-band affair as
symmetrical as you can).
Well that's about it! If pipes are cut closely to the above
dimensions, the instrument should be in close tune -- if you do
note that a note or two is off pitch, it's a simple matter to
either shorten the pipe a tad (proceed slowly) or to make a new,
longer pipe if it's too sharp. I pounded four 2 1/2" long nails
into a scrap of wood (two spaced 1 1/8" apart & 5" or so between
sets) to act as a "testing cradle" to use while pitching a pipe.
Also found that the ideal "tapper" to use while pitching pipes is
the blunt end of a bic pen -- seems to make sharps/flats stand-out
much more than when whacked with a regular dulcimer-hammer.
Incidentally, I find that regular dulcimer-hammers work better
than the lollipip style whappers usually associated with
marimba/xylophones etc.
Dennis Havlena - W8MI
Click here to
return to my homepage.