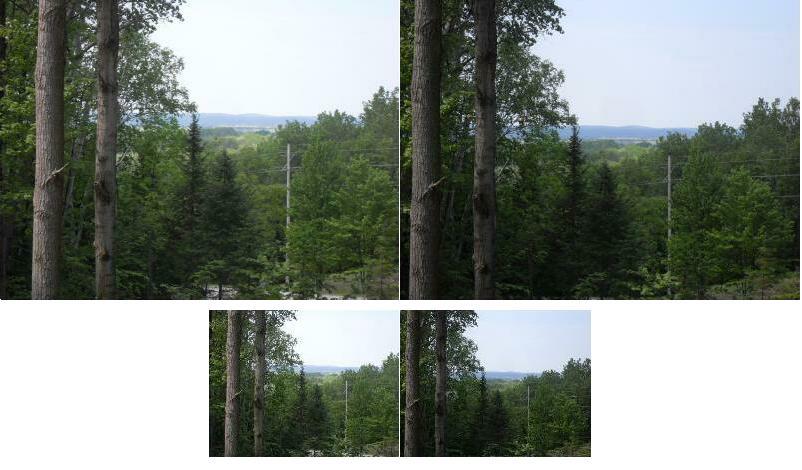
HOW TO EASILY MAKE HIGH-QUALITY STEREO-PHOTOGRAPHS WITHOUT A STEREO CAMERA

ALL that's needed is a digital camera of any type and a computer with Windows Paint
(or Paintbrush). Here's a sample, created by this simple method. I took this 3D photo
from my brother's deck in nearby Pellston, northern Michigan. It is shown here is two
sizes -- the smaller may be easier for "beginners" to "merge" into stereo than the larger:
Steps:

1 - Take a picture of some scene with good relief (some near objects, some far objects)

2 - IF your camera has the capability of taking lesser resolution photos, select that.
    The reason being that it'll be a bit easier to "size" the pictures in "Windows Paint".

3 - Carefully move the camera about 4 or 5 inches to the right and center the view on
    the same area as the first picture, take a second picture. No moving objects can be
    in either picture.

4 - Download both pictures to your computer.

5 - Fire up "Windows Paint" and bring up the first photo.

6- Click "edit" and then "select all" then reduce the size of the first photo until it's heigth
   is about half as tall as the screen and it's width is just under half of the screen-width.
   Try to keep the same heigth to width ratio as the original pic. Make sure the resulting
   smaller picture is located in the upper left corner of the screen. Hit "file" then
   "save" and give this first picture a name.

7- Now click "file" then "new" then bring up the second photo.  Click "edit" then "select
   all" to reduce the size of the second photo until it's heigth is about half as tall as the
   screen and it's width is just under half of the screen-width.

8- Drag the cursor diagonally from one corner of the second picture to the diagonal
   opposite corner then click "edit" then "copy". You do not have to save this second
   picture before you back out, but I do anyways, in case something goofs up.

9- Bring up the first photo again.

10- Click "file" then "paste" and position the resultant second photo just to the right
    of the first photo. Adjust the second picture until it is the same heigth and width
    as the first one. Note: if there's not enough room to paste the second photo, resize
    things by hitting "Image", "Attributes" then enlarging the screen to a width of 934
    and a height of 605.

11- Once step 10 is complete, resize the screen so that only the two photos are "framed".
    To do this, left-click and hold on the little dots in the center of the screen's bottom
    side and move the dot to the bottom of the two pics. Move the right side's dot
    similarily.

12- Save the image


There are two basic ways to view your new stereo photo:

-  You can print it out (or simply view on the computer screen) then,
   with your eyes a foot or so from the photo (& the photo square
   with your eyes -- ie not tilted) allow your eyes to "wander"
   (some say "cross") until the 3D image pops out in what has
   become the center of three apparent images. This is not an entirely
   easy way to view stereo photos, but give it a good try --- I will say
   that once you get the hang of it, subsequent viewings are easier.
   A hint is: larger images are harder to "sync" this way --- if you just
   can't do it, try reducing the size of the stereo photo. Larger images
   are harder to do. This method is the one used by virtually all
   "professionals" who use stereo photography (Topographic map makers,
   Department of Natural Resource people etc etc. One word of warning to
   the "novice" --- don't overdo it -- at first especially, it's all too easy to
   end up with headachy-type eyestrain. Be forewarned.

-  A very simple stereo-viewer can be made like this:  Buy two inexpensive
   1-1/2" to 2" diameter magnifying glasses. In a 6" by 3-34" piece of farily
   stiff paperboard (file-folder material works fine), cut two inch diameter
   holes, 2-5/8" apart (or however wide your eyes are spaced). Tape a lens,
   centered, over each hole. Make a "U" shaped cut for your nose.  This
   type of viewer makes it much easier to merge the two images into a single
   3D image. I should note that the dollar store type plastic magnifying glasses
   I bought were worse than worthless. WAY too distorted. Try to find glass
   magnifying lenses or at least better quality plastic lenses.


I have been diddling with stereo-photography for many decades, starting with
an old "Stereo Realist" film camera. Had I known about the above super-simple
method of making quality stereo photos earlier, I would not have bothered
with "dedicated cameras" etc.

Of course other programs besides Windows Paint will work for this, I own
"Photo-Shop" but almost never use it for anything. it's WAY overkill and
anything but user friendly. I do almost all of my work using two far
simpler programs, "Windows Paint" and "Potofiltre" which is a free download.
All of the images on my webpage were made or processed using these two
friendly, simpler programs - often in conjunction with each other.

Let me know how things turn out!

Dennis Havlena - W8MI (long-time radio amateur callsign)
Mackinac Straits, northern Michigan
dhavlena@gmail.com
Click here to access my webpage