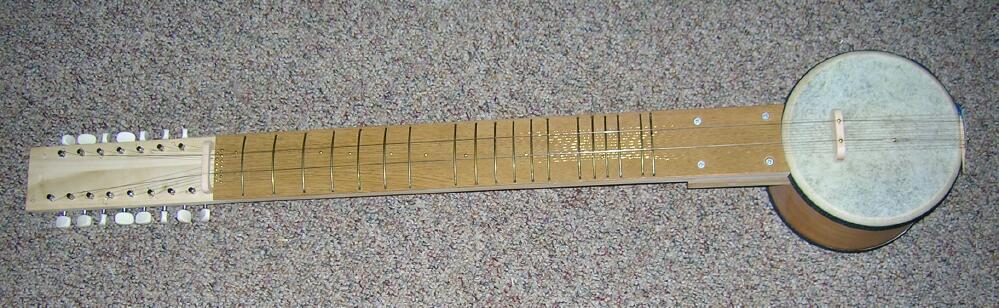
Not long ago I had the distinct privilege of working with an Asian gentleman who is an absolutley wonderful player and teacher of the Indian musical instrument called the Esraj. The idea was to develop a less expensive do-it-yourself version of the instrument that could be made at home. Later note: This gentleman has added a "Video Response" to my YouTube video showing himself playing an instrument I built for him. Click HERE to view his "Video Response".The Esraj is essentially a bowed-Sitar. This version has two playing strings (only one is used 95% of the time) and 13 sympathetic or drone strings. This simple Esraj is quite nice sounding, plays easily and is very stable (staying in tune from month to month -- thankfully, with 15 strings!).
My playing on this video could hardly be more of a "novice" attempt (never having
played an Esraj before) and my having only that day strung up the thing. What you
hear are only random notes - off the top of my head -- in short, I have no idea
of what I am doing but present this video merely to give you a very rough idea
as to how my version of the Esraj sounds.
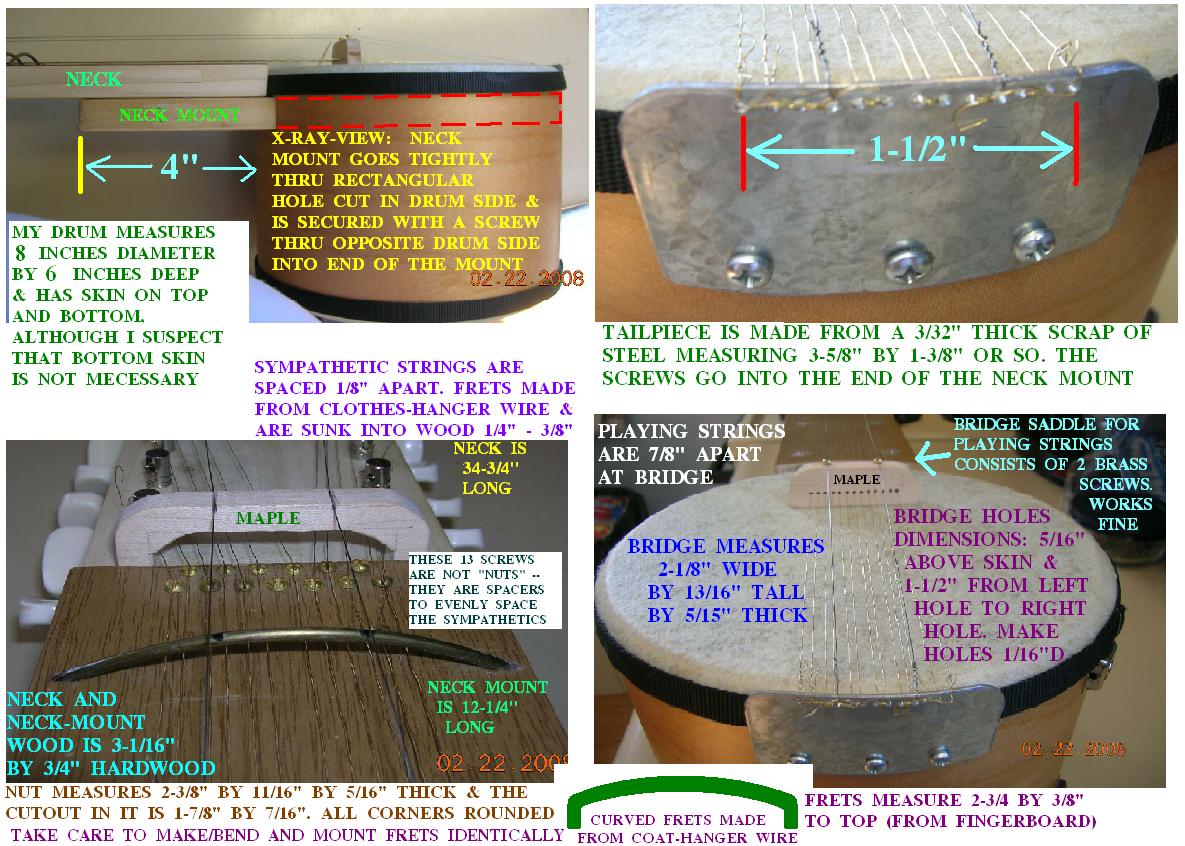
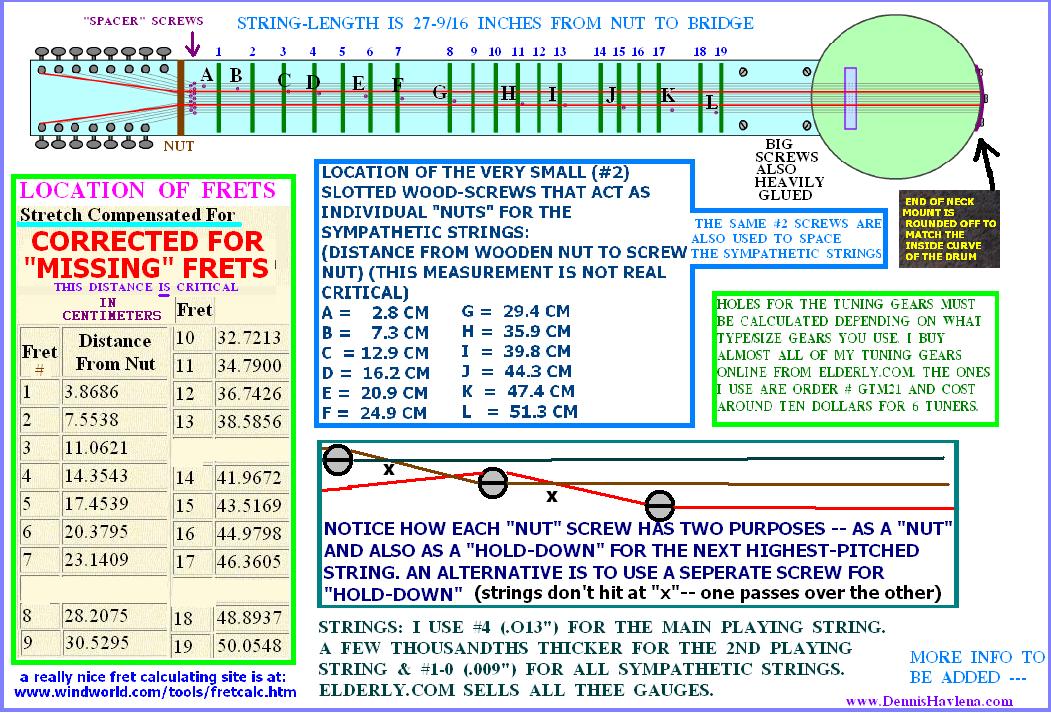
Components are few - the larger half of an inexpensive but sturdy bongo-drum; a
plank of just about any type of hardwood; 15 guitar-type tuning machines; strings
(mostly from a dismantled length of Wal-Mart vinyl-coated clothes-line); a few
screws; a small square of scrap sheet metal and a few regular coat-hangers.
I paid $19 for the bongo and less than $30 for the tuning machines. There's
just about no other expense (but now my wife tells me that I have to replace
the clothesline that I filched).

CONSTRUCTION:
In this, and many other cases, a picture (or a few) is worth a thousand words.

Despite having 15 strings, this instrument is deceptively easy to build.
There are only a few things to be careful of:
- To avoid unwanted buzzes & even missed notes, the curved frets have to be made &
  mounted identical to each other in all aspects. They have to be mounted on the neck so
  that a straight-edge shows that no fret(s) are higher or lower than their neighbor along
  each playing string's length. This is not difficult. Slight differences can be
  lightly hammered into submission.
- As far as string-length goes, you can avoid any trouble by simply making the string-length
  (nut-screws to bridge) the specified 27-9/16 inches, lest the pitch of the notes will be off.
- Maintain the 1/8" spacing between adjacent sympathetic strings & center the 13 strings so that
  neither the highest-pitched nor the lowest-pitched threatens to vibrate against the underside
  of any fret. Remember that when strings vibrate, they "expand" outwards & can hit things.
- Holes for mounting the frets must be drilled into the neck at the exact location specified.

Making the neck:
Again, I stress (throughout) look carefully at the photos. All necessary dimensions and construction
details can easily be found there. I happened to have a plank of birch hardwood that I used for my neck.
I sawed/sanded off the the last 9-1/2" of the neck's top surface so that the tuning machine posts
would stick far enough through to wind the strings around. Another reason is to allow a better
string angle as it approaches the nut. Neck thickness in this 9-1/2" neck-end area should be reduced
to about 5/8".

Modifying the bongo drum:
The only modification needed is to cut a 3-1/16" by 3/4" rectangular hole in the side of the drum. It is
important that the top edge of this hole be 13 millimeters (yeah I know) below the surface of the skin
head. Make this hole slightly undersized initially, then slowly file it larger until the "neck mount"
(see illustrations) just fits into the hole fairly tightly. The only other modification of the bongo drum
is to drill clearance holes for the three tailpiece/neck-affixing screws. When positioning these
screws, keep the top surface of the neck mount parallal with the skin head & be sure the center-line
of the neck (& neck mount) will run right down the center-line of the drum. When the neck is inserted
through the rectangular hole, it should be tight enough so that no glue is needed here. No glue is
needed at the tailpiece end either. The diameter of the drum is not too important so long as you maintain
the proper string-length.

Making the frets:
This is undoubtedly the most difficult part of making this instrument, but still, can be done in a couple
of hours. The main concern here is that the frets be made/bent as identically as possible. The distance
from the neck surface to the top of the mounted fret should be 3/8" in the middle. I bent short lengths of
hanger wire around a glass bottle to achieve the curve. Very carefully, bend the mounting "plugs" on each
end (I used two vise-grip pliers) - all the time comparing each fret with a "master fret" to ensure they
are all the same. Clothes-hangers are made in a variety of wire thicknesses -- I tried to get the heavier
gauge ones. File the ends of the mounting plugs so there are no snage which would interfere with plugging
into the mounting holes drilled into the neck. Constantly referring to a good strait-edge, plug the frets
into the neck making sure that everything is at the same lever etc. Do not use any glue -- yet. Once
satisfied that the top of the frets is uniform as determined with the straight-edge (placed along each of
the two playing string's route), then apply a small drop of super-glue to the place where the metal meets
the wood. This works nicely to keep frets in place. If, after the glue sets, your straight-edge shows you
that one fret is high, carefully tap with a light hammer til fixed --taking into account that if you tap
a high spot on a fret, a low-spot can develop elsewhere on the fret. Come to a happy-medium. Low spots can
be raised by careful prying from beneath. If all else fails, simple pull the offending fret and make another
one. I was able to make every offending fret work fine and did not have to do this.

Strings:
Main playing string is .013" music wire (aka #4 music wire)
2nd playing string is  .015"
Sympathetic strings are all .009" music wire (aka #1-0 music wire)

Tuning:
- Main playing string is G# (in the octave just below piano's middle C)
- 2nd playing string is D#  (In the octave just below piano's middle C)
The 13 Sympathetic strings are tuned like this (low-to-high pitch):
- G#
- A#
- C  (this note matches middle C on a piano)
- D#
- F
- G#
- A#
- C
- D#
- F
- G#
- A#
- C  (one octave above middle C on a piano)
- D#

Let me know if you have any questions.

PLEASE let me know if you build one of these.

There are some very beautiful videos of the Esraj on YouTube ---- just input the
search-word esraj.

Dennis Havlena - W8MI
dhavlena@gmail.com
Mackinac Straits, northern Michigan
10/15/2008
Click here to access my webpage