This article shows you how to build my very Simple "Fiddle-Gurdy" (for
lack of a better name). It is a hurdy gurdy but deviates from what is
normally thought of as a hurdy gurdy and is far easier to construct and
get playing than a conventional gurdy. I easily built this thing in a
single day (actually about half a day -- the other half was devoted
to re-caulking in the bathroom).

This thing is surprisingly nice sounding and fun. Construction of the
3 INCH diameter plywood wheel couldn't be easier. Larger wheels are
decidedly more difficult to cut out and make true. The "breakthrough"
that makes building this wheel a breeze is the use an off-the-shelf
3 INCH diameter hole cutter, which cuts out the wheel at the same time
that it drills a perfectly centered and exactly 90 degree angled
1/4" hole! Only 5 minutes of wheel-surface sanding/smoothing to
complete the job.
Click here
to hear this simple fiddle-gurdy. Please excuse low audio quality of the recording
Click HERE to see a short YouTube video of me playing a few instruments, including this one
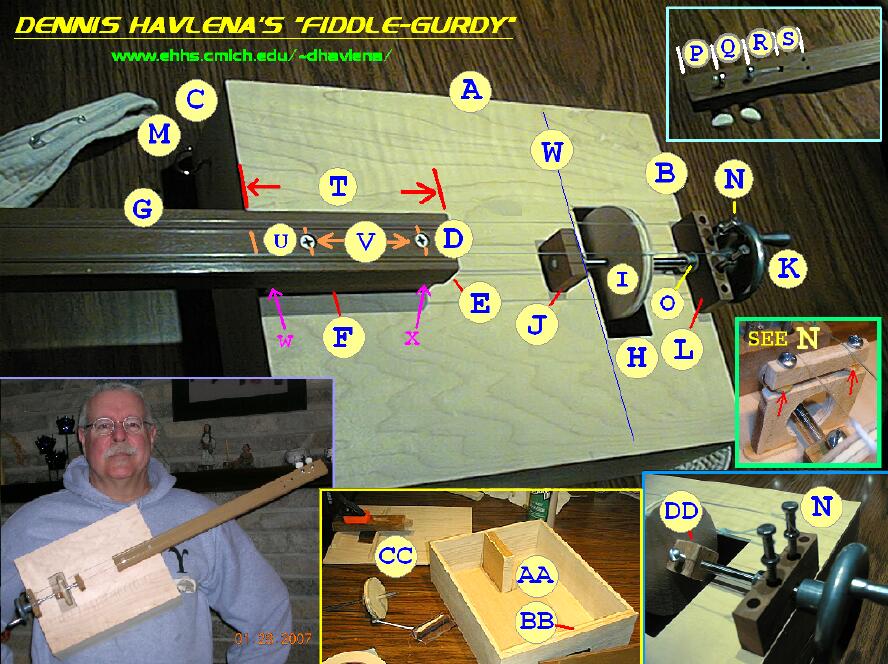
DIMENSIONS (IN MILLIMETERS) OF MY CURRENT INSTRUMENT - PLEASE REFER TO PHOTO:

A:
Sound-box is 300mm long

AA:
"Heel-block". Neck screws into this. Measures 3/4 INCH by 98mm by just high
enough to be flush with the top of the sides. Mine is made of pine.

B:
Sound-box is 235mm wide

BB:
Notice that this end of the sound-box sides is reinforced with another
thickness of the same type of wood that the sides are made of.

C:
Sound-box is 83mm "tall"

CC:
Shows the 1/2 INCH tall by 3/8 INCH wide by 8-5/8 INCH long, highest in the
middle, tapered down towards each end brace (similar to a simple guitar brace)
being clamped to the underside of the sound-box.

D:
Neck is 33mm wide (by 24mm thick by 499mm long). I used mahogany (from an old
bed head-board frame) for the neck. Round off that part of the bottom of the
neck from about the nut to where the neck meets the body until it feels
comfortable in your hand.

DD:
This is glued to the side of the wheel and serves to mount/secure the wheel
to the crank-shaft. Because the hole through it has to be aligned exactly
with the wheel-hole, the best way to make it is to glue it solidly to the
wheel-BLANK (before cutting the wheel), then mark and drill through it and
into the wheel-blank during the 3 INCH hole-cutting operation. This thing
can be either round (cut from a 3/4 INCH diameter dowel rod) or square
hardwood-- it makes no difference. Backing up a bit, before gluing it to the
wheel & drilling the crank-shaft hole, drill and tap it as in the picture
to accommodate a set-screw (taps are inexpensive at Home Depot & very easy
to use). The one pictured is very rough -- hacked out in a few minutes
because of builder impatience! I'll make a prettier one shortly. There's
no reason the finished wheel affair couldn't be mounted to the shaft using
epoxy instead of a set-screw -- it'd just mean that you'd better be very
sure as to it's position along the shaft before you epoxy it on.

E:
Neck is 24mm thick (see "D" above)

F:
This is a big, flat "shim" used to raise the neck to proper height. It
measures 98mm by 36mm by 15.5mm high. The height might have to be adjusted
to obtain proper action (more info below). Although I used mahogany for this
shim, any wood whould work fine.

G:
The neck is 499mm long total (see "D" above)

H:
The wheel-hole in the sound-box is 35mm by 90mm

I:
My wheel is made from a scrap of 3/8 INCH thick plywood. I used a readily
available 3 INCH hole cutter (which comes with a 1/4 INCH drill bit mounted
in the center, surrounded by jagged teeth). Cut  s l o w l y  - take your
time - this big a hole is asking a lot from a drill or drill-press even.
Once the wheel has been cut, temporarily insert a 1/4 INCH bolt (with a big
washer on each side) through the central hole & tighten down with a nut,
then stick in a drill press (can be done with a husky hand drill if done
carefully) and using progressively finer grades of sand-paper, bring the
wheel surface almost to a polish.

J:
The left shaft-support block measures 31mm by 11mm by 23mm tall. I used
mahogany but pine'd be ok. This block is glued squarely and solidly to the
sound-board.

K:
The crank is 53mm - outside diameter. I happened to use a $4 one purchased
from McMaster-Carr, but any home-made crank would work fine as well.

L:
The right shaft-support/string tie-off block measures 62mm by 11mm by 23mm
tall. I used mahogany but pine'd be ok. (see "N" below for details). This
block is glued squarely and solidly to the soundboard and also screwed
into the side using two longish wood-screws. Also, 2 "larger-than-nail-diameter"
nail-clearance holes are drilled 16mm apart to allow ample clearance for
the "bridge nails" (see "N" below).

M:
This is a lightweight webbing strap. Mine is of some type of cloth. This strap is
screwed in (use a big washer) to the right hand end, mid-bout and an inch from
the bottom edge in the picture. To attach the left end, I use the same very
functional quick-release method that I use with my Uilleann pipe bellows -- A
sturdy "coffee-cup-in-the-cupboard" type screw-eye is installed mid-bout and
an inch from the top edge in the picture. Belt adjustment is with a big safety
pin through the fabric - make it pretty snug and there'll be no "wobbling"
problems. As soon as I can find a "D" ring, I'm gonna put it in the belt's
left end - in the meantime, the loop of fabric suffices as a good attachment
point to the screw-eye.

N:
Two large, 3-1/2 INCH long double-headed, "Duplex" nails used to build
cement forms are installed, 16mm apart (reflecting string-spacing). These nails
work wonderfully for their purpose of not only anchoring the two strings
securely but also allowing very easy adjustment of about the only really
critical aspect of this instrument -- that is, the adjusting of how much pressure
the strings exert on the rotating wheel. The nails are installed so that the
range of up/down string movement necessary for proper sound falls between the
two heads of each nail. Also, to eliminate any chance that the nails might
slightly bend with string strain & thus bind the crank-shaft bearings,
I made the clearance hole (in block "L") a few drill-bit sizes larger than
the nail's diameter. The nails are only held erect and in place by their
being snugly fit about 1-1/2 INCH into tight holes drilled into the internal
end-block of the instrument. This arrangement may look complicated but it's
not & it works great. I initially intended to use a somewhat conventional
hurdy-gurdy or fiddle style self-standing bridge between the wheel and the
"L" block, but instead decided to simply use the two big nails as the "bridge".
The top of the double-headed nails on my recent instrument measure 2 INCHES
from the surface of the soundboard. These double-headed "Duplex" nails can be
had at any hardware store. LATER NOTE: While I still like the "attached-to-nails"
method described above, I did some experimentation with a very simple adjustable
bridge (see photo above) & I like it. Using this bridge there seems to be a bit
more volume and the tone is noticeably better. Bottom part the bridge is made
from 3/16 INCH thick rock maple measuring 1-1/4 INCH tall by 1-3/4 INCH wide, with
a 7/8 INCH diameter hole drilled through the center and a 3/8 INCH wide "slot" cut
in the bottom center to clear the crank-shaft. I goofed up and made the height too
short - thus the "foot" you can see in the photo. Two holes are drilled about 1/4
INCH from either end into which two #6x3/4 INCH sheet-metal screws are threaded.
The top part of the bridge is likewise made from 3/16 INCH thick rock maple.
Make this piece about 1/4 INCH "tall". Drill two matching holes through this top
part, of large enough diameter so the screw threads pass easily without binding.
The red arrows in the photo point to two "stop washers" whose purpose is to "capture"
the top part of the bridge & thus prevent it from dropping down-wards. I fashioned
small washers of phenolic electronic circuit-board material for these "stop washers"
& epoxied them in place on the screws threads, taking care that the screws turned
freely through the top part of the bridge. The bridge was then lightly glued in
place, about 3/8 INCH from the edge of the wheel/soundhole. I pointed the top part
where the strings pass over, but to do it again, I'd simply groove string slots.
The duplex nails were left intact, but they're now used merely as sturdy "hitch-pins"
for the strings (string loops are now attached BELOW the bottom heads). When using
this kind of adjustable bridge, regular single-headed nails would work fine as
hitch-pins. This bridge works great and is fully (and easily) adjustable to obtain
proper height as the strings ride over the wheel.

O:
These are 1/2 INCH stop-collars used to nicely secure the crank-shaft, but
not too tightly (lest binding occurs). One collar is at the "L" shaft-support
block and the other is at the left "J" block. The stop-collars, 1/4 INCH nylon
bushings* (installed into the "J" and "L" blocks & through which passes the
crank-shaft),1/4 INCH steel rod & hand crank might be available from a good
hardware or industrial parts store, but can be mail ordered from a number of
supply houses - the one I used and recommend is McMaster-Carr, www.mcmaster.com
If you haven't seen their incredible, almost 4,000 page catalog, you're in for
a surprise -- it's the experimenter's paradise. To top it all off, they ship
in just a few days & take "small orders" - a very refreshing thing in these
increasingly unfriendly times.

P:
28mm

Q:
24mm

R:
29mm

S:
21mm

T:
98mm of neck (& "shim") lays atop the sound-box

U:
Left neck screw is 16mm from left edge of sound-box

V:
Screws are 63mm apart. Make sure both screws go well into the "heel-block"

W:
This line marks the location of the under-side sound-box brace, the
center-line of which is 100mm from the instrument's right edge

Y:
Center-line of wheel is 79mm from right edge of instrument

Z:
To note the location of the sound-hole/wheel-hole, the measurement from the
left edge of the sound-hole to the right edge of the Fiddle-gurdy is 89mm.


OTHER NOTES:

- The 1/4 INCH diameter crank-shaft measures 143mm in length total

- The bottom of the crank-shaft is be mounted 10mm from the surface of the
  sound-board

- The type of nut I used is described in my webpage article

- Notice that the tuning-gear end of the neck is thinned out some on the bottom
  in the area of the gears to allow their mounting. Nothing critical here.

- The height of the strings at the end of the neck/fingerboard on my instrument
  measures 3.5mm

- My strings are spaced parallel and 16mm apart

- There's no reason a person couldn't put frets on this thing - just remember
  that it plucks at a quite a different pitch than it "wheels" ("bows"), so
  might be a good idea to determine fret position before mounting permanent
  frets by using some type of temporary, slidable frets.

- I've been rolling around in my head the idea of a "non-dog-string" buzzing
  system (conventional hurdy gurdies utilize a unique system whereby cranking &
  rhythmically accentuating or pulsing creates an interesting "buzz" that adds
  to the rhythm of a tune). I mean, how difficult can some alternate type of
  buzzing system be, given it's usually hard as hell to eliminate unwanted
  buzzes from many a guitar, bass or other such instrument!? The trick would be
  to have it turn on and off with increased cranking speed -- got my gears
  a-turning.

- I used two inexpensive mandolin tuning gears. Any gears should work.

- The neck is fastened to the body with two long, hefty wood-screws (gluing is
  not necessary)

- Strings - short lengths of 40 and 50 pound monofilament nylon fishing line
  seem to work nicely. I plan more experimentation however & will report back
  here. LATER NOTE: After considerable experimentation, I still like 40 & 50
  pound monofilament nylon fishing line best.

- For the sides of the sound-box I used 3/16" thick luan plywood I found at Home
  Depot. The top and bottom of the box was 1/8 INCH thick plywood readily
  available at hobby stores. An alternative to building a box: In these parts
  they have a craft store called "Michaels" -- like a craft super-store. They
  sell a wide variety of wooden boxes for various craft projects. For $6 I
  bought a perfect sized and thickness box for a fiddle-gurdy -- all that needed
  to be done was to cut out the wood from the boxes lid, resize it a bit & glue
  it to the box as a sound-board. Worked perfectly. I have seen similar boxes at
  other craft stores. Size/shape is not that important, but get one about the
  size prescribed here -- more volume. Also, a bigger box sits more solidly
  against my belly & scarcely moves at all when cranked (a problem with smaller
  sound-boxes)

- My overall string-length, "Duplex" nails to "nut" is 593mm or thereabouts


STRING "ACTION":

"Action" is the heigth of the strings above the fingerboard. Getting the proper
action for this instrument is a bit more important than guitar or fiddle action
(where high action mainly means sore fingers). With the fiddle-gurdy, if the string
action is too high, the angle of the string as it rides over the wheel is altered
when higher pitched notes are played on a string. Such a change can result in
gronking and an otherwise bad tone. With this in mind, I highly recommend trying to
get the lowest possible action. Experiment adding trial thicknesses of "shims"
at "W" and "X" to achieve the lowest action possible that does not result in
any buzzing when cranking vigourously. Once the ideal heigth is determined, you
can then make a permanent "shim" reflecting these measurements. The "action" on my
current instrument is only 3.5mm measured from the end of the neck/fingerboard
surface to the underside of the strings.

MORE ADJUSTING:
Hurdy Gurdy wheels must be rubbed with fiddle rosin to work. A new wheel needs to
be rosined thoroughly for maybe a minute or two. Having said that, too little rosin
and the tone is weak, but too much and things tend to get squaky. Turn the wheel
round and round with a cake of rosin pressed to it. I sometimes "burnish" the newly
rosined wheel a few cranks with a piece of wood -- seems to smooth things out
some. Wisps of cotton are wound around each string where the wheel rubs.
This mellows the tone and greatly lengthens the life of the string.
All cotton is not created equal! After years of experimentation, I find that
cotton directly from a cotton-boll is best. Kinda hard to get a cotton boll
in the wilds of northern michigan, but I've found a very good source
of excellent, long fibered hurdy-gurdy cotton -- Tampax feminine tampons work
great. Try to get just a small amount of cotton wound around the strings -- not
too much (which tends to mess up the sound). Once cottoned & tuned (see below),
slide the string end-loop where they are attached to the "duplex" nails up or
down until the cottoned strings just touch the wheel. give it a go & if the
sound is too light, slide the strings down the nail a bit. Conversely, if too
gronky, slide the strings up nail. This adjustment is somewhat fussy, but in the
case of this fiddle-gurdy with the adjustable nail/bridge, it's a whole lot easier
than getting it right on a conventional hurdy-gurdy. LATER NOTE: If you opt to use
the more conventional bridge method described in "N" above, the above adjustments
are then accomplished by cranking the two #6x3/4 INCH screws up or down.
One other thing - unlike a normal hurdy-gurdy which has strings whose approach
angle to the wheel remains constant, playing up-neck on this fiddly fingerboard
cause the string angle to change as it rides over the bridge from the angle
fingering down-string. Fortunately, there is some latitude in what angle the wheel
seems to like - however, if the thing plays nicely in lower positions but squeaks
up-neck, you'll have to raise the string on the nail a small bit. Raising it causes
the lower notes to lose volume, so it's a matter of balance.
If you still experience odd noises after following the above, some things you
might try to eliminate such racket includes: crank the wheel backwards a few turns.
I'm not exactly sure why, but this very often tends to tame an unruly string.
Something to do obviously with "resetting" the cotton methinks. Make sure the cotton
hasn't jiggled up or down-string.

TUNING:
So far I have used several different tunings - each with their very own distinctive
feeling and effect. My favorite now is "tonic/3rd" (first G below piano's middle
C/first B below middle C). A very droney and pretty tuning. In this tuning, I play
mostly on the thin string, but it's easy to switch to the other string as the melody
dictates -- this "switch of drone-string" is rather interesting. Another tuning is
"tonic/5th" (first G below middle C/first D above middle C) which is a much used
traditional hurdy-gurdy tuning. Any HG player should have no trouble after only a
short time playing HG tunes on this instrument in this tuning, even though there
are no keys and the thing is fretless, as he/she already knows where the notes are.
Two other interesting tunings are "1st/4th" (first G below middle C/middle C) and
1st/1st (both strings tuned in unison to the first G below middle C. Experimention
should turn up other tunings.

* You may safely choose not to use these nylon bushings and instead have the crank-shaft
mount in holes drilled in the wood itself. In this case, I would use rock-maple or
other such dense wood. One of my other hurdy-gurdies, which has been played daily as
part of my job, uses this shaft-to-wood bearing method and has not given me one tiny
bit of trouble in over a decade -- zero wear or wobble.

Dennis Havlena - W8MI
Mackinac Straits, northern Michigan
1/31/07
Click here to access my webpage