HOW TO MAKE A VERY NICE 5-STRING, FRETTED, GOURD BANJO

I love making instruments out of gourds. The problem is that up here
in the arctic regions of northern Michigan, gourds seldom get the chance
to grow to musically-useable sizes. Two season ago was an exception however
& I procured several huge, dry and nicely thick-walled  gourds – one a foot
and a half in diameter & about 3/8 inch thick.
CLICK HERE to see a YouTube video of this gourd banjo being played
The gourd I chose for my banjo project measures about 10" in diameter
by about 7 inches tall. It was perfect for the purpose.
My interest in banjos is in playing the clawhammer style of old-time tunes.
As a long-time fiddler, I only rarely play fiddle tunes in the key of C -- D being
used far more often. For this reason, I made this banjo's neck two frets shorter
than a normal banjo. In my favorite tuning of "double C", this instrument sounds
in the key of D -- perfect to match a lot of fiddle tunes. Another advantage of
a shortened neck is that it lessens finger stretch.

Materials used to build this gourd banjo:
- one dried gourd measuring something like 10 inches in diameter by 7 or 8
  inches tall.

- one plank of oak measuring 2 inches by 21-1/2 inches. Any other hardwood should
  work fine & there's no reason softwood wouldn't work as well - particularily
  if you, like me, use nylon banjo strings.

- another piece of oak - same width but 14 inches long (for the gourd/neck
  support piece).

- a couple feet of fret wire (available at www.elderly.com and elsewhere -- any
  good music store can order you some inexpensively). If you prefer, you can
  skip the frets and make it a fretless gourd banjo.  While I love fretless on
  some instruments (I won't touch a bass with frets on it) my own personal
  preference for banjos is fretted.

- four inexpensive guitar tuning gears (available for about $2 apiece from
  www.elderly.com)

- one inexpensive banjo 5th string tuning peg - from www.elderly.com

- a few small flat-headed brads

- a set of nylon 5-string banjo strings. I bought a fine set online for $3. There's
  no reason steel wouldn't work, but I think nylon feels and sounds so much better.

- a few screws - as described in the text

- one ten-inch inexpensive, common metal-rimmed drum-head -- widely
  available at music stores.

- one banjo bridge, either home-made easily or purchased (again,
  www.elderly.com sells these for a few dollars)

- a few yards of what's called "artificial sinew" -- a very tough, non-stretchy
  waxed nylon cord used here for tensioning the drum-head. Alternatively,
  any tough, strong (preferably waxed) cords should work fine.

- 16 somewhat largish, flat glass beads - of the basic sort seen in the photos.
  Just about any bead store sells such beads. Alternately, home-made wooden
  "beads" will work fine. These are for tensioning the nylon cord & thus the
  drum head. Make sure the holes in the beads are large enough to pass two
  thicknesses of the cord easily.


Tools needed:
As with most of my projects, everything can be built using just hand tools,
ditto with this banjo, altho some power tools would surely speed things up.

- carpenter's type handsaw

- a thin-bladed saw is needed to saw the fret-slots to the appropriate thickness.
   I have a real fret-saw, but do you think I could find it for this project -- no!
   So I used a simple kind of Japanese backsaw that worked perfectly --
   experiment on scrap to get the proper width so that the frets fit tightly.

- drill and few drill-bits

- hammer

- a file for smoothing. Also some sandpaper


                             CONSTRUCTION PROCEDURE:


DEALING WITH THE GOURD:

Carefully determine just where to cut the top off the gourd so that the rim
will measures 9 inches in diameter. With the gourd sitting squarely on it's
bottom on a flat surface, tape a pencil to the top of a block of wood of the
right height (experiment) that allows the pencil to scribe a line around the
gourd that marks where the thing should be cut (remember -- 9 inch diameter).

Use a hack-saw blade to carefully cut the top off of the gourd along this line.

Placed the gourd upside-down on a plank of wood with sandpaper fastened
to it & carefully sand the cut edge level & smooth. A bit of edge-sanding
rounds off the edges of the gourd so that the drum head would see no real
sharp corners as it's stretched across the rim.

Before the remaining holes can be cut in the gourd, the neck has to be made.


MAKING THE NECK:
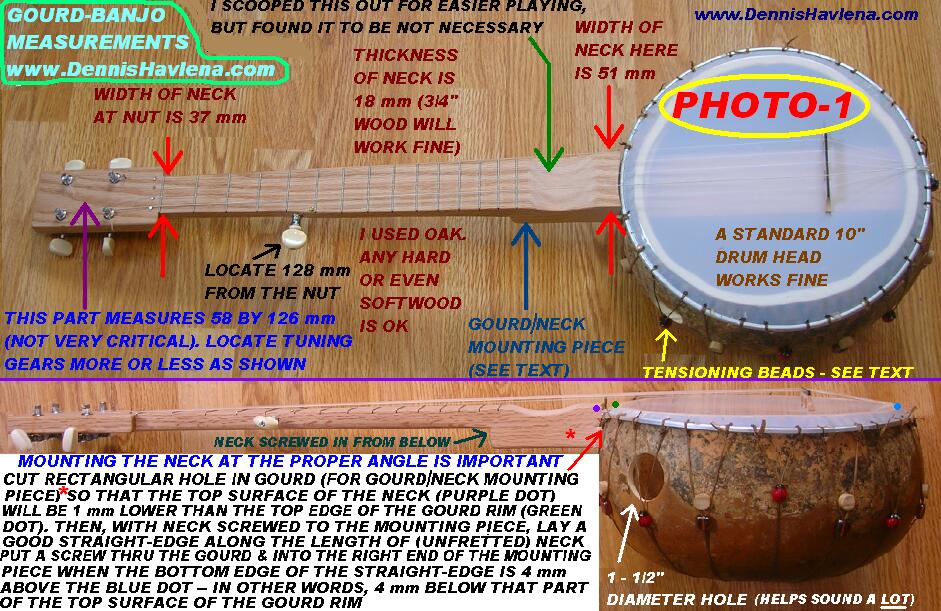
My neck is made of oak.


Round off the bottom of the neck where your palm will rest while playing.
The amount of "roundiness" is not that important - in fact, it's probably
better to round it off too little than too much -- whatever's comfortable.
DO NOT round off the bottom of the part where the tuning gears attach.
Also DO NOT round off the last 4-1/4 inches of the neck (where it attaches
to the "gourd/neck mounting piece")

Drill for and mount the four guitar gear tuners as per photo. Then
carefully locate and drill the hole for the 5th string tuner. Taper this
hole properly, for a nice tight fit -- I highly suggest experimenting a
few times using scrap wood before making the hole in the actual instrument.
A small slot-headed wood screw is installed near the 5th string tuner to
act as a nut for the 5th string. Details of this can be seen in the photos.


DEALING WITH NECK MOUNTING:

First off, curve the end of the neck to match the curve of the gourd.
Carefully plot and measure how the gourd/neck mounting piece should be
positioned in relation to the gourd (refer to photos & measurements) & then
fasten the neck (accurately but temporarily) to the proper part of the gourd/neck
mounting piece using three hefty wood-screws --  two, next to each other, on the
"left" side (to better resist any upwards neck pull) & one screw installed closer
to the gourd body. Pre-drill everything nicely & make sure these screws don't
protrude through the neck into the fingering area. I very successfully did not
use any glue here -- the screws are amply strong & should the need arise to
perhaps change the neck angle or.... it'd be very easy to remove the neck.
Another point: keep the end of the neck 1/2" or so from the gourd rim -- to
allow drum head/rim clearance.

The gourd/neck mounting piece serves the purpose of not only securing the gourd
to the rest of the banjo, but it also provides a solid mounting surface to fasten
the neck to. The part of this piece located inside the gourd is curved to fit the
inside curve of the gourd. Obviously,do this fitting later, once the gourd's
rectangular hole has been cut.

Speaking of which, the mounting piece fits through a rectangular hole CAREFULLY
cut into the gourd. Refer to the instructions in photo-1 to see how to cut this
rectangle. Make a not-TOO-tight fit here. Although fairly thick-walled, gourds
are not notoriously strong - for this reason, I whittled out a wooden
"bracing piece" and glued it on the gourd's inside immediately above the
rectangular hole in the gourd (see photo-3). This is not hard to do,
is not that fussy & is cheap insurance against the gourd rim breaking here.

Once the gourd/neck mounting piece (with neck firmly attached) fits nicely through
the rectangular hole, it's time to set the neck/drum-head angle. This is quite
easily accomplished by very careful placement of a nice stout wood-screw,
passing through a hole in the gourd material and into the end of the
mounting piece, at the far right end of the instrument. Getting this angle
right is quite important to the ease of playing this banjo, so please follow
the text in the photo very closely.
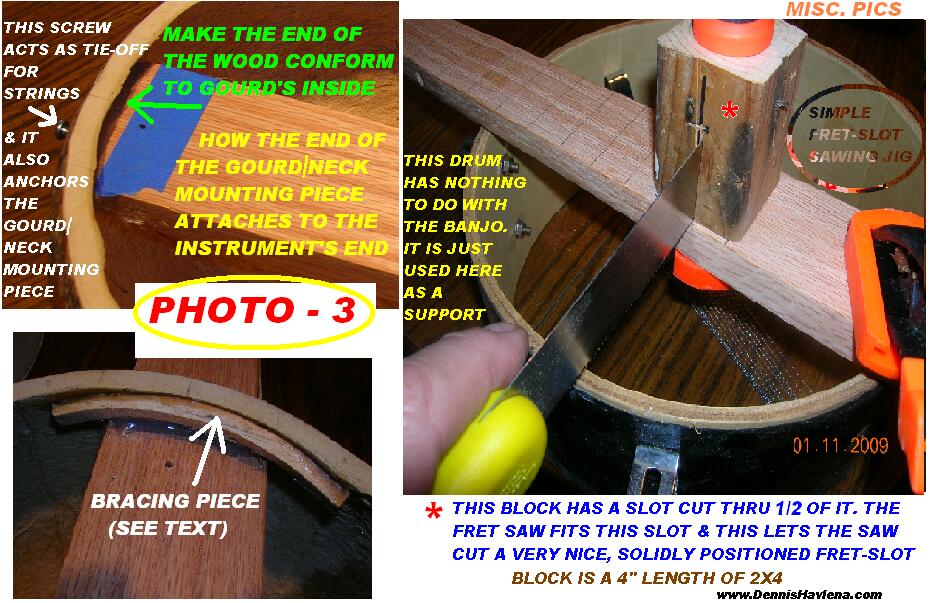
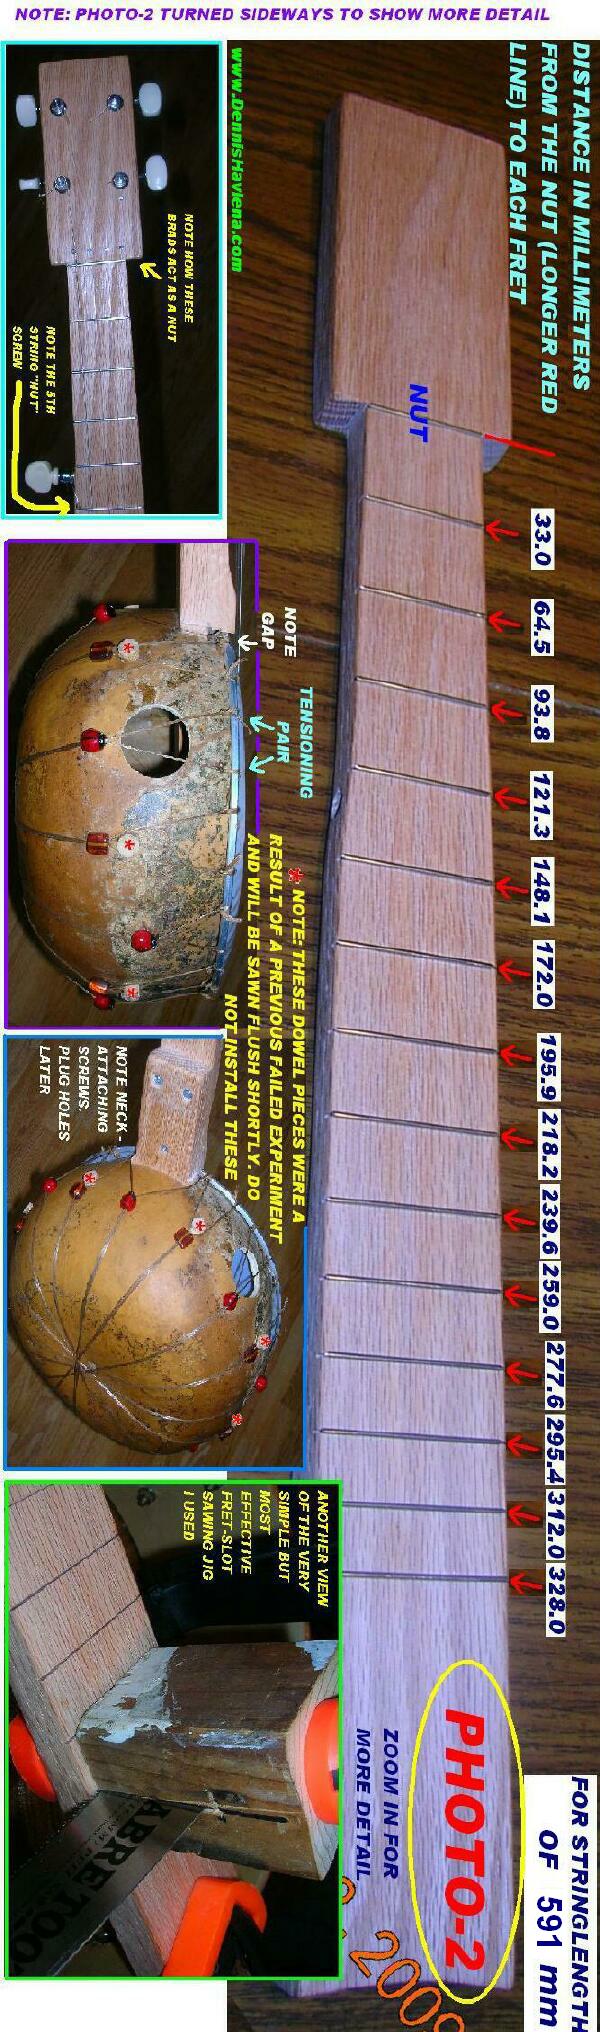
Now remove the temporarily installed neck & get ready to mount the frets.


INSTALLING THE FRETS:

Don't let this prospect intimidate you -- anyone can do a good job with
just minimal forethought and care. On this banjo, there is no need for a
fingerboard as such -- the frets are mounted directly onto the top surface
of the neck itself. I placed a single layer of masking-tape over the entire
neck before I plotted where the frets-slots should go. Refer to the photos
for the measurements as to just where to place the frets. Make the fret-slots
deep enough, but not too deep - lest you weaken the neck. If ever there was
a time for experimenting on scrap, this is it! The most important thing being
to make the fret-slots the proper width -- not too tight nor too loose.
Experiment! It's pretty easy.  When sawing the frets, you might use the
simple jig I built that made the job duck-soup easy (see photo-2 above).
Carefully measure & cut each fret. Angle the ends of each fret maybe
45 degrees, then carefully tap them in. Once mounted, very carefully file the
ends so no snags remain. Be extra vigilant that you don't file the neck wood
while doing this. When done, lay a good straight-edge at various spots along
the length of frets -- any high spots will become very obvious -- usually just
requires a slight tap to settle things. I am not fond of conventional "nuts" --
The simple brad method I use requires mounting a fret where a nut would
normally be located (see photos). Reattach the neck to the mounting piece.


MOUNTING THE DRUM HEAD TO THE GOURD:

Once mounted & tightened, the drum head should ideally not be exactly
centered over the gourd rim, but rather, it should be "slid" a bit towards the
far end of the instrument so it does not interfere with the end of the neck
once the neck is mounted. See photos. 15 pairs of "tensioning strings/beads"
are positioned evenly around the perimeter of the drum head. These serve to pull
down the drum head tightly against the rim of the gourd. Each tensioning
pair consists of a length of artificial sinew (stout nylon cord) tied securely
to the metal ring that runs around the drum head (& through a hole punched
with a hot nail through the plastic drum head itself) -- then the cord wraps
around the gourd's bottom & is tied as tightly as possible to a corresponding
hole on the opposite side of the gourd (about 180 degrees opposite). The other
half of each pair is made in the same manner. Before each cord of each half of
the tensioning pair is tied tight, two glass beads (sliders) are threaded onto
both halves. Initially position all of the beads at the gourd's bottom. Once all
15 tensioning pairs have been thus installed & tied tightly, the glass beads
can then be slid upwards, towards the rim, to very effectively tighten/tension
the drum head. This all sounds FAR more complicated than it really is --
just refer to photo-1 above, which should give you a good idea of things.

Simply put, position your tensioning strings (& associated holes through the
plastic drum head) similar to what's shown in photo-1. This is not that critical.
To punch the holes through the plastic, a nail held in Vise-grips & heated
over a candle works fine - as does a small soldering gun (round) point. Once
the plastic head holes are made, it's a good idea to put a small gob of hot glue
immediately next to each hole -- this lessens the chance of the small sidewards
pressure of the tensioning cord to rip the plastic drum head material.

Note: in the photo, you may notice a number of wooden "plugs" or dowels
sticking a quarter inch or so out of the side of the gourd-side -- pay no attention to
these plugs behind the curtain -- they are merely remnants of an earlier
(& less successful) attempt at head tensioning. They will be sawn off flush shortly
as they interfere with the sliders. Notice the ladybug beads I used as sliders
-- you certainly don't have to get so cutesy. It IS a good idea however to
look for flat-bottom beads, to lessen the chance of scuffing up the gourd
surface.


BRIDGE THOUGHTS:

If you follow my neck-angle and other recommendations, a standard off-the-shelf
banjo bridge should work fine on this instrument. Alternatively, a simple bridge
can be hacked out of a scrap of wood in minutes that will work fine.  For
reference, my strings measure 1/4 inch above the right end of the neck (where
the neck meets the gourd -- nice, easy, effortless action).


MISC. THOUGHTS:

I still intend to make a proper tailpiece, but in lieu of that, I simply attached the
ends of each string to the same wood-screw that attaches the end of the neck to
the gourd. This works fine IF you deepen the bridge slots some so that the
sidewards pull of the strings doesn't yank the string out of the bridge slots.

There are a lot of words written above -- much like trying to describe tying a
shoelace, it's often much more difficult to explain how to do something than it
is to just do it! Such is the case here. The photos should really tell it all.

Let me know if you build one.

Dennis Havlena - W8MI
dhavlena@gmail.com
northern Michigan

PS: When I refer to "right side" or "Left side" of the instrument, I mean right
or left as shown in photo-1 above.

Apologies for mixing up metric with non-metric measurements. In general I
dislike the metric system but begrudgingly acknowledge it's usefulness in
certain situations.
Click here to access my webpage