HOW I BUILT A CELLO-BANJO FOR $41.50
Long ago a friend had a 4-string cello-banjo & while I much appreciated
it's deep melodious tone, my interest was in the 5-string banjo. At the time
I mused a bit about adding a 5th string to such an instrument, but I never
got around to doing that.
Now I see 5-string "cello-banjos" becoming popular (personally I think the name
"bass-banjo" would be more fitting) I hear some truly excellent cello-banjo playing
on Banjo Hangout & youtube --- one fellow's absolutely incredible low-banjo
clawhammering on "Bonaparte Crossing the Rhine" on Banjo Hangout (click)
put me over the top -- I HAD to have a banjo that played an octave lower!
Being short the thousand dollars to spend for a commercial jobbie, I, as is my apt,
set out to see what couldn't be built out of "available parts" -- thus this article.
This instrument was easily built in 5 days of spare time.
CLICK
HERE to see a YouTube video of this cello-banjo being played.
Here are a couple of photos that will help understand the construction better. Other than string-length, neck angle & fret-placement, not much is fussy or critical.
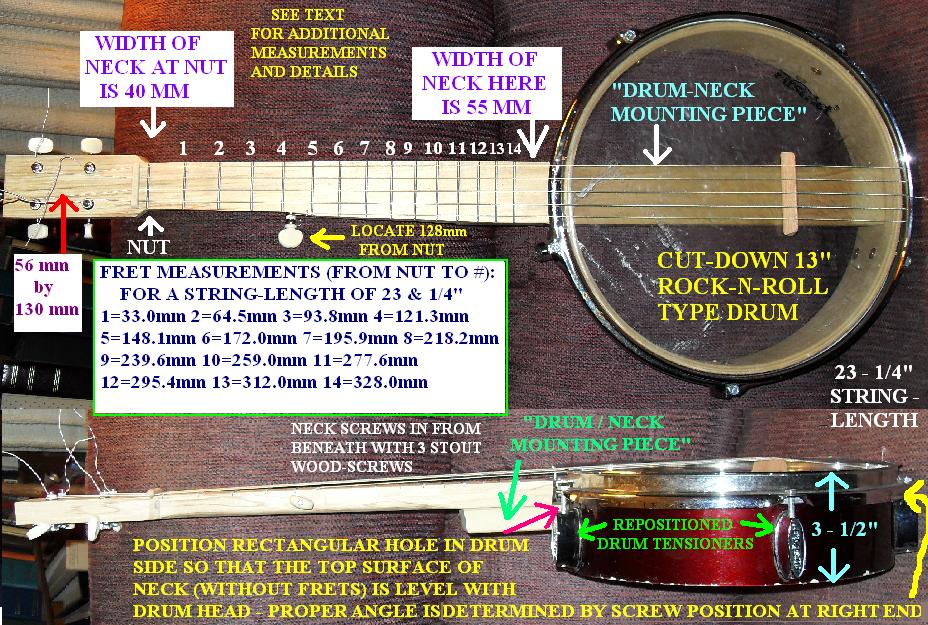
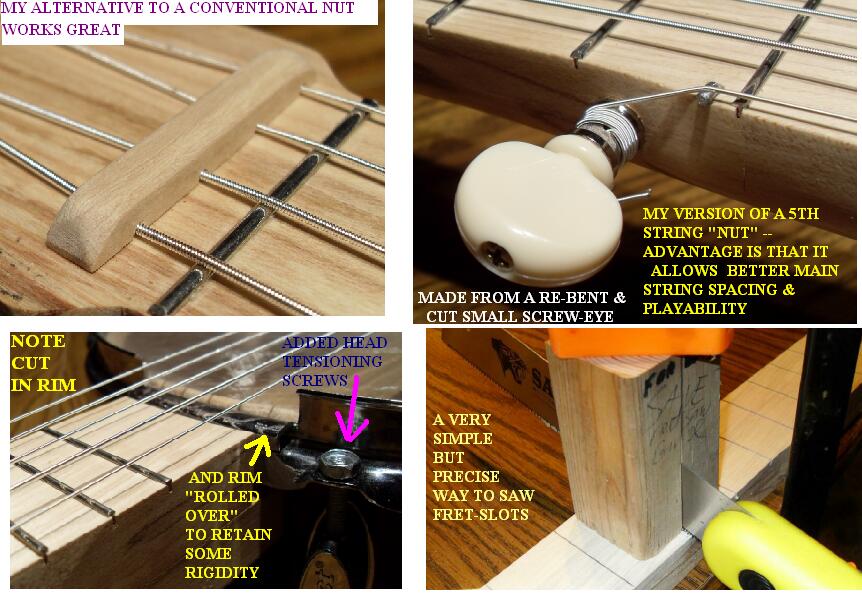
A quick breakdown of the cash outlay: - Rock-n-roll type 13" wooden shell drum (Salvation Army for $1.50)(I often see such drums at Salvation Army, Goodwill & other resale shops) Any similar drum diameter should work fine. - Maple, for neck -- from an old bed-frame - free - Four guitar-type tuning gears - $8 total from elderly.com - 5th-string tuning peg - $8 from elderly.com - Commercial Cello-banjo strings - part # GTCB5-M $19 (ouch) from elderly.com (when I have more time, plan to experiment using regular classical guitar strings -- I'm SURE I can beat this $19 price!) - $5 worth of fret-wire from elderly.com That's about all that's required other than a few screws & minor odds/ends! Tools needed: As with most of my projects, everything can be built using just hand tools, altho some power tools would surely speed things up. - carpenter's type handsaw - a thin-bladed saw is needed to saw the fret-slots to the appropriate thickness. I have a real fret-saw somewhere around here but do you think I could find it for this project - no! So I used a simple kind of Japanese backsaw that worked perfectly -- experiment on scrap to get the proper width so that the frets fit tightly. - drill and few drill-bits - a good yard-long straight-edge - hammer - a file, also some sandpaper DRUM MODIFICATION: A) Remove all the hardware & heads etc from the drum. Cut all around the drum shell til you end up with something that looks like a banjo body. The thickness is not critical. Then re-mount the tensioning-rod "screw-ins" on the newly cut down shell. Make sure that there will be no conflict between the head's metal rim & the "screw-ins" when the head is tightened. Instead of the tensioning rods which tighten the heads when it was a rock drum, I used hardware-store bolts of the appropriate thread & length (easy to find). B) Because the normal rock drum's head-tensioning rim extends above the level of the surface of the skin head, it is necessary to bend down & fold-over that part of the rim (in my case 65 mm of the rim) so the strings can pass over. This is easy to do, just hacksaw two slots 65 mm apart then (using a pair of Vise-Grips) carefully and slowly bend down this 65 mm of the rim outwards until every part of it is below the level of the skin head. After that is done, ensure (again with Vise-Grips) that the newly bent part is equal to or less than the thickness (as from looking above) of the rim thickness -- this is done so that it will not interfere once the end of the neck is mounted. You may ask why not just cut off this 65 mm section -- my answer is that it provides at least rigidity to help keep the rim/skin tight. C) The "drum/neck mounting piece" fits through a rectangular hole CAREFULLY cut into the side of the drum (see photos). MAKING THE NECK: My neck is made of hard maple. Overall it measures 493 mm long (this includes the tuning head) by 55 mm wide at the right end (where it first meets the drum-body, 40 mm wide at the nut. The part of the neck that comprises the tuning head measures 56mm by 130mm. The neck I used happened to be 21.5 mm thick. The "drum/neck mounting piece measures about 408 mm long by 55 mm wide by 21.5 mm thick. These thicknesses are not that critical as long as you cut the rectangular hole in the drum-shell accordingly (making sure that the neck surface is more or less level with the drum-head surface). Round off the bottom of the neck where your palm will rest while playing. The amount of "roundiness" is not that important - in fact, it's probably better to round it off too little than too much -- whatever's comfortable. DO NOT round off the bottom of the part where the tuning gears attach. Also DO NOT round off the last 87 mm of the neck (where it screws onto the "gourd/neck mounting piece") PS: I suggest cutting the fret-slots before the bottom of the neck is shaped - it sets better. DEALING WITH NECK MOUNTING: First off, shape the end of the neck to match the inside curve of the drum. Carefully plot and measure how the "drum/neck mounting piece" should be positioned in relation to the drum (refer to photos & measurements) & then fasten the neck (accurately but temporarily) to the proper part of the drum/neck mounting piece using three hefty wood-screws (screwed in from the bottom) -- two, next to each other, on the "left" side (to better resist any upwards neck pull) & one screw installed closer to the drum body. Pre-drill everything nicely & make sure these screws don't protrude through the neck into the fingering area. I very successfully did not use any glue here -- the screws by themselves are amply strong. Another point - keep the end of the neck 1/8" - 1/4" or so from the drum rim -- to allow drum head/rim clearance. Once the "drum/neck mounting piece" (with neck firmly attached) fits nicely through the rectangular hole, it's time to set the neck/drum-head angle. This is quite easily accomplished by very careful placement of a nice stout wood-screw, passing through a hole at the end of the drum's side and into the end of the mounting piece, at the far right end of the instrument. Getting this angle right is quite important to the ease of playing this banjo. Now remove the temporarily installed neck & get ready to mount the frets. INSTALLING THE FRETS: Don't let this prospect intimidate you -- anyone can do a fine job with just minimal forethought and care. On this cello-banjo, there is no need for a fingerboard as such -- the frets are mounted directly onto the top surface of the neck itself. I placed a single layer of masking-tape over the entire neck before I plotted where the frets-slots should go. Refer to the photos for the measurements as to just where to place the frets. Make the fret-slots deep enough, but not too deep - lest you weaken the neck. If ever there was a time for experimenting on scrap, this is it! The most important thing being to make the fret-slots the proper width -- not too tight nor too loose. Experiment! It's pretty easy. When sawing the frets, you might use the simple jig I built that made the job duck-soup easy (see photo-2 above). Carefully measure & cut each fret. File the ends of each fret maybe 45 degrees, then carefully tap them in. Once mounted, very carefully file the ends so no snags remain. Be extra vigilant that you don't file the neck wood while doing this. When done, lay a good straight-edge at various spots along the length of frets -- any high spots will become very obvious -- usually just requires a slight tap to settle things. I am not fond of conventional "nuts" -- The simple method here is a variation of my "brad nut" system. that requires mounting a fret where a nut would normally be located (see photos). MISC: Drill for and mount the four guitar gear tuners as per photo. Then carefully locate and drill the hole for the 5th string tuner. Taper this hole properly, for a nice tight fit -- I highly suggest experimenting a few times using scrap hardwood before making the hole in the actual instrument. First drill the guide hole. What I then did was to find a non-Phillips-head type screwdriver whose blade end was the same taper as that of the 5th peg shaft. If I hadn't found this onewith the exact taper, I would have taken a wider screw-driver blade & ground or filed it until it was the proper taper. Carefully worry thehole larger until the 5th peg fits very snugly. What have I got against conventional nuts you might ask --- plenty! In my 5 decades of musical adventure, if I had to point to a single reason prospective musicians give up playing it'd be because of a nut on their guitar or whatever that was too high! Seiously - I've seen this countless times -- even amongst people who should know better! Folks often are very concerned about their action being too high, but many, even experienced musicians, fail to fully realize that their string's nut is very often the real culprit. Not nearly enough attention is paid to proper nut adjustment. Darn things are just too fussy & buzzy & pinchy all the way around. Throw em out & let's come up with something better I say. Speaking of "action" --- action and bridge heigth are controlled on this instrument by the proper positioning of a single stout wood-screw -- the one at the far right end of the instrument (as pictured here), that goes through the drum-shell and into the end of the "drum/neck mounting piece". Once the rectangular hole in the drum-shell has been cut, with the neck solidly & 'straightly' screwed to the drum/neck mounting piece & inserted all the way thru the rectangular hole, then it is time to set the action/bridge-heigth. To put it simply, experiment with the position of the end of the drum/neck mounting piece (up & down -- while keeping things centered horizontally) until the distance from the top of the 12th fret to the bottom of the strings (I use the middle stirng) is about 4 millimeters. With any luck, this will give you a bridge heigth or somewhere around 20 mm or a bit less. When you have things just where you want them, carefully install the stout wood-screw to cinch things in place. If you cut the rectangular hole so the drum/neck mounting piece pits through tightly, no fastening or glue is needed other than the single end screw. You'll also notice a bit of an unconventional 5th string "nut". Instead of a small slotted screw, I wanted to move the string a small bit away from the four main playing strings so the latter wouldn't be as "crowded". Worked nicely. The "nut" is fashioned from a very small eye-hook that I cut & then bent into an "L" shape. A groove filed (& smoothed) on the top part of the upside-down "L" is where the 5th string rides over. Drill the pilot-hole for the modified screw-eye a bit smaller than usual so the "L" retains it's position & doesn't rotate. Don't make this pilot-hole too much smaller lest the wood split. Experiment on a piece of scrap hardwood. BRIDGE THOUGHTS: If you follow my neck-angle and other recommendations, a standard off-the-shelf banjo bridge should work fine on this instrument. Alternatively, a simple bridge can be hacked out of a scrap of wood in minutes that will work fine. TAILPIECE: Not needed! Simply drill five holes, each spaced 12.5 mm apart, low through the metal rim 180 degrees opposite the center line of the neck. Be careful not to hit the drum-head when drilling these holes. De-burr these holes on both sides to keep from cutting the strings. The distance between the 1st and the 5th string (at the bridge) as measures 49 mm. The distance between the 1st and 4th string at the nut measures 30 mm. This article is still very much a work-in-progress. Check back for additional information, fixed typos & mistakes etc. Let me know if you build one -- LOT of fun for very little effort & expense.. Dennis Havlena - W8MI dhavlena@gmail.com northern Michigan PS: When I refer to "right side" or "Left side" of the instrument, I mean right or left as shown in the photos. Apologies for mixing up metric with non-metric measurements. In general I dislike the metric system but begrudgingly acknowledge it's usefulness in certain situations.
Click here to access my webpage