Click
here to hear how this $20 hurdy gurdy sounds
The tune is called "En Roullant Ma Boulle" - a very old
French-Canadian Voyageur's paddling song
 HOW TO MAKE A VERY NICE SOUNDING HURDY GURDY FOR UNDER $20
 ~~~~~~~~~~~~~~~~~~~~~~~~~~~~~~~~~~~~~~~~~~~~~~~~~~~~~~~~~~
NOTE: 14 additional photos (plus 7 photos of other's instruments) and a sound sample of this instrument are available. Click here for information.
.........................
A note or two in defense of this instrument (Summer 2006):

I recently read the less-than-kind observations of a top U.S.
Hurdy Gurdy expert who severely takes me to task, on his web-site,
for promoting "inferior quality, low end and thus terrible sounding
Hurdy Gurdies". All I can offer in response is "phooey!!"

A large part of why I so enjoy making simple musical instruments
and offering their building plans on my webpage is to counter such
artsy-fartsy attitudes.

I DEARLY love the concept of "giant-killer".

.........................

The point of this article is simply to show how one can, in a weekend
or so, with very basic woodworking skills & for quite minimal expense
create a very pleasing simple hurdy gurdy & in the process learn a
lot about this most fascinating instrument. Great fun too.

The shape of my instrument here is patterned after the first hurdy gurdies,
many centuries ago, which were rectangular in shape. "Curvy-shaped" hurdy
gurdies were a later development.

This thing was built at a very low cost in a bit more than a
weekend's worth of spare-time tinkering. It has proven a very playable
& nice sounding instrument -- one which I have had no fear of playing for
hundreds of thousands of folks as part of my job with the Mackinac State
Historic Parks (One of our sites being Fort Michilimackinac, built by
the French in 1715).
NEW - A FEW JPG IMAGES OF THIS INSTRUMENT:
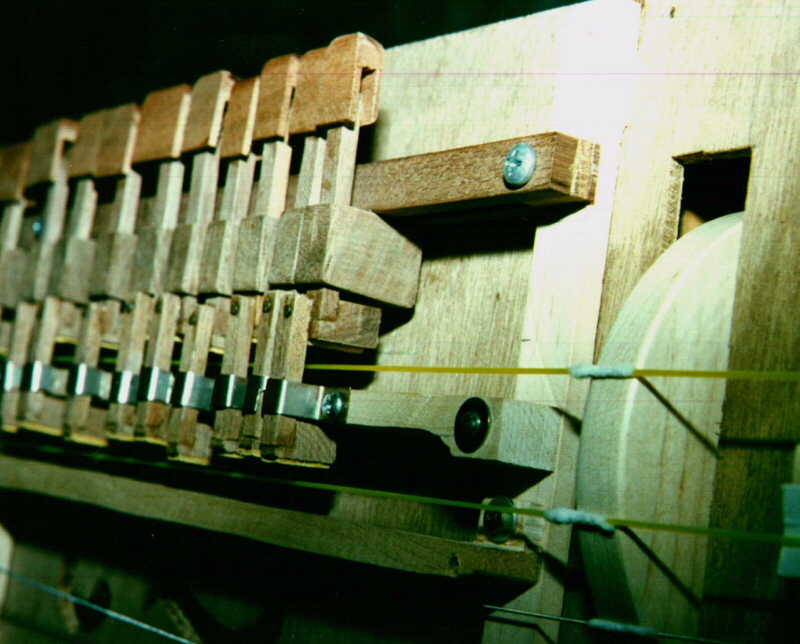
Click here for most detailed view (49k)
Click here for top view of instrument (33k)
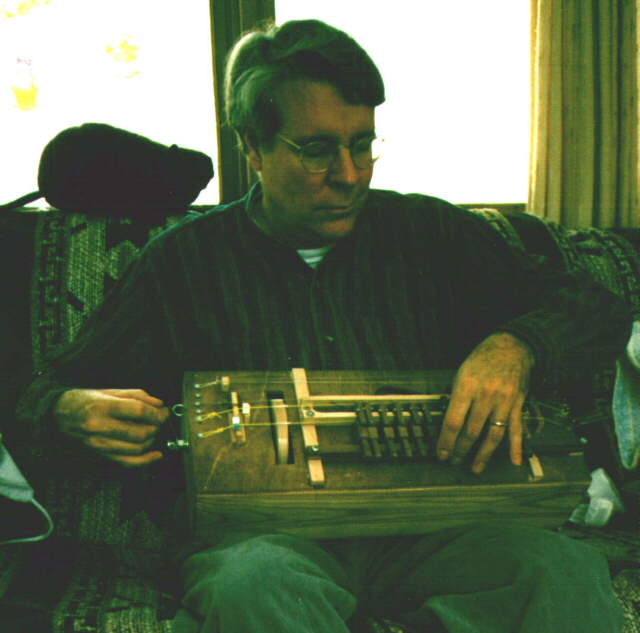
Click here for shot of me playing the thing (36k)
Many thanks to Bill Wilkinson for nice photo to jpg conversions!
Aside from general handyman-type tools, I did have use of a rather
rickety table saw. The 4 1/2" diameter wheel (made of solid rock
maple, 1/2" thick) was cut out with a coping saw as round as
possible and a bolt/nut secured through it's DEAD-center - the
whole mess put into an electric drill clamped into a vise & worked
VERY round & smooth using a sanding block & files applied to the
rotating disk. "Brace" the rasping tools as best you can so that
they don't follow any possible depression or dip in the wheel
surface. The wheel takes some TIME and PATIENCE to get right.
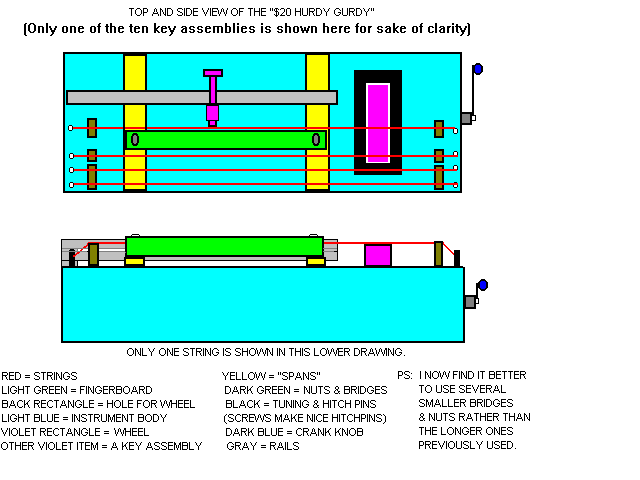
CLICK here FOR A .GIF ILLUSTRATION.
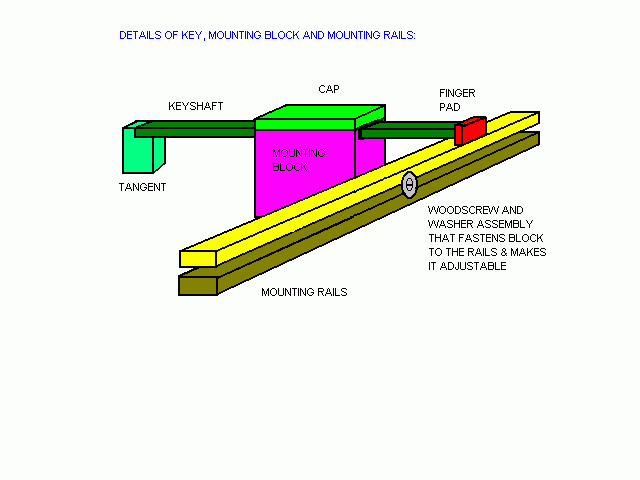
                         "AERIAL" VIEW
                         **************

                 T
           (The  !  bit represent the keys)
                 X
                 X

                              Back
     _ _ _ _ _ _ _ _ _ _ _ _ _ _ _ _ _ _ _ _ _ _ _ _ _ _ _ _ _
    |      | |                              | |               |
    |      | |  T  T  T  T  T T  T  T T T   | |  |~~~~| wheel | |=O
    |,----------!--!--!--!--!-!--!--!-!-!------, |!~~!|<-hole | |
R-> |'----------X--X--X--X--X-X--X--X-X-X------' |!  !|       | |
    |   H  | |  X  X  X  X  X X  X  X X X   | |  |!  !|    B  |_|
o-> |o  H  |OIIIIIIIIIIIIIIIIIIIIIIIIIIIIIIIIO|  |!  !|    B .| |]
    |o  H  | |                              | |  |!  !|    B .|~
    |o  H  | |                              | |  |!  !|    B .|
    |o  H  | | <--S      f-hole here        | |  |!Wh!|    B .|
    |o  H  | |                              | |  |!__!|    B .|
H-> |   H  | |                         S--> | |  |____|    B  |
    |_ _ _ |_| _ _ _ _ _ _ _ _ _ _ _ _ _ _ _|_|_ _ _ _ _ _ _ _|

   Left                          Front                 ^     Right
   side                                                L     side


Wh   = Wheel                        o = tuning pins (zither pins)
H    = Nut                          . = hitch pins (woodscrews)
R    = Key/keyblock mounting rails  S = Rail & f'board mounting
       These make each note/key         "spans"
       fully adjustable             OIIIIIIIIIIIIIIIO = Fingerboard
T!XX = Key/key mounting blocks      L = Location of brace (below)
B    = Bridge

PS: I now use several seperate bridges & nuts instead of the
    long ones described here.

PS: Zither pins are available for about 22 cents each (2002 price)
    from Elderly Instruments in Lansing, Michigan. They have a
    mail-order website: http://www.elderly.com .

                              NUT
This measures 7/8" high by 5/16" wide & 4 1/16" long & is made of
either hard or softwood. Strings ride through slotted woodscrews
screwed into top of nut at a slight "back-angle" to lessen the
chance of buzz. All strings should be spaced parallel & about 3/4"
apart except that the chanter string (main melody string) should
be about 1 1/16" from the other "wheeled" string (drone string).
The nut should be glued onto the soundboard with it's center-line
2 1/4" from the left end of the instrument.

PS: I now use several small nuts instead of one long one.


                            "SPANS"
These are made so that they touch the instrument's soundboard only
at each end, thus not interfering with the it's vibration. The
right end of the key/keyblock mounting-rails and both ends of the
fingerboard are screwed to these "spans". The top-side of the left
span is cut-away so that the mounting rails will just pass over &
not touch it. I used hardwood for the spans.

   |~~~~~~~~~~~~~~~~~~~~~~~~~~~~~~~~~~~~~~~~~~~~~~~~~~~~~~~~~~~~~~|
   |______________________________________________________________|
   '-----'                                                  '-----'
       Note the two 1/16" thick spacers at each end to keep span
       bottom from contacting the soundboard face. These spans are
       made 11/32 inch "tall" (including spacers) by 1/2" wide by
       7 7/8" long. The span's centerlines are located like so:
       Left span - - 3" from left end of instrument. Right span -
       - 14 3/16" from left end of instrument.


                             BRIDGE
Make this of any hard or softwood 23/32" high by 5/16" wide by 4
1/16" long. Four small blocks can be glued along bridge base (&
nut too) to help keep it from tipping over when glued to the
soundboard. The bridge should be located so that it's center-line
is 2 5/16" from the right side of the instrument.

PS: I now use several small bridges instead of one long one.


                       BRACE (UNDERNEATH)
6" long by 5/32" wide by 3/8" high softwood brace glued to
underside of soundboard, just at the right hand edge of the
wheel-hole.


                          FINGERBOARD
I have found the use of a fingerboard (as opposed to having the
"keypad" merely touch the strings as is the case traditionally) to
be an advantage in this instrument. It most noticeably makes for a
cleaner, clearer & louder tone. The fingerboard is a piece of rock
maple 3/4 inch "tall" by 1/2" wide by 11 3/4" long & is mounted to
the two "spans". Instead of round screw-holes at each end,
elongate (make eliptical) each hole to allow for a range of
forward/backwards adjustment to position the fingerboard properly.
Use two woodscrews with washers to secure in the desired position.
Locate the fingerboard so that the fingerboard's surface is about
3 5/8" from the back edge of the soundboard.

Below is an "Aerial" view of one end of the fingerboard (greatly
enlarged) showing elongated adjustment hole. Through these two
holes are inserted woodscrews with washers which when cinched-down
firmly secure the fingerboard in the desired position.

          ______________________________________________________
         |       _
as       |     /   \
viewed   |    |     |
from     |    |     |
TOP      |    |     |  <-- note elongated "adjustment hole"
         |    |     |
         |    |     |
         |     \ _ /
         |______________________________________________________


                CONSTRUCTION OF THE BODY ITSELF

This is a very simple rectangular box. I used two pieces of 4"
wide 3/4" thick softwood for the front & back, two 4" wide 3/4"
thick pieces of rock maple for the end pieces (dense hardwood
needed here for the tuning pins, good "bearing" properties etc),
1/4" plywood for on the bottom & an 8 3/8" by 19 7/8" piece of
5/16 cheap mahogany panelling, top side down, for the soundboard.
Use of thick wood for the sides was on purpose - it helps keep the
instrument from walking about & does not seem to appreciably
effect the instrument's loudness. Cut a 1" by 5" hole in the
soundboard to accomodate the part of the wheel that projects above
the surface of the instrument. A 5 or 6" long simply cut f-hole
really does help the volume. The soundboard is attached with tiny
dabs of glue here & there which facilitates easy removal for
access to the crankshaft/wheel.


-------------------------------------------------------------------

            KEYS/KEY-MOUNTING BLOCK & MOUNTING RAILS
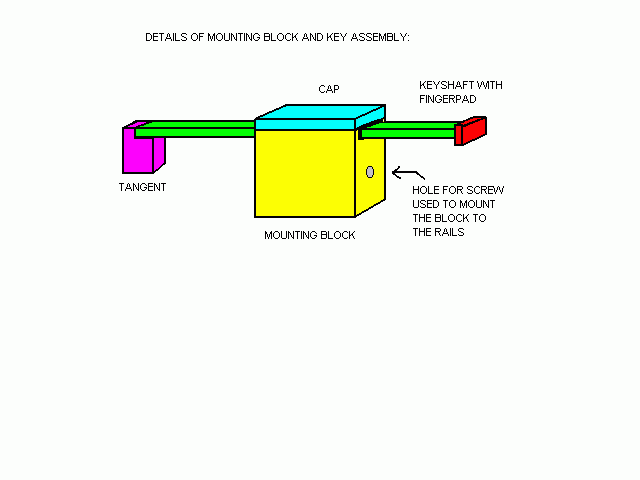
CLICK HERE FOR A .GIF ILLUSTRATION.
                Key slides in
Side view:      mounting block
                 <---   --->   .-------------.            _
              .-.--------------' -   -   -   '-----------' |
              : :--.-----------' -   -   -   '-----------, |<-K
Put leather   :    :<--T       |             |            ~
pad on this-> :    :      B--> |             |_ _ _ _
surface       :____:           |             |       | <--R
                               |             |- - - -'
                               |             |_ _ _ _  <--S
                               |             |       | <--R
                               `-------------`- - - -'

K  = Keyshaft with glued-on "fingerpad"
B  = Mounting Block through which the key slides
T  = "Tangent" - this pushes string against the fingerboard
R  = Key/keyblock mounting Rails
S = Woodscrew with washer goes thru this slot to mount the
    key/keyblock at the desired position/pitch along the rails


                             Key-mounting block
                           (Made of any hardwood)

                                             ________     glue
                                            '--------' <- cap
                                                          on
                                             _      _
                                            | |    | | <- this
                                            |  ~~~~  |   notch
                                   body --> |        |   is for
                                (END-view)  |        |  keyshaft
                                            |        |
          Pilot-hole for mounting screw --> |   o    |
          (11/32" from bottom). It's best   |        |
          if this screw does not go into     ~~~~~~~~
          end-grain.

Dimensions are 1 3/32" tall, 3/4" deep, 1/2" wide. "Notch" is
3/16" deep by 11/32" wide (make JUST larger than dimensions of
key-shaft). Making the notch to these dimensions will mean that
the thickness of body-wood on either side of the notch will be
about 3/32" & is thus fragile, until the cap is glued on top.The
pilot-hole for the mounting screw should be located about 11/32"
from bottom & in center. Make the top cap 1/16" thick or less. I
made these blocks all together in a strip & then cut them into
1/2" wide blocks.


                              keys
The shafts are made of any hardwood & are 5/16" wide by 11/64"
thick, cut 2 1/16" long. Very slightly round off the 4 long edges
& "adjust" shaft dimensions until they just nicely slip in & out
of the keyblock "notch" without any binding or excessive play.
Glue a 5/16" square (*) piece of wood to shaft end as a fingerpad
(a small channel chisled or routed into pad's bottom so pad can
grip the shaft end before glueing keeps them from getting knocked
off). Amply round-off all corners & edges of fingerpads.

* LATE PS: AFTER USING THESE SMALL PADS, I NOW RECOMMEND MAKING
THE FINGERPADS LONGER SO THEY CAN BE MORE EASILY HIT WHILE
PLAYING. MAKE THE PADS LONG ENOUGH SO THERE IS ONLY A 3/32 TO 1/8
INCH GAP BETWEEN ADJACENT KEYPADS. THIS MEANS THAT SOME OF THE
PADS WILL BE AS LONG AS AN INCH OR SO, WHILE OTHER PADS WILL BE
ONLY HALF THAT LONG. WITH THESE LONGER KEYPADS, IT MIGHT ME A GOOD
IDEA TO MAKE THE KEYPAD THICKER & ALSO MAKE THE "GROOVED CHANNEL"
ON THE UNDERSIDE OF EACH ONE DEEPER - FOR BETTER GLUEING GRIP. IT
IS NOT NECESSARY THAT THE PADS BE CENTERED ON THE KEY-SHAFT --
JUST ARRANGE THEM SO THE 3/32 TO 1/8 INCH DISTANCE BERTWEEN
ADJACENT KEYS IS MAINTAINED.

            / ~~~~~~~~~~~~~~~/|
          /                /  |
        /                /   /  <-- Fingerpad (greatly enlarged)
       .----------------,  /
       |_____:~~~:______|/
              /\
        end of key-shaft
        inserts in here


"Tangents" are small blocks of any hardwood 5/16" wide by 11/16"
high by 3/8" deep notched to accept the end of the key shaft (&
thus provide a better glue joint). Small pads of leather (shiny
side out) are glued to each blockface. These pads are what contact
the strings. I made these "tangents" all together in a strip &
then cut them into the 5/16" wide pieces.

             /~~~~/|
           /     / |________
          /____/   /       /|
         |     |  /Notch  / |
         |     |/_______/   | <-- "Tangent" (greatly enlarged)
         |              |   |
         |              |   |
         |              |   |
         |              |   |
         |              |   |
         |              |  /
         |              | /
         |______________|/

PS - On certain high notes (ie. 10th - 12th keys) where keys have
to be placed very close together to achieve proper notes, the
leather pads can be offset a tad right or left on the tangent
blocks. Slightly wider tangent blocks can a help in this case as
well.

                             rails
This instrument is a bit unique in that these rails allow each
note to be completely adjustable pitchwise. The sketch above at
the top of this section shows an end view of these mounting-rails
upon which the key/key-mounting blocks are mounted. The
keys/keyblock are secured at exact position by tightening the
woodscrews once they are properly placed/pitched along the rail
length.

Each of the two rails is 1/4 inch "high" by 15/32" wide by 14 1/2"
long & are made of any hardwood.


Below is a side view of these two rails & how one key/keyblock
mounts to it: The () is the woodscrew/washer location (screw-point
pointing towards you -- screw screws in from the rear in this
sketch). Only the keyblock shown here, not the key itself - for
clarity.

                  ______ cap
                  ||__||
   _______________|    |___________________________________
  |_______________|    |___________________________________|
  |____|__________| () |______________________________|____|<-Spa-
  |_______________|    |___________________________________|  cers
  |____|          '----'                                     (on
                <--    -->                                    each
                adjustable                                    end)

The above also shows how the rail assembly is mounted to the
instrument. Right end is screwed to the right "span" & left end
has a 3/16" thick spacer glued to bottom. This spacer is used to
keep rails parallel to the soundboard. Seperate the 2 rails by
glueing two 5/32" thick spacers between rails, at right & left
ends. This creates the slot in which the key/keyblock's adjustment
screw slides. Notch out the bottom right side of the lower rail
where it contacts the right span so that the top side of the rail
assembly measures 7/8" from the soundboard surface. Locate the
rail assembly so that the centerline of it is about 1 9/16" from
the back edge of the soundboard.
CLICK HERE FOR A .GIF ILLUSTRATION.
-------------------------------------------------------------------

                CRANKSHAFT/CRANK/WHEEL ASSEMBLY

A 5/16" diameter, fully threaded 7 1/4" bolt proved to be a great
crankshaft!

            inside bracket for
     !  ! <-mounting crankshaft               |   |
     !  !                  __                 |   |        !!~~~~|
     !  !        Wheel--> |  |                |   |        !!----'
     !  !                 |  |                |   |        !!
     !  !_               _|  |_               |   |_      _!!_
  |~~|  !  \_ _ _ _ _  /  |  |  \_ _ _ _ _ _ _|   |  \ _/  !!  \ _
  |--!  ! N |  bolt   | N |Wh| N |   bolt     |   | N || N !! N | |
  |__|  !  /~ ~ ~ ~ ~  \  |  |  /~ ~ ~ ~ ~ ~ ~|   |  / ~\  !!  / ~
     !  !~               ~|  |~               |   |~      ~!!~
     !  !                 |  |                |   |
     !  !                 |  |                |   |
     !  !                 |__|                |   | <-- right side
     !  !                                     |   |     of box
     !  !                                     |   |     (frame)

The center-line of the wheel should be 4 1/2" from the right side
of the instrument.

Use locking nuts everywhere N appears above (lockwashers are not
recommended). Tighten these nuts very tightly on wheel and crank.
Use plain (non-locking) flat washers on BOTH sides of the "inside
bracket for mounting crankshaft" & another on the one locking bolt
associated with the "right side of box (frame)". (altho a bolt
here is unnecessary I put one on here for cosmetic reasons). DO
NOT tighten at these places very tightly -- you want a good deal
of "slip" here. Graphite dust lubricates.

The crank-arm can be made out of any 1/16" or so thick scrap of
metal. Mine is 3/4" wide by 2 1/2" long & is bent slightly into an
"s" to get the knob out a bit further from the body of the
instrument. Any knob or stub of wood will act as a crank-handle.
Obviously, don't tighten the handle too much.


The "inside bracket" for mounting the left end of the crankshaft
bolt is simply a length of 3/4" by 2" rock maple fitted, glued &
screwed on the inside between the front & back - a hole drilled
through the middle to allow the crankshaft bolt to just pass (this
hole carefully positioned midway between the instrument's front
and back & 1 3/8" from the top surface of the soundboard to the
center of the hole). Very carefully drill a corresponding hole in
the right side maple body end-piece (any "off-centerness" here
will result in an intolerable wheel wobble & resulstant wavery
tone). The crankshaft is inserted through these two holes. It
might be argued that no real bearing exists here - undeniable, but
zero evidence of elongation exists nor is likely to exist to any
debilitating degree for a good length of time*. I had planned to
utilize pieces of teflon here (left over from my telescope making
days) but this (so far) has proved unnecessary.
(* late report:  1/21/00 & still not the slightest sign of wear
after years of heavy playing)


                    STRINGS, SETUP & TUNING
This instrument's strings consist of two strings which are sounded
by the rotating wheel (the chanter & a lower drone) and three
sympathetic strings that do not touch the wheel, but sing nicely
by sympathizing with the two wheeled string's notes. Sympathetic
strings on any instrument must be tuned as precisely as possible
to achieve maximum sympathetic effect. A "buzzing bridge/dog
string" was not (yet) utilized on this instrument. Further
experiments are planned & I will post the results if successful. I
had good luck using primarily classical nylon guitar strings. I
happened to have a set of inexpensive Savarez brand strings from
France & they worked nicely. Having said this, I have found 50
thousandths weed-whip nylon line to make an excellent chanter
string (main melody string). The irridescent yellow color is
hardly "authentic looking", but after trying myriad other strings
here, the weed-whip beauty was best. Here's my string setup:

    Chanter -.050" weed-whip line - from K-mart garden department.
    This string is tuned to G.

    Wheeled string next to chanter -.031" wound nylon, from
    Savarez guitar set. This string is tuned to the first C below
    the chanter pitch.

    Sympathetic string next to above -.030" plain nylon, from
    Savarez guitar set. This string is tuned to G that matches the
    chanter pitch with the 3rd key pressed.

    Sympathetic string next to above -.033" wound nylon, from
    Savarez guitar set. This string is tuned to C, in the octave
    below the above string.

    Sympathetic string next to above -.041" wound nylon, from
    Savarez guitar set. This string is tuned to G, in the octave
    below the above string.

Wispy strands of preferably long-fiber cotton must be tightly
wound around each string where they contact the rotating wheel.
The purpose is to mellow out the tone & to keep the wheel from
quickly abrading through the string. I happened to have several
bolls of raw cotton - right from the field & this worked great.
Simply pull out a fine wisp of cotton strands from a clump of the
material & introduce it to the rotating wheel/string contact
point. The rotation should pull the wisp onto the string & wind it
round and round. This process can be encouraged by at first
placing the wisp end underneath the string, atop the wheel. Don't
get too much cotton on the string -- or too little.
Experimentation while listening to overall tone is the key.

Add (or subtract) small pieces of paper of varying thickness
between the bridge & each string to raise or lower the two wheeled
strings so that they might ride over the wheel with just the right
contact tension. This is a bit fussy, but not all that difficult.

Rosin the wheel by applying a cake of rosin & rotating crank a
half dozen times or so. Use the back (wood) part of the rosin cake
to smoothe out the rosin on the wheel for a rotation or two. Too
much rosin causes the tone to be raspy & with too little the tone
sounds anemic.

To play the instrument, hold it securely it in your lap tilted
forward so that the soundboard tilts away from you at about a 45
degree angle. There are no return springs necessary on the keys --
they are returned by gravity. Adjust each key/keyblock's woodscrew
along the rail assembly so that when playing in the key of C (the
main key) the first note of the scale ("do") starts by pressing
the third key. The secondary key of G can be played as well by
starting it's scale ("do") by playing the chanter string (melody
string) open (un-keyed) -- the key of G in this configuration has
a flatted 7th note.

Dennis Havlena - W8MI
northern Michigan

Click here to
return to my homepage.
Click here for information about adding a second melody string to the above instrument.