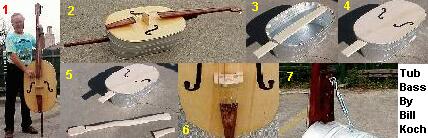
The washtub bass that I built was inspired by Dennis Havlena,
who has a great web site about numerous, home made musical
instruments that he designed and built. Check it out sometime:
http://www.ehhs.cmich.edu/~dhavlena/db.htm
Dennis had some drawings, plans, and pictures of a washtub bass
he made. His design used a maple neck attached to a circular #3
galvanized tub. I decided to make my own washtub by improvising
upon his basic design. The finished product turned out much
better than I envisioned, both in appearance and sound
(See pictures 1 and 2).

The tub I used for the bass was a #3 oblong galvanized tub ($20
new). I removed the handles from each end of the tub by hooking
the handle over the "ears" of a bench vise and opening the vise.
You could probably use some strong pliers to do the same thing.
I cut a bunch of small pieces of pine 1" x2" board and glued
them to the inside of the washtub using Liquid Nails
(construction adhesive). I made sure that the top of each piece
of wood was one-fourth of an inch below the top rim of the
washtub (See picture 3). If you cut the pieces at a slight
angle, when mounted to the slanted side of the tub they will
have a top surface that is roughly parallel with the front that
will be glued on later. You could use epoxy instead of Liquid
Nails for the same purpose.

To make the front of the bass (the table), I turned the washtub
upside down and traced it onto the back (rough side) of a 2' x
4' sheet of quarter inch birch plywood ($10). Alternately, you
could chalk the top and transfer it to the wood. To take into
account the width of the lip of the washtub, you need to cut the
wood about one-fourth of an inch INSIDE the tracing. The saber
saw blade leaves a jagged edge when it cuts, so be sure to cut
with the good side down (giving it the smooth edge after
cutting). Then sand the edges of the top and fit it into the tub
so that you have a snug fit inside the tub, fairly flush with
the lip (See picture 4).

I used a piece of 1" x 4" pine board for the main support. If I
did this again, I would use hardwood because the pine is not
strong enough to resist bending under the pressure of the
strings. I cut a rectangular hole at the top end of the tub to
fit the main support through the tub so that the neck end sticks
out about 7". The top edge of the hole should be about one-half
inch below the rim of the tub. If you cut three sides of the
hole in the tub, it leaves you a metal flap that can be bent and
then screwed into the main support. Later, the neck of the bass
is mounted to the part of the main support that sticks out.
Also, I wedged a wooden block at the top end of the inside of
the tub between the bottom of the main support and the tub
bottom. That block is used to mount the screw eye bolt (using
washer and nut) that will hook to the turnbuckle.

At the foot of the tub, I attached the main support using two
wood screws from outside the tub into the wood. The main support
was mounted about one-half inch below the rim of the washtub,
which gives adequate clearance from the top even when it flexes
during playing.

Also at the base of the washtub, I mounted a wooden block using
four wood screws. The block wedges between the bottom of the tub
and the main support. The block serves two purposes. First, you
need to drill a hole through both the tub and the block to mount
a screw eye (with a washer and nut tightened from the inside) to
which you will later attach the end piece for the bass. The end
piece holds the bottom ends of the bass strings. Also, you need
to drill a hole into the block for the endpin. I used a hardwood
table leg about 14" long for the endpin; it screws into the
block via a threaded T-nut mounted into the wood block.

By far, the most difficult part of the project is cutting and
shaping the neck/fingerboard of the bass. I used a piece of 1" x
4" x 8' length of red oak ($15). No doubt it would be preferable
to use some other hardwood that is less grainy such as "rock
hard" maple or rosewood. First I cut the oak board into two
pieces 35" long each. I overlapped them by 25" so that 10" stuck
out at each end. Then I glued them together and clamped; that
way you have 1.5" thickness for the neck/fingerboard. The top
board becomes the fingerboard and the bottom board is the neck
(See picture 5).

The washtub bass requires the usual sound post and bass bar
that you'll find inside any upright double bass. I took a
small square block of wood (2" x 2" x 3/4") and drilled a hole
into it to fit a piece of dowel (broom stick) for the sound
post. I glued the block to the bottom of the tub (Liquid
Nails), and then I stuck the dowel into it. You need to
position it so that it will contact the top (the table) just
below where the foot of the bridge on the G string side will
be. I also put a thin (1/4") strip of wood between the top of
the sound post and the underside of the top to distribute the
pressure. The bass bar that I used was simply a piece of 1" x
3/4" of pine about 18" long. You need to glue and clamp it to
the underside of the top (table) in a lengthwise direction
roughly where the other food of the bridge will be (the E
string side). The sound post and the bass bar support the
table and keep it from collapsing when under the pressure of
the strings. They have to be finished and in place before you
actually glue down the top to the washtub (using Liquid
Nails). Finally, after the top was mounted, I used clear
silicone sealer all around the rim of the washtub to seal the
top to the tub and fill the crack.

The fingerboard was 3.5" wide at the bridge end and 1.5" wide at
the nut. I used a Stanley hasp to shape it very roughly (to make
its surface gently rounded as you go to the edges) followed by
the use of a long wooden sanding block (3 feet), which must be
perfectly flat. You can staple sandpaper to the block or use
spray adhesive to hold the sandpaper in place. The sanding is
very tedious but must be done carefully to avoid flat spots. You
sand lengthwise with the fingerboard (going with the grain of
the wood) to make its surface gradually curved toward the edges.

The same method was used to shape the neck, but the curving is
much more severe. The best thing to do would be to look
carefully at the neck of an upright bass to see the shape it
should have. The last 8" of the neck at the top end are made
into the head of the bass where the string tuners are mounted.

The tailpiece was cut from the same red oak board. It was 10"
long, 3.25" wide at the bridge end and 1.75" wide at the tail. I
shaped and curved it slightly and smoothed the corners. I
drilled four holes needed to insert the ball ends of the strings
and also cut a thin slot about 1/8" wide coming out of each hole
for the strings to slide into their mounting position. Also, I
carved a shallow slot about one-half inch from the bridge end
and inserted a piece of copper wire for the strings to rest on.
I just bent about 1/4" of the wire at each end and inserted the
ends into small holes drilled into the tailpiece.

To attach the tailpiece, I used a short length of braided
aircraft cable from the hardware store and some cable clamps
(about 1/8" diameter). I threaded the cable through the two
holes drilled into the bottom end of the tailpiece. The two ends
were clamped to the screw eye bolt at the bottom of the tub. My
buddy, Ward Walker used a Dremel grinder to carve my last name
into the tailpiece in a scroll design similar to that used on
the Kay double bass. Many thanks also to Ward for taking the
digital photos used here and sending them to me as jpeg images.

I cut two F-holes into the table (front) of the bass. From
center to center, the F-holes are 6" apart toward the top and
14" apart toward the bottom of the bass. At the top, the holes
are about 6" from the edge; at the bottom, the holes are about
2" from the edge. The curved slot connecting the holes is 3/4"
wide at the widest part, but it tapers down to about 3/8" where
it joins the holes. The bridge will be mounted about 15 inches
down from the top of the table, so the F-holes should be cut
accordingly. You want the bridge to be positioned about in the
middle of the F-holes.

The bridge also was cut from the oak, but you need to be sure
that the wood grain runs horizontally when looking at the bridge
as it stands up. My bridge was 4.5" wide at the base and 4.25"
wide at its top. Its height was 3.25". The slot along the foot
was 2.25" long. Two holes of 3/4" diameter were cut toward the
bottom of the bridge. The two holes at the top were 1/2" in
diameter and then joined by cutting a slot (See picture 6).

The turnbuckle that I attached serves two purposes. First, it
prevents the main support (and neck) from bending under the
string pressure. Second, it allows the player to adjust the
action of the strings (how far the strings are above the
fingerboard). If the strings are too close, they will buzz when
played. If they are too far above, the volume will increase, but
it becomes more difficult to play (it takes lots of strength and
effort to press them down to make a note). The turnbuckle I used
had a body that was 4" long, plus you add the length of the
screw eyes, etc. I mounted a block of wood inside the tub to
mount one end of the turnbuckle using an eyebolt. The other
eyebolt was mounted to the back of the neck (See picture 7).

The neck/fingerboard unit was mounted to the main support via
six wood screws, glue, and an oak wedge (used to get the proper
angle of the neck). The wedge was 7" long, 1/8" thick at the
head end and 3/4" thick at the other end toward the washtub
(See picture 7).

The strings that I used were Corelli Bass strings for a one-half
sized bass, which were a perfect fit. The Corelli brand is
Italian, but the strings are made in France. I ordered them from
Quinn Violins on the internet for about $120. Sorry, but there
is no substitute for good quality, commercial double bass
strings (even the cheapest cost at least $75). I used standard,
nickel plated electric bass tuning machines available at most
music stores (about $25).

Here's a picture of me (Bill Koch) playing the washtub bass in
the beer garden of Player's Rretaurant near the University of
Texas at Austin campus (See photo 1).
Click here to return to Dennis Havlena's webpage.