
The photos kinda tell it all, but I'd better add a bunch of words too:
- Lightly pencil-mark where the bridge sits ond the bridge pad - then do likewise, noting the pad's
position on the instrument's skin head.
- Mark the neck using a pencil at the places where it enters & exits the gourd.
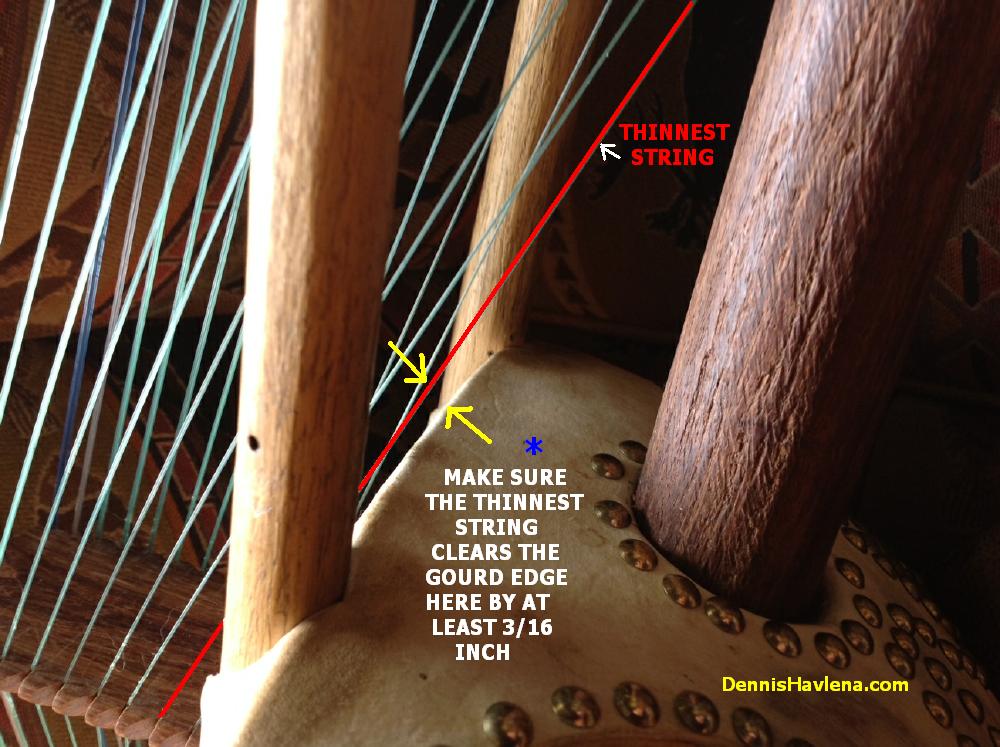
- One of the fussiest things with Kora design, building & setting up is where/how the thinnest string is
positioned as it goes from the ring (or tuner) to the bridge. If too low, it will hit the edge of the gourd,
which will mute it or at very least make it buzz mercilessly. So, at this point in the conversion, observe:
if the highest-pitch string misses hitting the edge of the gourd by ideally 3/16" at it's closest point, note
down the leather ring's location so this measurement can be used as a starting point later on when plotting
the location of the new geared tuners. If the highest-pitched string does hit the edge, or is very close to
hitting it, experiment, using a straight-edge to determine just where the tuner must be located to avoid
this situation. * More about this further on . No other string has this problem.
- Half loosen all 21 strings
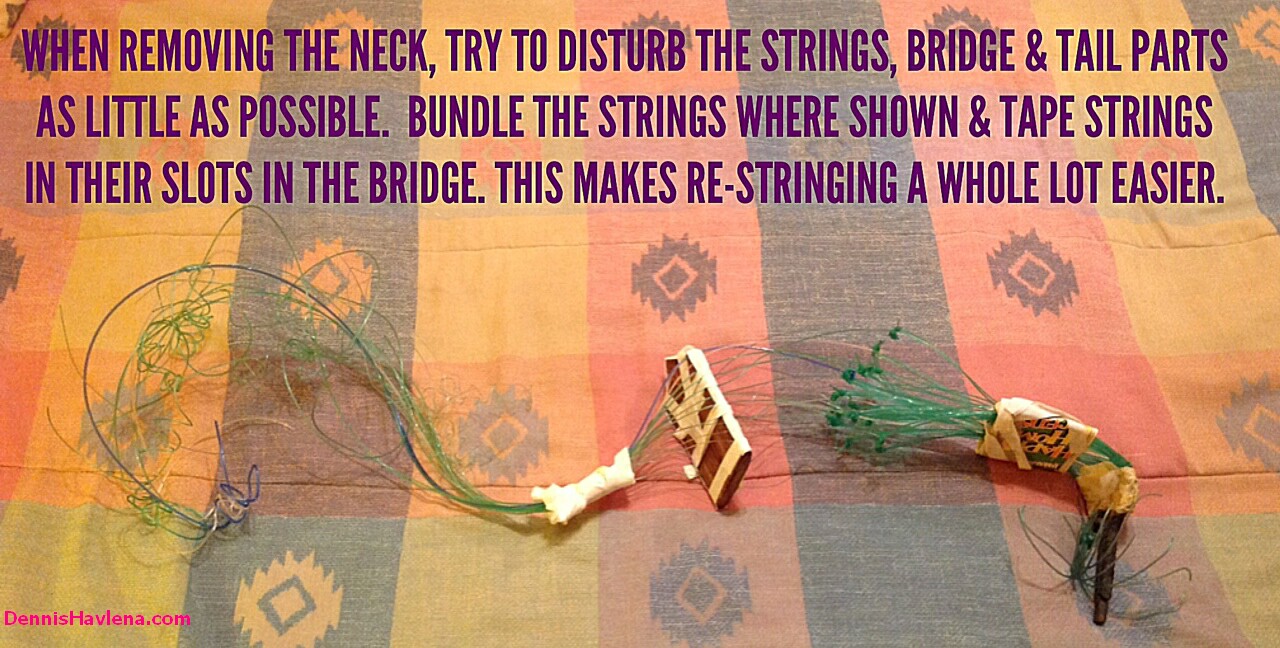
- Bundle (wrap securely) all of the strings together, on both sides of the bridge. I wind on & tie two,
foot-long strips of cloth. The idea here being to keep the strings somewhat "organized" as you take the
instrument apart. I also apply strips of adhesive tape (less sticky/gooey than duct tape) to the
bridge/strings to help keep the strings from falling out of their proper grooves in the bridge. Makes
reassembly a whole lot easier.
- Completely loosen all strings by pulling all of the rings towards the gourd.

- Remove the big bolt (or ironwork) that anchors the strings.

-  Slide the entire neck off of the gourd. Every Kora I've ever seen has an easily removable neck, once the
strings are removed. Careful twisting helps if it doesn't want to move.

- Remove all strings from their rings. Leave the bolt, bridge and strings together, as a unit, to
facilitate reassembly.

- Slide all of the rings off of the neck.
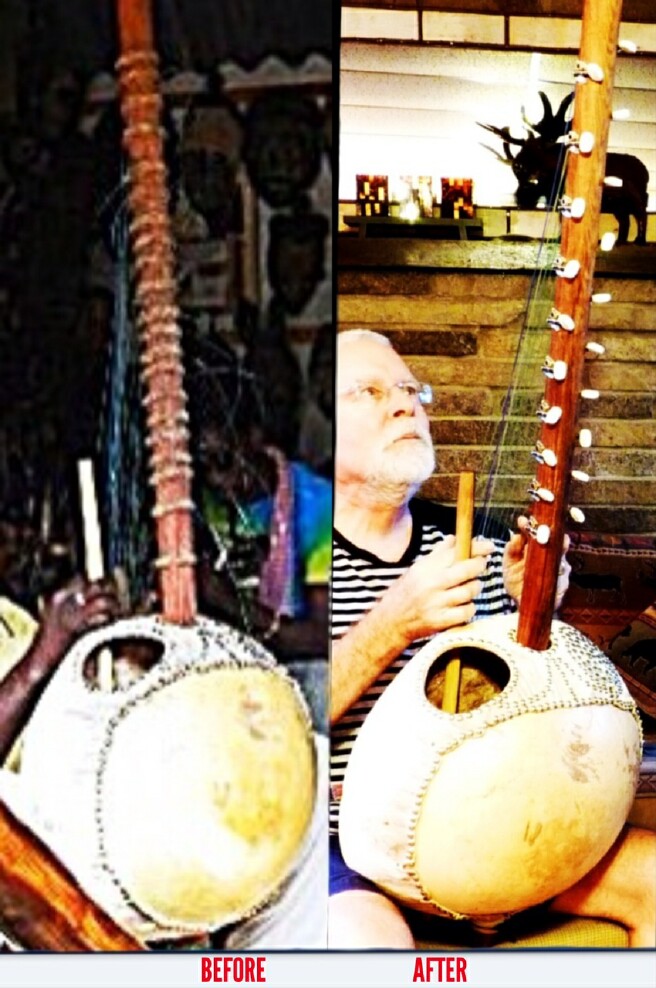
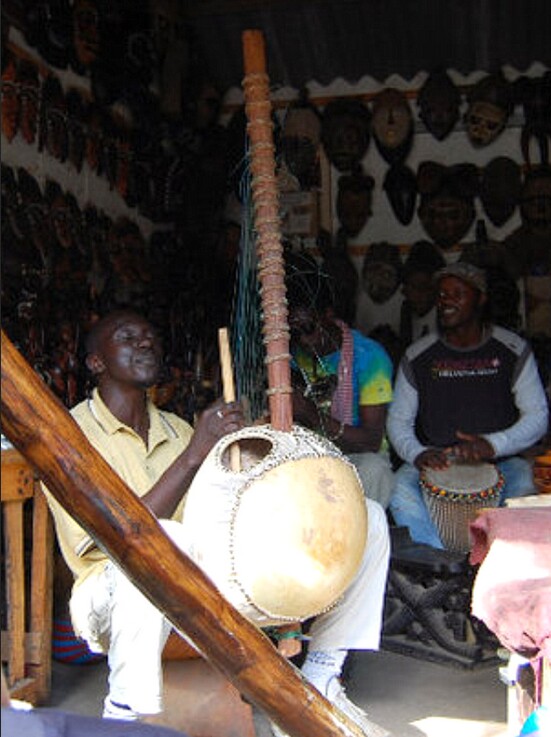
Here's a photo of this same Kora, with it's original leather tuning
rings, being played by it's builder in the Gambia:
-  I screw on a long strip (something like 2 inches wide & 1/4 inch thick or so) of flat wood along the exact
bottom of the neck - it's purpose is to help keep the neck from rolling about,  to prevent the vertical 1/2"
diameter string access holes from ending up being drilled at bad angles. Take pains to ensure this strip is
fastened as close as possible along he exact bottom of the neck (small shim wedges can make this easier).
Three screws should hold nicely.
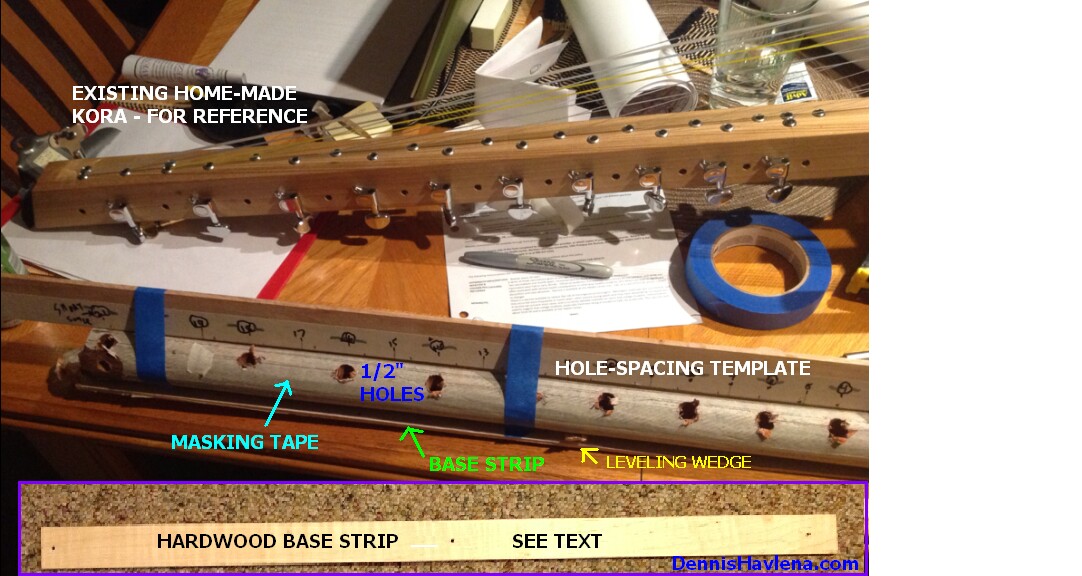
- Flip the neck over and lay a strip of wide masking tape down the center for the entire length. Carefully
scribe a line down the length of this tape that represents the exact top (center-line) of the neck.
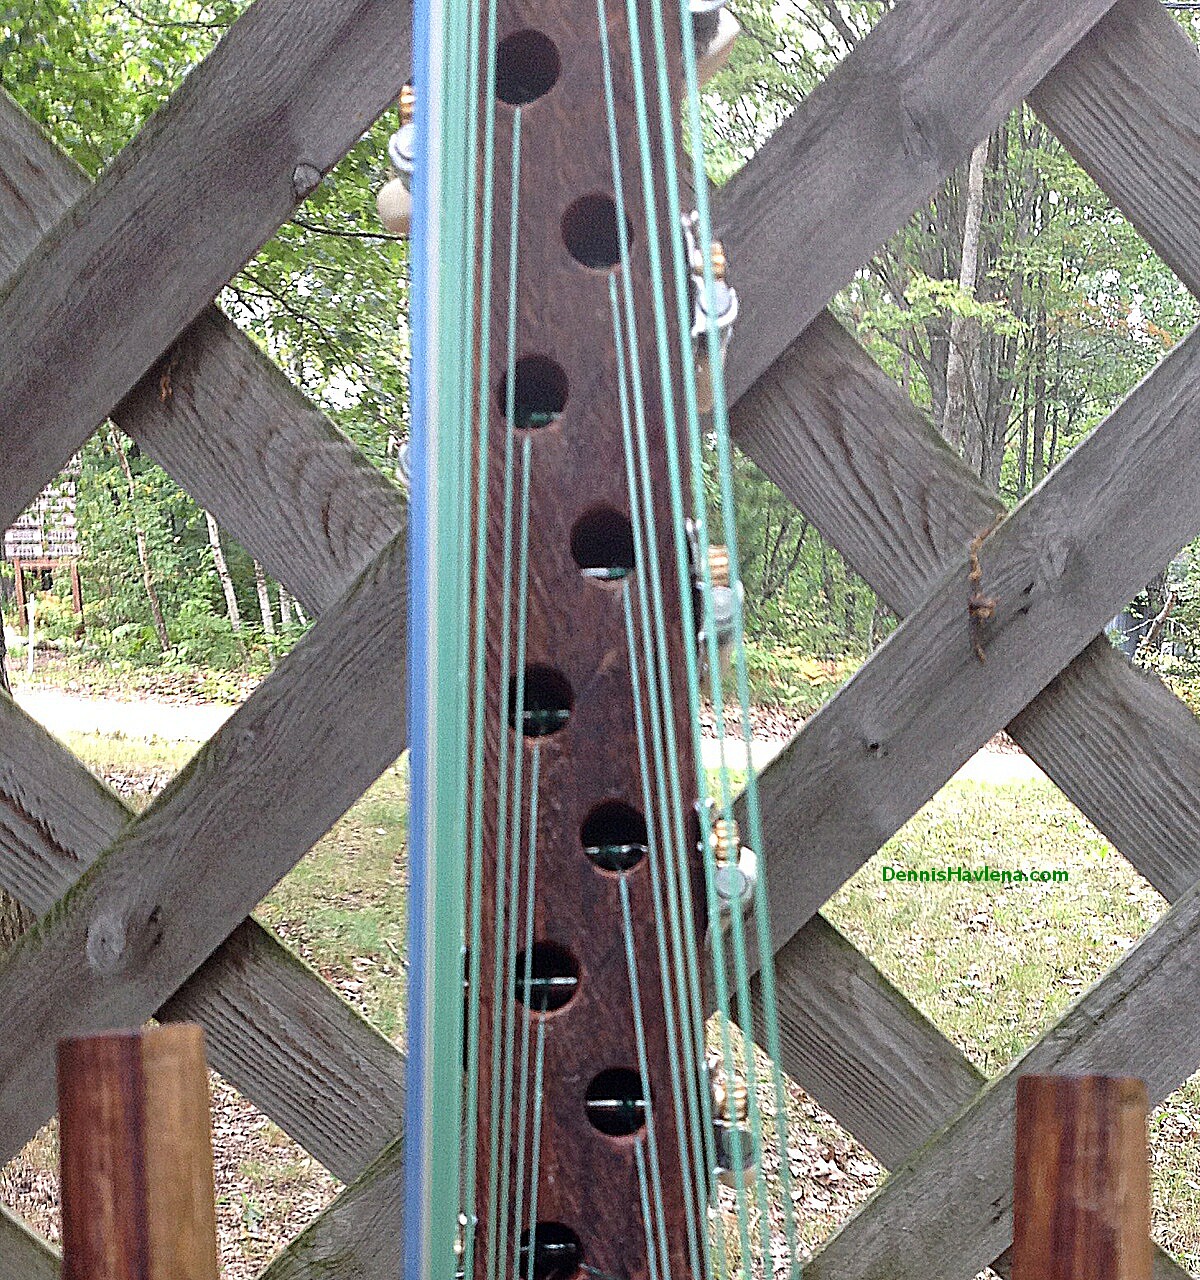
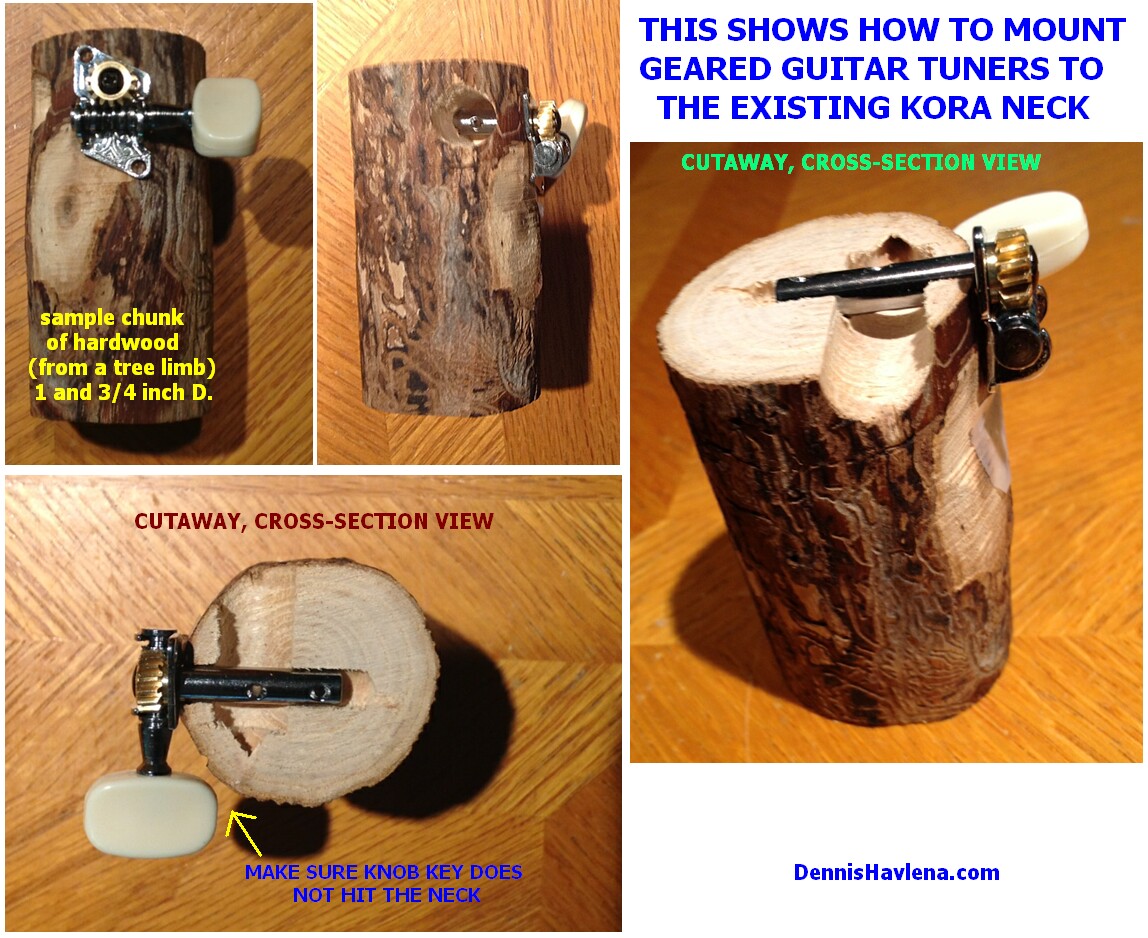
- There are two main holes that have to be drilled in the neck for each tuner (other than for each tuner's
tiny fastening screws):
1) a 1/2 inch diameter hole, drilled vertically into the top-side of the neck, but stopping a bit short of
going all the way through the neck. This hole allows access for the string so the string can be inserted
through the hole in the tuner's metal shaft.
2) The hole for the metal shaft of the geared tuner is then drilled 90 degrees horizontally into (and a
bit through) the middle of the 1/2" hole. The metal shaft of the tuner is inserted into this hole.
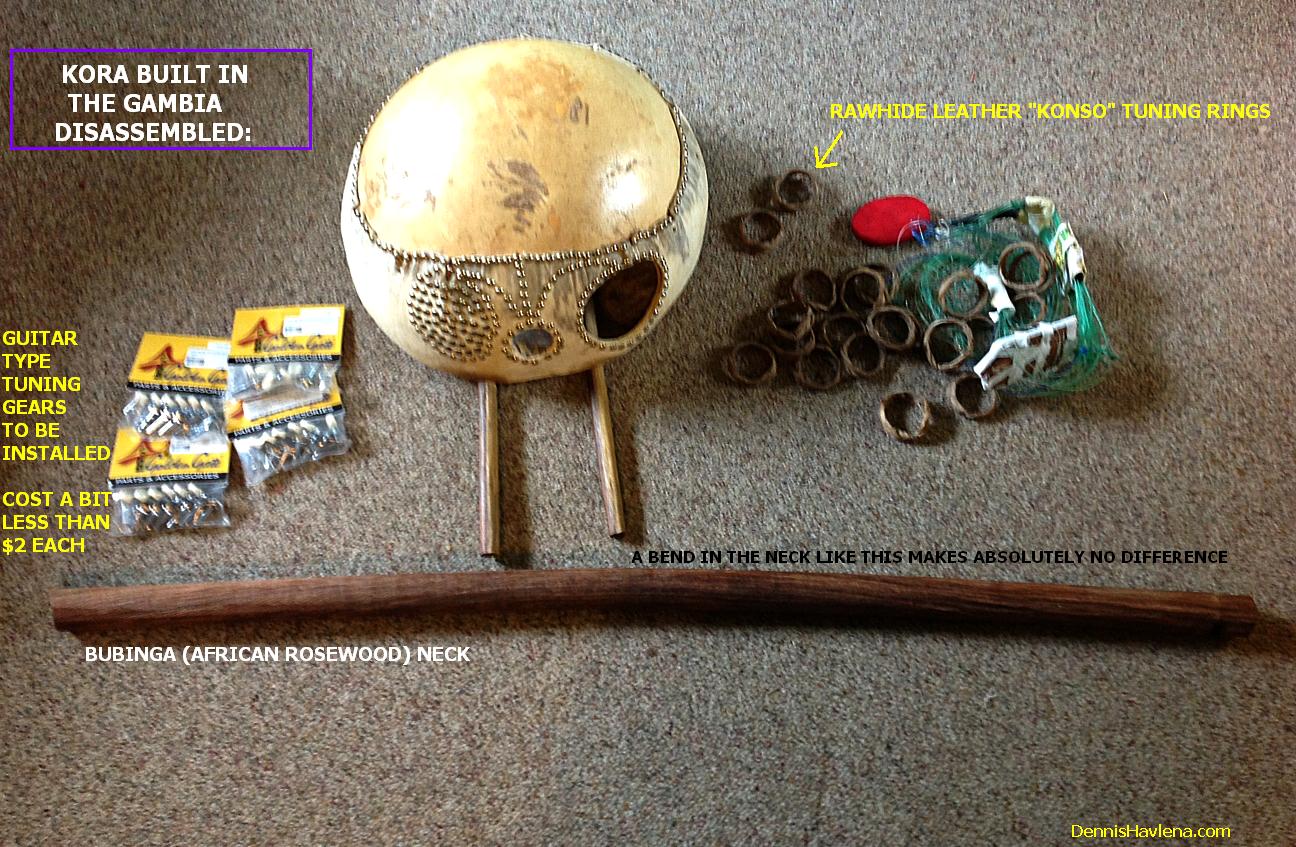
- Although just about any sort of guitar type geared tuner can be made to work here, I really like Elderly
Instruments (elderly.com) part number "GTM 21" guitar-type open-geared tuners. They're cheap (a bit less than
$2 each) and wonderfully reliable. I've used well over a thousand GTM 21 tuners over the years without a single
failure or any complaint whatsoever. Although I have used expensive covered tuners (where the gears are
covered) on past Koras, I now find them way too heavy and overkill. Having said that, I did use one such
fancy tuner on this current conversion --- for just the thickest string - it, theoretically at least, being a
ble to better handle the thickest string's extra tension. GTM 21s have never failed me for this thick string
though. Also, I like to mount the thickest-string tuner "upside down" - with the knob pointing up instead of
down --- makes it easier to lean the instrument against a wall. You'll likely have to drill the hole in the
thickest-string's metal shaft a but bigger so the thick string will fit into it.
- How to determine where to mount individual turners:
This is a bit tricky to explain --- Let's start with the left side of the Kora neck. The job here is to
calculate carefully just how the tuners should best be physically located on the neck. There's not that much
room for error. GTM 21s work nicely for Kora necks on the order of 1 & 3/4 inches diameter but will also
work on smaller diameter necks as well as larger ones (you may have to whittle or file a bit for tuning-knob c
learance - no big deal - master Kora makers at Senegal's Keur Moussa workshop routinely do this. They use a
rather large "cut-away" which is a bit of a hallmark of their current design.) The idea is to locate the
vertical 1/2" diameter hole so that the string-hole in the metal shaft of the tuner will be readily visible
(& accessible) when you look down into the 1/2" diameter hole. Once you determine this, plot all remaining
holes on the left side of the neck accordingly. Repeat this whole process for the right side of the neck.
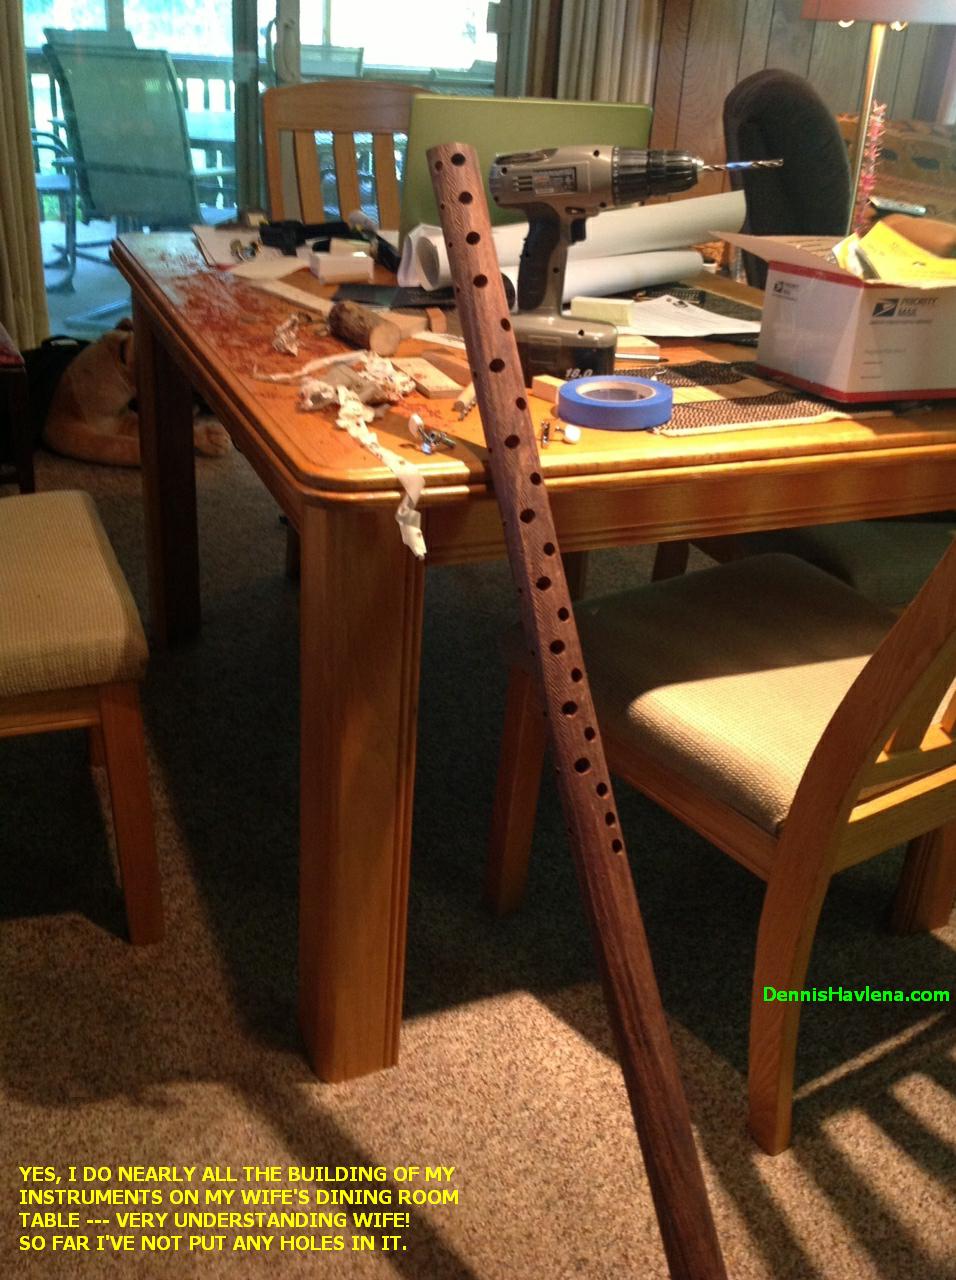
When plotting where to drill a 1/2" hole, make very sure that the drill bit won't drill through the side of
the neck. Also, don't drill all the way thru the neck. I first use a 1/16" drill bit to make a pilot hole
for a 1/2" spade bit. Then I clean up & deepen the hole using a regular 1/2" drill bit. It might be a good
idea to practice on a scrap piece of same diameter wood - I used a length of tree limb.
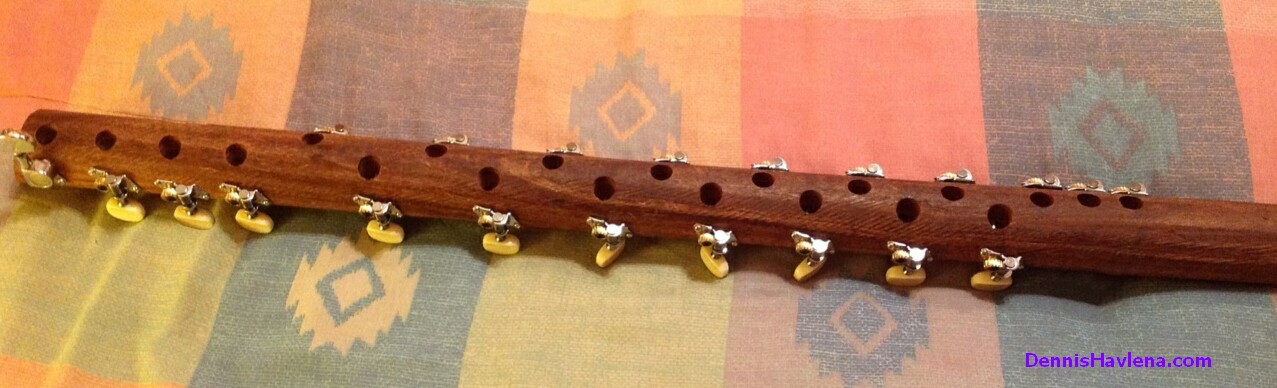
- As to just where along the neck to locate the tuners, it's not a good idea to simply replicate the same
spacing as on the unmodified instrument, because the leather ring's position along the neck is dictated by
the pitch that the strings need to be tuned to, one ring  may end up almost touching it's neighbor, while
another two rings might be separated by as much as two inches.  Realizing this, a certain degree of asymmetry
here is normal and acceptable -- still, with geared tuners I nonetheless try for an orderly placement --
widest separation between strings at the far end of the neck - the spaces becoming gradually (not haphazardly)
narrower as you go up the neck. While obtaining good string spacing using geared tuners is much easier to
accomplish than when using leather rings, there are a few situations where tweaks might be needed to give
even better spacing, due to the multiple variables involved. Such tweaks might include: using a small screw
to "fret" a string a small distance closer to the bridge might be necessary, as might using a small screw to
align an errant string into it's proper plane. Also you may need to file a small notch into the lip of a 1/2"
hole to redirect a string - all minor, easy tweaks.  Although geared type tuners are not designed to work on
a round neck, they can easily be made to perfectly do so with a minimum of finagling.

-Locate the thickest-string tuner at the same place on the neck that the thickest string ring was, on the
original, unmodified Kora. Then plot the highest pitched string's tuner's position using the information and
measurement obtained in the 3rd step above.

- I have included an illustration showing the tuner spacing dimensions I used on the current Gambian-built
Kora that I just finished converting tonight.  NOTE that you may have to interpolate for your Kora's
particular string length etc. --  I present my measurements only as an example.  Have to say that tuner
placement (& string length) is not really THAT fussy -- it can vary an inch either way & still
work/sound/play great.

- The _____" diameter horizontal hole for each tuner's metal shaft is located & drilled mid-way up the side
of the neck. Plan this carefully -- you want this hole to intersect the vertical 1/2" hole right through
it's middle.  Make this hole deep enough so the tuner shaft won't bottom out.
- Using a vise-grip or pliers, bend down one or both of the screw-hole mounting tabs on each tuner until the
tuner's base more or less conforms to the neck's curvature. Be careful not to over-tighten the tuner-mounting
screws as the heads twist off easily.
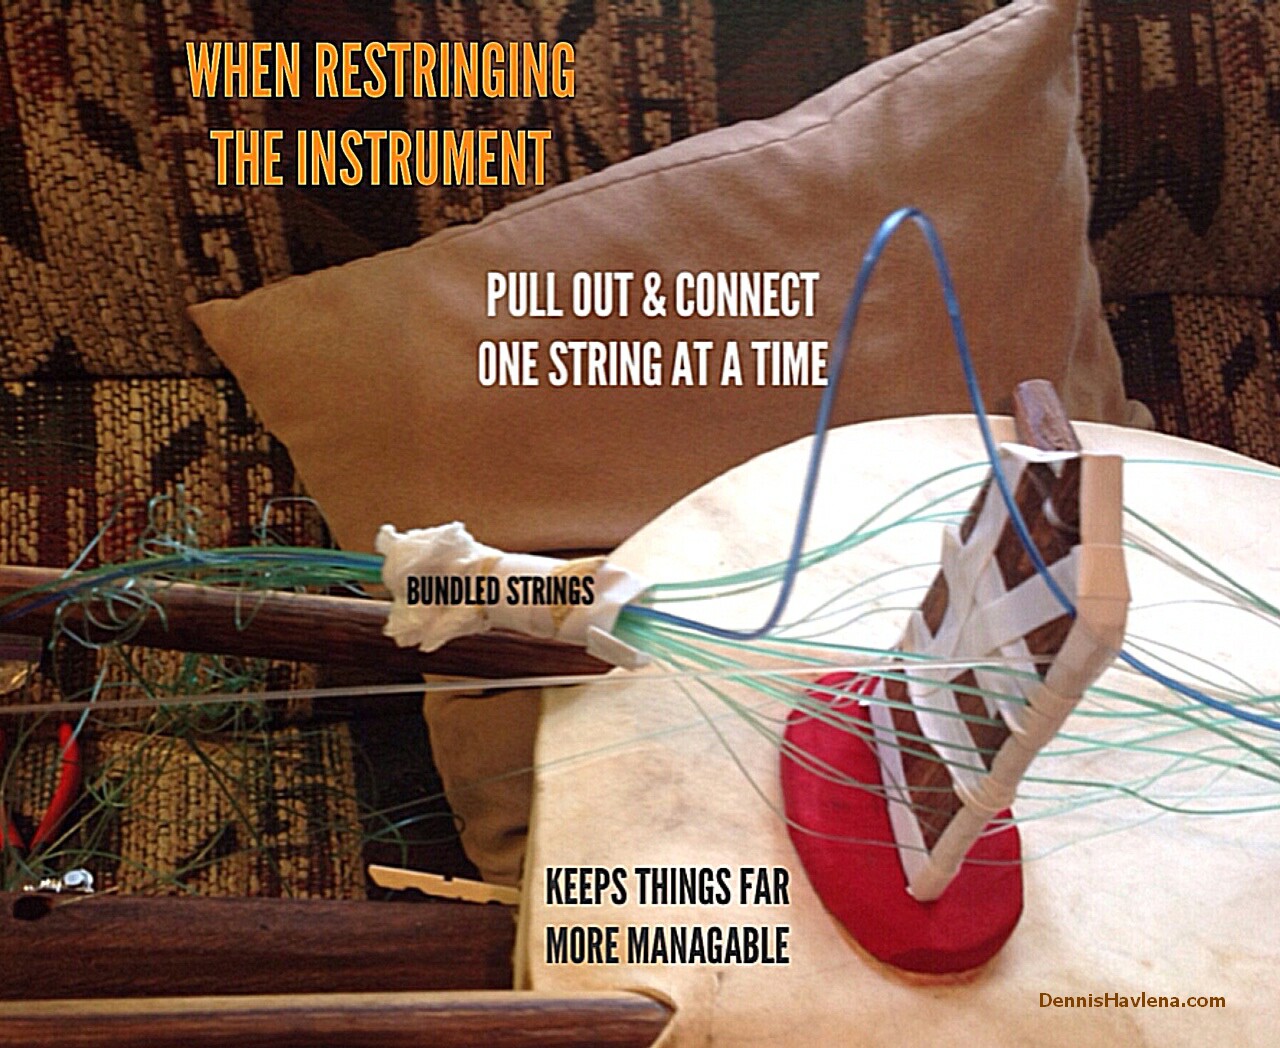
- When stringing up the newly converted instrument,  make sure the pencilled marks showing how far to insert
the neck through the gourd line up properly. Until full string tension is on, you may have to, as I did,
temporarily wedge a splinter of wood between the neck and a gourd opening (best to put this wedge on the
bottom side of the neck) to old the neck at the proper place through the gourd. Put the bridge & bridge pad
in the place you marked earlier on the skin head and start stringing up. The bridge will want to keep falling
over until more strings are added -  keep straightening it as needed.  I suggest pulling one string at a time
through the tied-up bundle (the bundle that is on the tuner side of the bridge). This makes restringing far
easier & less haywire. Each string will have to be shortened - be careful not to cut it too short.
Don't bring the instrument up to full pitch yet - just make it so each string is somewhat tensioned.
I put a few of the thick strings on first to help keep the bridge upright Then I work from thin string to
thick. A pair of needle-nose pliers or better yet a surgical hemostat greatly facilitates this process -
this job is almost impossible without one of them.
I wrote this article with a bit of hesitation ---- I'm not real fond of advocating the modifying of some
African Kora-maker's handiwork but if you truly  can not or do not play your leather ringed Kora because of
the difficulty of tuning using the rings - and if it's not a real historic or otherwise precious instrument,
then I believe it's better to make a modification of this sort - certainly better than having a nice instrument
languish, unplayed, in a closet somewhere (or worse yet, screwed to the wall as a decoration). Having said
all this, there is another alternative -- find a piece of wood,  locally, of the same diameter & put the geared
tuners on it. Our local Home Depot sells 1 & 3/4" diameter, long "closet rods" --  made of beautiful Tulip
(aka Yellow) Poplar hardwood that'd be perfect for this conversion -- leaving the original Bubinga (aka African
Rosewood) neck intact, should it ever be desired to return the Kora to it's original, unmodified configuration.

Way (WAY) too many words! Makes this conversion sound complicated -- it really isn't tho.

Now - later note - yet more words!:
In defense of the leather-ring "Konso" tuning system:
-  It's not THAT hard to keep strings in tune! My opinion is that just the
   lowest-pitched five strings are a bit difficult & take a bit of muscle
   to keep in tune, generally necessitating leaving the playing position --
   even so, they're not that stubborn to coax into tune. The upper
   majority of strings are fairly easy to tweak from the playing position.
-  In my mind, there there is even an advantage to the konso system --
   if any of the strings show themselves to be too high pitched, generally
   all that is necessary to lower them to pitch is to tension the offending
   string with your fingers & thus lower it's pitch - this finger stretching
   is a lot easier and quicker than farting with a guitar-type gear.
-  I dearly love the ever-so-simple, ancient, time-proven traditional
   konso ring system. It has a decided charm vs guitar tuners.
Having said all this, I know a dear lady who did not play her kora
on account of the relative difficulty of having to use konso tuning,
thus this article...

* Here are a few ideas to deal with thinnest string hitting the edge of the gourd problem:
- loosen the strings and slide the whole neck through the gourd a bit so that the neck is effectively longer
- move the bridge/bridge pad a bit towards the tuner end
- put a flat hardwood shim under the bridge to raise it a bit
- Add a "fret" (wood, small screw or ?)  to raise the end of the thinnest string just after it emerges from
the 1/2" hole. If this "fret" is too high, you'll have to add progressively shorter "frets" to a few of the
"down-neck" strings to level things out.
- if all else fails, make a new, taller bridge. Sounds hard but anyone can do it.

I put so much time and energy into this article because the results work so well and once the dimensions are
worked out for your particular Kora, the actual conversion is pretty easily made.

HEY -- TALK TO ME! I SOMETIMES GET THE FEELING THAT THERE ARE JUST A SMALL HANDFUL OF FOLKS INTERESTED IN
PLAYING, BUILDING AND EXPERIMENTING WITH AN INSTRUMENT AS RELATIVELY OBSCURE AS THE AFRICAN KORA!
PLEASE LET ME KNOW IF YOU READ THIS OR IF YOU HAVE ANY INPUT, QUESTIONS, IDEAS ETC.
THANKS Dennis dhavlena@gmail.com

Dennis Havlena - W8MI
dhavlena@gmail.com
sEPTEMBER 4, 2013
Mackinac Straits,
northern Michigan
dhavlena@gmail.com
DennisHavlena.com
Click here to access
my webpage