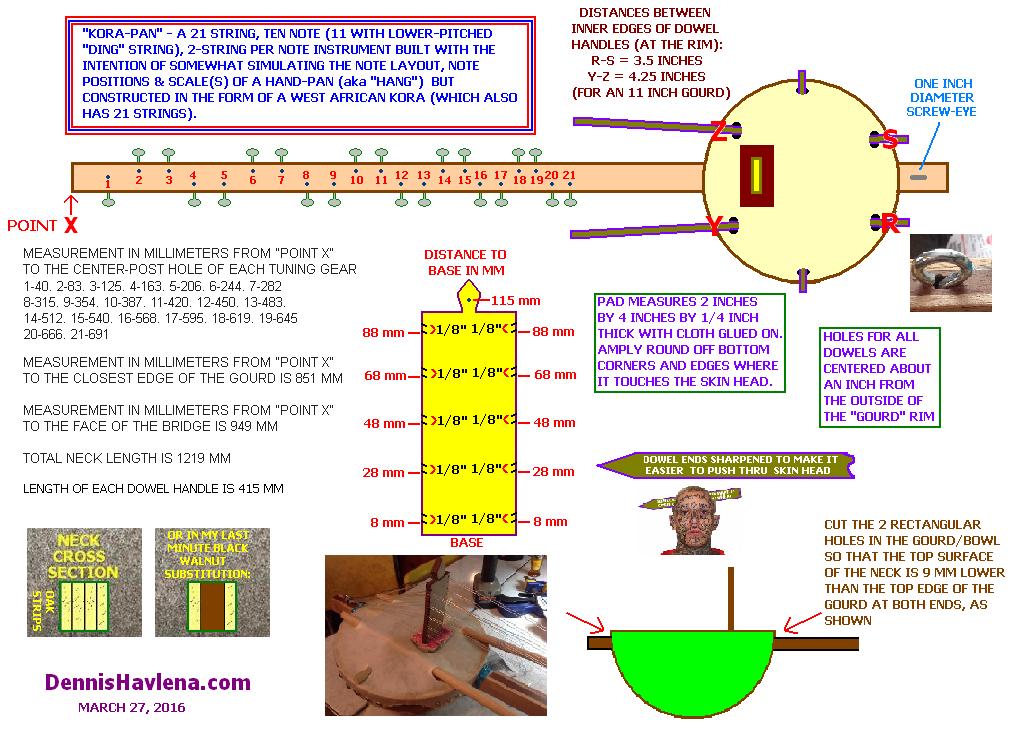
How to build a "kora-pan" -- essentially a ten note, 2-strings per note
(plus one lower-pitched "ding" string), instrument built in the form of
a West African kora. It's tuned to hand-pan scale(s), it's note's are
laid out in a manner that hand-pan players'd be familiar with. A kinda
hybrid combination of a hand-pan and a kora.
I've built quite a few koras over the years. My latest experiments
involves converting an unused kora into a number of different instruments
-- first one being a ten note, two strings per note (12-string guitar
effect) "n'kora".  Second being a chromatic, ten note , two strings per
note affair. Lastly, this current iteration - a ten note, two string,
with a single low note (corresponding to the "ding" of a hand-pan)
instrument -- a "kora-pan" if you will (for lack of a better name).
Apologies to hand-pan players (I am one) for this "mis-use" of the
name "pan" ('tain't no "pan"at all). This instrument nicely approximates
the scale, "right-left-right-left" note location and the ding note of a
regular hand-pan, with a few extra high notes thrown in for good measure.

Any hand-pan player could pick this thing up and play it.  The kora-pan can
be tuned to any handpan scale. I currently have it tuned to the same "Ursa
Minor" scale as my Halo handpan but because I wanted to play in the key of D,
I configured the string gauges to be optimum for sounding the Ursa Minor
scale in the key of D, but with each string tuned eight half-steps higher in pitch:
Ursa Minor scale of my handpan:  B (Ding)    F#  G   B   C#  D   E   F#
Ursa Minor scale on my kora-pan: G (Ding)    D   Eb  G   A   Bb  C   D   x   x   x
(there are 3 extra high notes available on the kora-pan). As you can see, it still
plays in "Ursa Major" scale, just higher pitched overall. A planned project is to
experimentally reconfigure the strings to play the Ursa Minor scale at the same
pitch as my Halo, but I'm suspecting that this may be too low-pitched to sound good.

(Often when experimenting, I'll convert one instrument into another
then into another & occasionally into yet another instrument. Because
I always try to document my experimentation by posting construction
articles on my webpage, DennisHavlena.com, I've been known to refer
readers to my previously posted articles to see pertinent construction
details. I can see where this referring here and there might be confusing.
So, with this "kora-pan" article, I will keep this referring to a minimum.
In addition, I'll detail the entire construction in this single article here.)

Construction info:

I used a $20 Ikea 11 inch pieced-bamboo salad bowl in place of a gourd. This
sturdy Ikea bowl is a bbit over 1/4 inches thick. It's Ikea number is
602.143.4321926 & should be available at any Ikea store. Of course, most any
other bowl of similar size and thickness should work as well. The skin I used
is an 18" piece of not-too-thin goatskin rawhide. The neck consists four pieces
of Lowe's 1&5/16 x 1/4 x 48 inch solid Oak "trim" strips glued together to make
sturdy 1" wide neck. Model GTM-21 guitar tuners from elderly.com work great
for tuning.

Skin attachment: For some reason I find that a lot of folks think it difficult
to mount skin heads. Not so at all. With this smaller than usual head diameter
(11"), I did not use the normal "tie/pull/stretch - bands around the bottom"
method. Instead, I merely soaked the skin in warm water an hour or so, til soft
& pliable, dried off the excess moisture with a bath towel, then simply tacked
it onto the bowl rim about every 5/8 inch or so - pulling tightly on opposite
sides (north then south - east then west etc) as the tacking proceeded. Even
when still wet, the fully tacked-on head had a nice drum-like resonance & once
dried, was perfectly tight. The bowl material is very hard and quite un-nailable
so I pre-drilled holes for each tack as they went in. Easy. A 1/16" drill-bit
worked fine for my tacks. I advise smearing some Tite-bond wood glue all around
the rim top and a bit down the outsides before tacking on a skin head. Cheap
insurance. No exact diameter of skin is called for -- if you have a large skin,
just drape it further down the bowl & tack. My skin allowed me a roughly two
inch overhang which is fine. After tacking, reconfirm where the six holes for
the handles & cross-brace will pierce the skin at the locations described & mark
with a Sharpie dot. When inserting handles & cross-brace through holes in thicker
skins, all I've ever done in the past was to poke a nail-hole thru the skin &
simply enlarge this hole with the stick - the end of which being temporarily
pointed/tapered for this purpose. However, I quickly saw that the somewhat thinner
goat-skin could possibly tear slightly around these holes - this problem was
circumvented by cutting small circles (about half the diameter of the sticks)
out of the skin at the Sharpie dots before proceeding with the enlargement using
the stick's tapered end. Insert the cross-brace first, then the two handles, which
are carefully routed atop the cross-brace (taking care not to pierce the skin)
before resurfacing at the hole opposite. Make sure the handle rods protrude far
enough. Careful light hammer taps can facilitate this process. In warm and sunny
weather, set the whole mess outside to dry & tighten in the sun - takes a bit
longer to dry inside. The goat-skin used is not as thick as the hide used on most
koras but I am positive that it will hold up (much later note - it has). The
dowels are 5/8 inch diameter for handles & 3/8" diameter for the cross-brace. With
the skin drying/tightening, attention is turned to Making the neck.

Building the neck is simple &
straightforward, requiring only a bit of careful measuring & glueing/clamping.
I purposely opted here to build this Kora to use a laminated neck - it being
stronger and less apt to warp than if using solid hardwood. The idea is simply
to glue together four 1 & 5/16 inch by 1/4 inch sticks of readily available Oak
"utility strips" sold at Lowes, Home Depot etc for about $12 total. Use a lot of
clamps and scrap wood to ensure a good job. Once dry, plane or sand the four
surfaces flat & smooth - nothing real critical. I ended up kinda cheating a bit
here and diverged from my above-mentioned plans by making my neck out of stuff I
had on hand instead of the four Oak strips mentioned above. I had some 1/2" thick
Black Walnut (got for a good price at Habitat for Humanity), so I made a sandwich:
1/4" x 1&5/16" x 48" Oak "trim" strips glued & clamped on either side of the 1/2"
x 1&5/16" x 48" piece of Walnut. Looks nice - but the Black Walnut is certainly
not necessary.

Carefully plot the location of the two rectangular holes in the "gourd" through
which the neck passes and cut them as close-fitting as possible. I used a hacksaw
blade (minus frame), a few files and a dremel tool. Again, it's not that fussy -
if you goof up and make the hole too big, the downward string tension of the
completed instrument will compensate and keep everything tight.

I did not use the traditional Kora method of tieing off the strings - instead I
used a much simpler method -- tieing the strings directly to a hardware-store
eye-bolt mounted vertically through the end of the neck.

The sound hole I cut is larger than needed, but I had this diameter hole saw &
figured a bigger hole'd let out more sound (duh). Pretty much any sized hole
within reason will work.

As for making the bridge: I sometimes use small holes in the bridge for the
strings to pass through instead of slots - but slots are easier when stringing.
Angle the slots slightly downwards towards the center of the bridge to keep the
strings in place. The neck need not be affixed into the two gourd holes, as the
string pressure will hold everything in place - having said that, I sometimes do
glue the neck into the gourd holes - keeps things a bit simpler during construction.
A "guy-wire" or cord is necessary to keep the bridge vertical and keep it from
tipping over. Wire or nylon cord works equally well. The photos show this guy-wire.
Note: with full string tension, it is very normal for the bridge to "sink" into the
skin-head considerably. This is normal & nothing to be worried about (check photos
of any African Kora on the internet to verify this). The guy-wire may have to be
readjusted to keep the bridge upright. The amount of the neck sticking past the
lower end of the instrument is not very important. Just make sure you leave enough
so that the tie-off eye-bolt is securely mounted. Once the strings are on, locate
the left side of the bridge face 944MM from "point X" (944mm string-length).

STRING GAUGES IN THOUSANDTHS OF AN INCH (regular monofilament fishline used
throughout. a thousandth of an inch or so either way makes little difference):

#1- .038
#2- .036
#3- .036
#4- .036
#5- .036
#6- .028
#7-  .028
#8-  .028
#9-  .028
#10-  .023
#11-  .023
#12-  .023
#13-  .023
#14-  .019
#15-  .019
#16-  .019
#17-  .019
#18-  .019
#19-  .019
#20-  .019
#21-  .019

This thing is a good deal of fun to play. The 2-strings per note bit really
enhances the overall sound. Same as with a hand-pan, this instrument lends
itself far more to improvisational music than to songs --- I play both
hand-pan and this thing & they feel very similar in this regard.

I'll try to add a short sound-sample here, hopefully shortly.

Thoughts? LET ME KNOW IF YOU BUILD ONE !! PLEASE. I ONLY RARELY GET FEEDBACK!

Dennis Havlena
dhavlena@gmail.com
http://DennisHavlena.com
Click here to access my webpage
Keywords: kora n-kora kora-goni goni-pan goni havlena diy build
construct cheboygan dakar