
Click here to access
my webpage

Once all parts are secured, the construction entails:
CUTTING THE GOURD IN HALF. Use the roundest, most regular part of the gourd. Remember
however that nothing's perfect & as far as the instrument and it's sound is concerned,
absolute hemisphereicality (is that a word?) is relatively unimportant. I affix a few
sheets of course sandpaper to a 2 foot square of plywood & by rotating/agitating the cut
edge on this sandpaper, a nice, flat surface for mounting the skin head is obtained.
Round off the inside & outside edges of the sanded rim a bit so the skin doesn't have
to make a sharp bend over it.
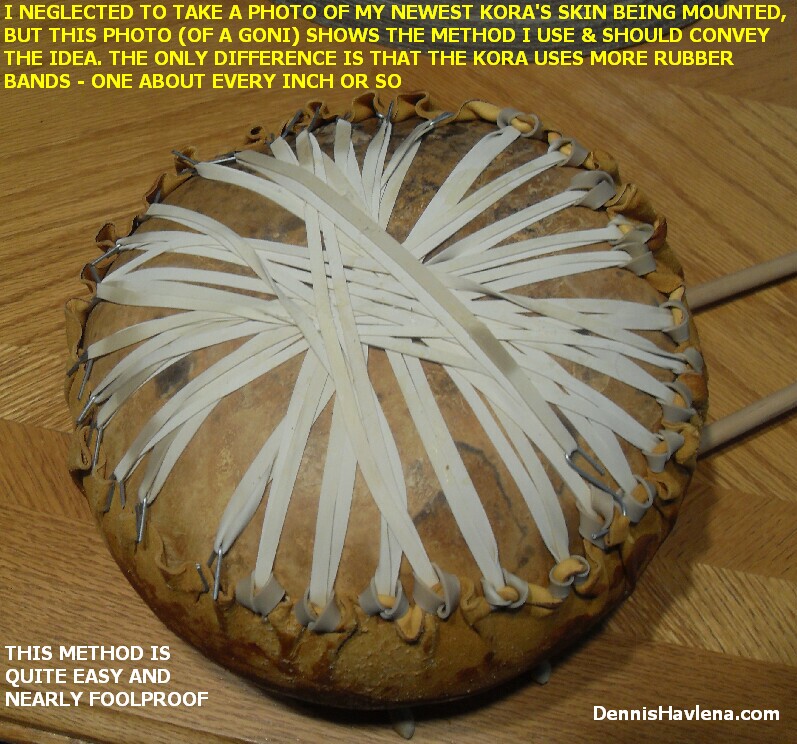
ATTACHING THE SKIN TO THE GOURD:
This scares off a lot of folks but it's very simple for even a beginner to do.
Cut the skin to the diameter of the gourd rim PLUS at least 4 or 5 inches out of the best
looking, thickest part of your hide. It doesn't even have go be round.
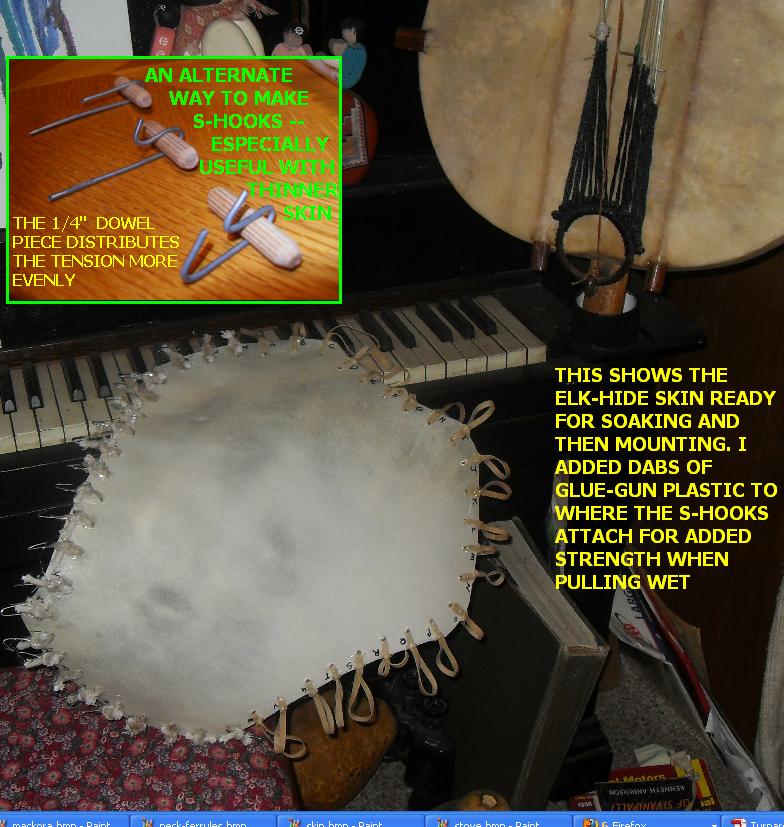
Leather punch (or drill) an even number of 1/8 inch holes (an inch +/- apart & a half
inch from the edge) in the stiff, dry rawhide. The rubber bands and the wire skin-tensioner
hooks go through these holes.
The skin-tensioners in conjunction with the rubber bands are used to pull the skin tightly
over the bottom of the gourd while it's drying & being tacked into place & consist of
big office/postal size #64 rubber bands hooked to hand-made S-hooks easily fashioned out
of inch & a half lengths of pencil lead thickness steel utility wire. When it comes time
to stretch the hide, the rubber bands which are pre-looped through the punched holes in the hide
are stretched over the gourd's bottom and hooked to S-hooks 180 degrees, on the opposite side.
Soak the skin overnight in baby-bath temperature water - no hotter.
Utilize this soaking time to as far as possible at this stage plot the location where the
wooden cross-brace and the two handles will pierce the mounted skin. The measurements in
my illustration have worked for me right along. Also, this is a good time to get the
handles and cross-brace ready. Refer to the diagram for dimensions etc. To make it easier
to coax the handles & brace through the wet, tightened rawhide, sharpen one end of each
to a semi-blunt point.
Lay the soaked skin on half a bath towel & flop over the other half of the towel to
soak up excess surface water.
Just before mounting the skin I like to smear some Titebond glue along the gourd's rim and
along the top inch or so of it's sides. Cheap insurance methinks.
With the skin lying best-side-down on a flat surface, center the gourd opening atop it.
Then it is a simple matter of stretching each rubber band across the gourd's bottom &
hooking it to the appropriate S-hook (180 degrees across).
Let everything sit this way for a couple of hours before tacking the skin in place.
Because I had them and have seen nice Koras made using them, I secured the skin to the gourd
with small sheet-metal type screws (predirlling the holes first) which turned out to work fine.
More commonly, Upholstery tacks and/or linoleum tacks are used for this purpose and will
certainly work here. Nothing critical - I just try to put the tacks so the EDGES of the heads
are spaced about 2-4mm apart.  Both African and American gourds are somewhat spongy, once you
get past the harder outer shell -- this means you can (carefully) just hammer the tacks in,
though it doesn't hurt to pre-drill a smaller guide-hole to insure against splitting the gourd.
I do this a lot. If you use a wooden "gourd" or other "not-gourd", pre-drilling is a necessity.
After a couple of days when the skin dries further, tighten all the screws a bit more (or tap
the tacks home gently).

It is impossible, here and in Africa, to avoid wrinkles in the skin - especially towards the
perimeter of the stretched skin -- this too is very normal and accepted.

There's no need to cut neck or sound holes yet.

After tacking, reconfirm where the six holes for the handles & cross-brace will pierce
the skin & mark with a Sharpie dot. I poke thru these dots with an awl, then, starting
with the cross-brace, I insert the pointy end & slowly, carefully twist & pierce my way
thru one hole and exit the far hole - both ends overlapping the gourd rim. Careful very
light hammer taps can facilitate this process. Follow similarly for the two handles,
which are carefully routed atop the cross-brace before resurfacing at the hole opposite.
Make sure the handle rods protrude far enough towards the tuning end of the neck.
In warm and sunny weather, set the whole mess outside to dry & tighten in the sun.
Alternately, atop a piano or cabinet inside dries things nicely too in a couple of days.
PS: I find it useful to permanently bend the cross-brace a bit so that the handles don't
end up bent too much -- wet the wood and (with gloved hands) get the area you want to bend
quite hot over a stove element - well short of scorching though. Once at the desired bend,
run the wood under cold tap water to set it. There's no need to thoroughly dry it before
putting it through the skin. When the skin is thoroughly dry, trim off the excess. Toenail
scissors work great for this!

With the skin drying/tightening on the gourd, attention is turned to
MAKING THE NECK.

Building the neck is simple & straightforward, requiring only a bit of careful measuring
& some repetitive drilling, glueing/clamping and tuner installing.

This neck is made like a sandwich. Two pieces of bread & a similarily shaped middle
piece which is cut away only in the areas where for strings wind on the pegs (the assembled
neck in the peg area resembles an upside-down "U").  The sandwich is glued, clamped and
left to set overnight.  The "U" faces downward & the strings exit through holes drilled in
the topside of the "U", above each peg (& a quarter inch closer to the gourd). Into these
holes I inserted guitar tuning machine bushings. Modified small rifle empty cartridges make
great bushings too.  The bushings keep the strings from possibly cutting into the wood
where they exit the topside of the neck. File the inside edges of each bushing smooth where
the strings ride over, as these edges tend to be a bit sharp.Bushings really
are not even that necessary - monofilament nylon fish-line riding over hardwood only causes
minimal "indentation". I've used "no bushings" a lot with no trouble.

Even tho I could have used hard hardwood for this new neck,  I chose Tulip (Yellow) Poplar -
beautiful hardwood that easily handles the string tension.  Having said that, really
any hardwood will work nicely for the neck.  Somewhat against common sense, I've even had
softwood such as pine work fine for a Kora neck! A little neck bend is absolutely ok. My
"cookie-tin" Kora's neck is pine and it's well into it's second decade with no problems.

The soundhole on this instrument is oval and measures 83mm wide by 63mm tall. Not critical.

I mounted the electric bass tuner, for the lowest-pitched, thickest string, so it's tuning
paddle is oriented upright. Reason for this is that if it were downward, you couldn't as
easily lean the instrument in a corner - the tuning paddle would hit the wall.

Here are details for making the bridge:
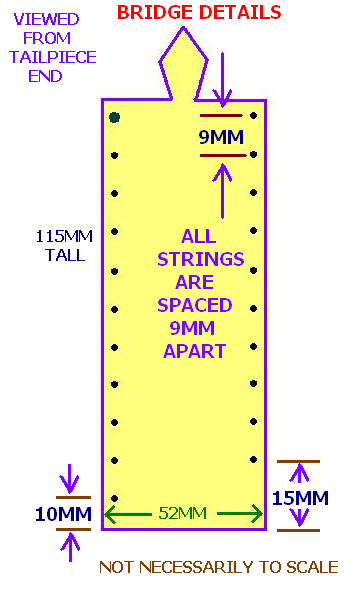
Locate the bridge 944MM from "point X".

I very successfully use softwood for Kora and other bridges altho hardwood will work fine too.

When drilling the 1/16 inch holes in the bridge, be sure to drill the holes so they angle a bit
downwards towards the tailpiece end. This lessens the chance of unwanted string buzz.

The neck need not be affixed into the gourd holes as the string pressure will hold everything
in place - having said that, I often glue the neck into the gourd holes - keeps things a bit
simpler during construction.
A "guy-wire" or cord is necessary to keep the bridge from tipping over. Wire or nylon cord
works equally well. The photos show this guy-wire.

Note: with full string tension, it is very normal for the bridge to "sink" considerably.
This is normal & nothing to be worried about (check photos of African Kora photos on the
internet). The guy-wire will then likely have to be adjusted to keep the bridge upright.

The amount of the neck sticking past the lower end of the instrument is not very important.
Just make sure you leave enough so that the tie-off eye-bolt is securely mounted.My ends
are on the order of an inch and a half to two inches long or so.

A hint for anyone ever working with Koras: my dog's round, foot-diameter stuffed
cloth-covered chewing toy - shaped like a big, flatish donut works wonderfully as a
rest/positioner for the Kora's gourd when working on the instrument. It keeps it from
rolling about.

Over the years I've amassed a big Rubbermade tote full of rolls of just about every gauge
monofilament fishing (& weed-whip) line available. I use this stuff for all sorts of
instrument projects. Having mentioned this, it's by no means necessary to buy lots of
rolls of this stuff if you know a few fishermen.Here's string information:

  STRING GAUGES AND  TUNING:

                                                  HIGH-PITCHED END

    30 LB (.022 inch) fishing line    C#-| |
    30 LB (.022 inch) fishing line    A--| |--F#   20 LB (.018 inch) fishing line
    50 LB (.029 inch) fishing line    F#-| |--E    25 LB (.020 inch) fishing line
    50 LB (.029 inch) fishing line    D--| |--D    25 LB (.020 inch) fishing line
    60 LB (.031 inch) fishing line    B--| |--B    40 LB (.024 inch) fishing line
    60 LB (.031 inch) fishing line    G--| |--G    50 LB (.029 inch) fishing line
    60 LB (.031 inch) fishing line    E--| |--E    50 LB (.029 inch) fishing line
   .050 inch weed-whip line           C#-| |--C#   60 LB (.031 inch) fishing line
   .050 inch weed-whip line           B--| |--A    60 LB (.031 inch) fishing line
   .065 inch weed-whip line           A--| |--F#   60 LB (.031 inch) fishing line
   .095 inch weed-whip line           D--| |--D   .040 inch weed-whip line (or
                                                   100 LB fishing line)

                                                  LOW-PITCHED END

Regular monofilament fishing line is used for the higher-pitched strings.
Weed-whip (aka weed-whacker) line is used for the lower pitched strings.
Use ROUND, un-serrated weed-whip line. Lately ridged or square line
is being sold - avoid it.

NOTE: IF ANYONE ABSOLUTELY CANNOT FIND A PARTICULAR GAUGE OR TWO,
LET ME KNOW AND I'D BE HAPPY TO MAIL TO YOU.

Re Fish-line:
"Strengths" (in pounds) of fish-line needed are;
20 LB, 25 LB, 30 LB, 40 LB, 50 LB, 60 LB (& 80 LB.
if you can't find .040 inch diameter weedwhip line).
This line is available in a wide variety of
strengths (rated in pounds). Wall-Mart & K-mart
carry many gauges. Cabela's big Sporting Goods
catalog carries all of the required gauges, but
I have found that their huge retail stores do not
always carry all the gauges that their catalog does.
Dunhams and other such sporting goods stores often
have what K/Wal Mart doesn't. It just takes a bit
of looking around. You can always go the Cabelas
mailorder route.

Re Weed-whip line:
Diameters of the weed-whip line needed are:.040",
.050",.065" and.095" K-mart and Wal-mart do (at
least sesonally) carry most of the gauges of
weed-whip line needed. Also, Tru-Value & Ace carry
a wide selection of this line. Try lawn-mower
specialty shops. One caution however is to avoid
buying grooved or square line. While these MAY work,
go for the regular round monofilament line. In the
winter, I have been able to have the people at our
local Tru-Value hardware store go into the basement
to get rolls of this stuff for me. If you simply
cannot find a particular gauge weed-whip or fish-line,
just use the next smaller size & get used to the
slight "looseness" & very slightly lower volume.


A NOTE ABOUT STRING STRETCHING:

Monofilament nylon line stretches prodigiously at first - Not just on a Kora, but on
any instrument.This is an unavoidable but fortunately short-lived situation.
It takes about two or three weeks or so before the things completely settle down.
Once thus settled, the instrument can go for months without requiring retuning.

It's not only the strings that stretch & settle -- the drum head does so as well. Also,
the bridge settles down into the head & various other wrinkles will likely appear.
This is all very normal and this all settles down in about the same amount of time that
it takes for the strings to settle.

My procedure is to tune up the instrument right after it's made. Then keep retuning it
a couple of times daily (it will drop in pitch regularly). After a day or two it's
playable, so long as you realize that strings will have to be retouched quite often,
until it's completely settled (in a couple of weeks).

During this settling-in process, remember to not just tune the instrument to itself,
but tune it up to pitch. Day by day the thing holds it's tune better. In aweek's time,
you scarcely notice that it's going out of tune & after a couple more weeks, it's
all settled.

There's an up-side to this 2 to 3 weeks of string stretching/numerous retunings --
during the process, you'll invariably become quite familiar with the string layout,
pitch, tuning, intervals etc.

A few words for anyone wanting to play the Kora but not having an instrument..... A  Kora
may well look like a super-complicated collections of strings, tuning devices and whatnot
but because there are no frets, no  curves or wood bending involved and even the string
length isn't very critical, building a workable Kora is an easy, straightforward project.
Really.

I sure hope I don't come off as a "know-it-all" as concerns Koras (or any other instrument
for that matter) because I certainly am not. What I have done is attempt (with varying
degrees of success) over the past few decades to understand this most fascinating
instrument & then take stabs at building some. I have learned a lot, but nowhere near enough.

The zither pins on this $60 jobbie worked out great. They hold
fine and are easily tuned:
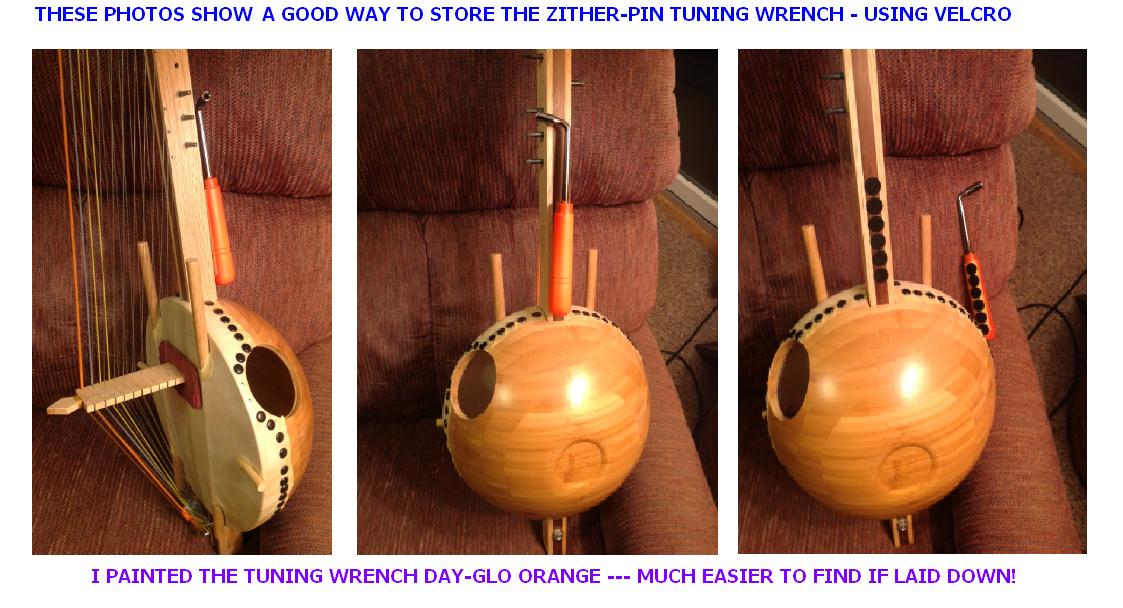
Here are a few additional photos of this thing that might help during construction:
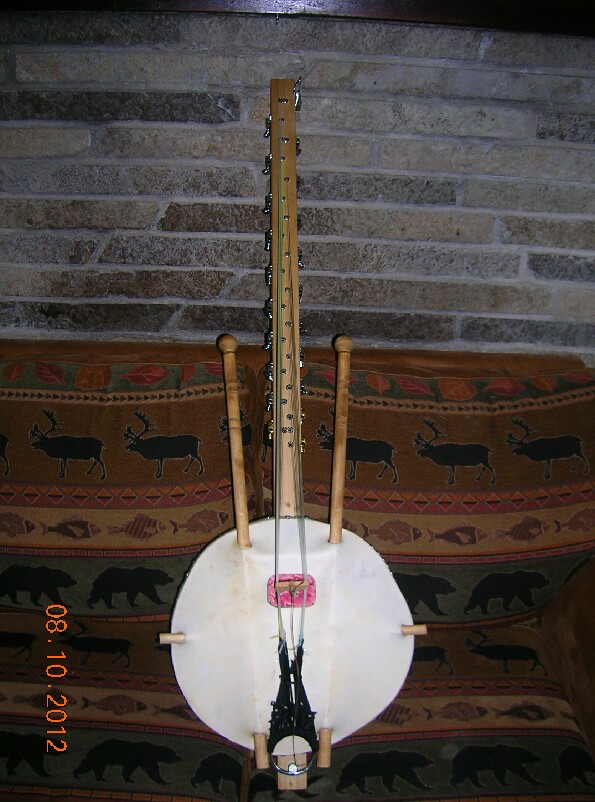
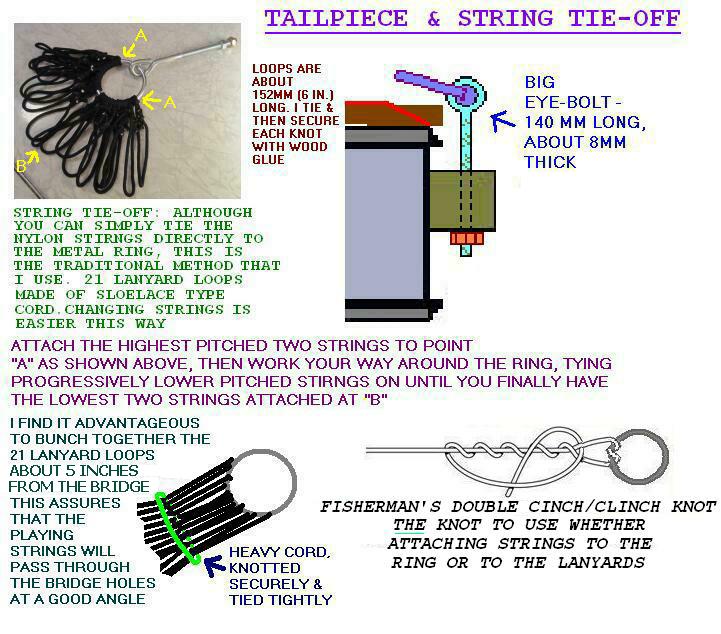
The big bolt that the tailpiece ring is attached to is temporary - it works fine but isn't
"pretty". I have a much neater modified eye-bolt affair that I will install next time all
the strings are off the instrument.

A number of folks have come up with forms of tablature for the Kora. Here's my "contribution"
which I find pretty useful. First an example (bass notes are in red):
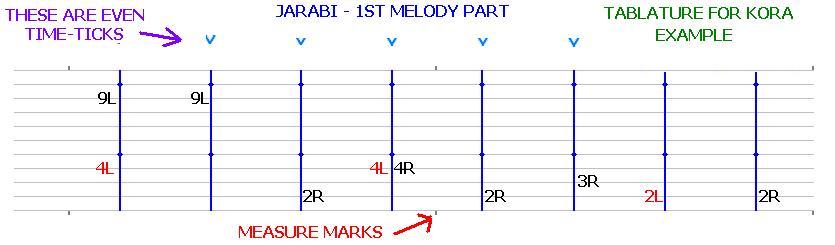
Here's a blank (downloadable) sheet of my Kora tab:
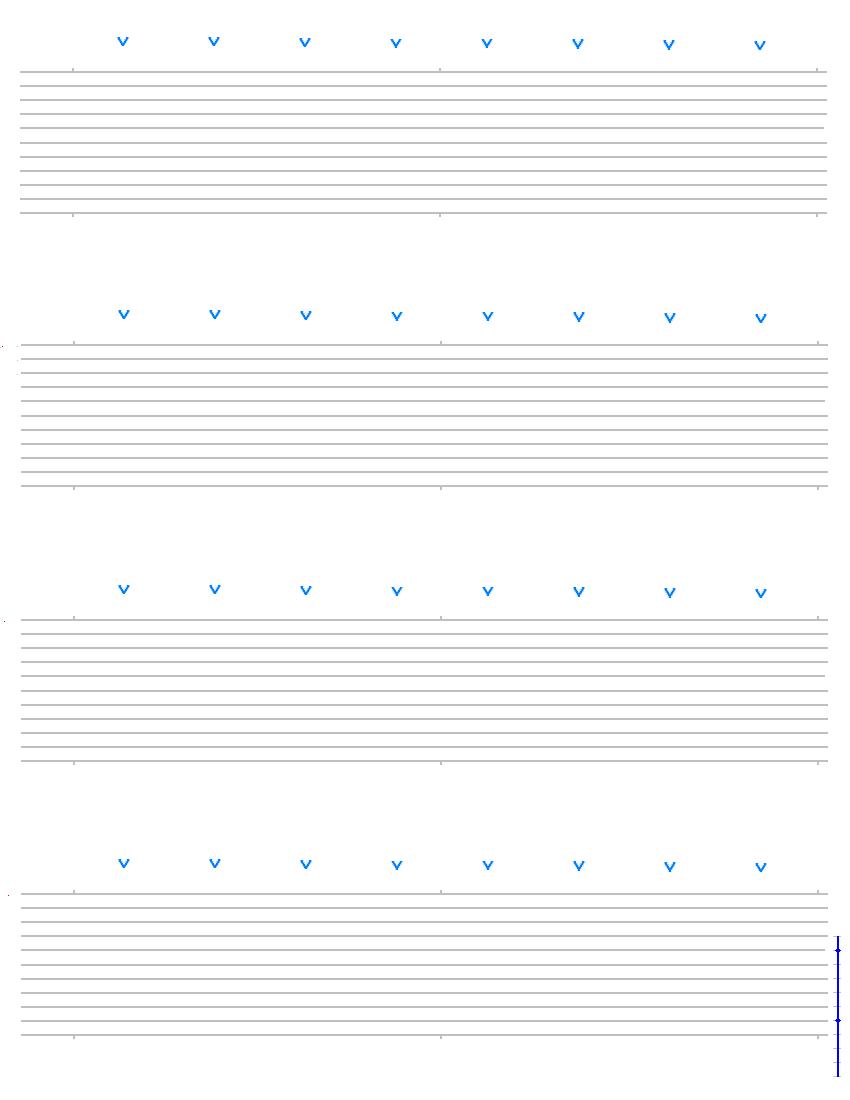
Please let me know if you think this tab is useful?           This dark blue vertical line at the end is
a "cut-and-pastable" note line that you can insert into the tablature.

Also, let me know if you have any questions or build a Kora.
Thanks
Dennis Havlena - W8MI
Straits of Mackinac,
northern Michigan
dhavlena@gmail.com
http://www.DennisHavlena.com
keywords: diy kora do it yourself homemade home made build construct havlena
how to african elk hide calabasse callabash gourd dennis dennishavlena dhavlena
gmail com dakar keur moussa senegal africa goethe institut eccif baay fall baye fall