PRE PS - ĀMUCH ĀLATER ĀNOTE Ā(March 2013):This is one of my first attempts,
long ago, at building a Kora. My idea of measurements, and construction came
completely from careful study of photos, a few e-mails and the very scant info
I could find at the time on the just budding internet. This Kora I built plays
and sounds fine - having said that, instead of this "northern Michigan Kora, Ā
I'd suggest following my more recent plans on my web site:
( http://DennisHavlena.com ). Most of what you see about this "northern
Michigan Kora" is still applicable but now that I have seen, played and
learned a lot more about the instrument, some of my earlier ideas about
such things as string gauges, tuner arrangement, bridge dimensions etc.
have changed.
.........................................
A few decades ago I became mesmerized upon rounding a
corner at Disney's Epcot Center and seeing a fellow in
flowing Afican robes wonderfully playing on the west
African Kora. I am not sure but he may have been Vieux
Diop, from west Africa, who, internet research tells me,
has played at Disney a number of times.
My fascination with this very melodical and rhythmically
intricate African instrument was immediately kindled by
this first hearing.
The Kora could be thought of as a sort of "stringed
Kalimba" -- in that the notes of the scale alternate
back and forth from right side to left side of the two
planes of strings - 10 on the right and 11 on the left.
It's sound is decidedly beautiful -- I am puzzled by
why it is not more popular amongst folk musicians in
non-African parts of the world.
In any event, what follows is a short description of
how I built a Kora , using materials readily
available here in the north of Michigan. The results
more than met my expectations.
This article should easily contain enough information
needed to build one of these instruments for yourself.
Being that it's not fretted, things like string-length
are not terribly critical. Very little actually is fussy.
GOURD:
Big gourds (aka calabashes) can not be grown here in
northern Michigan's harsh climate. The best we can grow
are nice figure-eight shaped "bird-house" gourds whose
largest diameter measures around 9 inches or so (these
are nicely thick-walled and make great banjo gourds).
I've looked for years, in vain, for a gourd that would
work for a Kora. No gourds approaching this desired size
are ever available in these parts. I once did find a
beaut -- at Pier One Imports -- but sadly, it was being
sold as a Halloween "pumpkin" -- complete with eye, nose
and mouth cut into it, which pretty much ruined it for
my musical instrument purposes!
Thus this plaster "gourd".
In a nutshell, it consists of six layers of regular
cheese-cloth, each layer saturated with plaster of
paris. The cheese-cloth layers are applied to an 18"
diameter kid's beach ball, which was easily removed
later by letting the air out of it. It was not necessary
or desirable to grease-up the beach-ball -- it came out
easily once deflated.
Using rubber gloves, I first draped & formed a dry piece
of cheese-cloth over the beach-ball, then saturate it
with lots of plaster, worked in thoroughly with my
hands. I got another piece of cheese-cloth & repeated
the process -- and repeated -- and repeated until all
six layers of cheesecloth were in place.
I used a BIG drop-cloth -- my understanding wife is
still pointing out plaster splatters.
Once cured, a hand-held saber-saw cut the resultant
approximately 3/16" thick "gourd" to the desired shape
easily.
While surely not as strong as if made using fiberglass
resin etc, the plaster "gourd" is quite sturdy and
appears no more fragile than a guitar body.
Speaking of fiberglass -- that was my original
intention, but one whiff of the resin (even when
positioned underneath our stove's exhaust fan) --
promptly convinced me to forget the venomous, fumey
fiberglass -- at least until warmer outside weather!
Later note: A coating of fiberglass was eventually
applied over the sanded & varnished "gourd",
strengthening it noticeably.
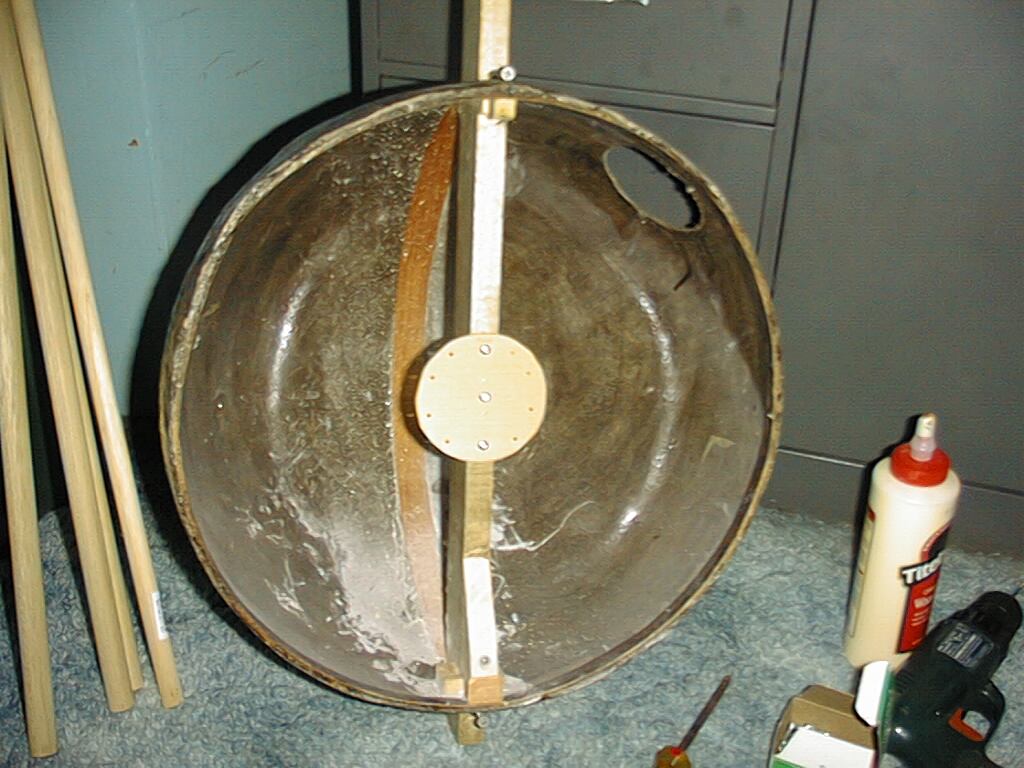
I Tite-bond glued a 1/2" wide strip of 1/8" thick wood
(using a hundred spring clothes-pins as clamps) to the
inside of the open edge of the "gourd", angle-tapering
the thickness at each end so the ends overlap. Also, I
sealed the inside and outside with three coats of
Min-Wax varnish/stain. "Tudor" color! Looks somewhat
like a real gourd now. Pretty nice actually. The varnish
adds additional rigidity.
By the way - For the wood strip, I used basket-making
edging/rim wood, available at craft stores, that I had
left over from the heigth of my basket-making days.
The advantage here being that the stuff was already
curved & required no bending/steaming etc.
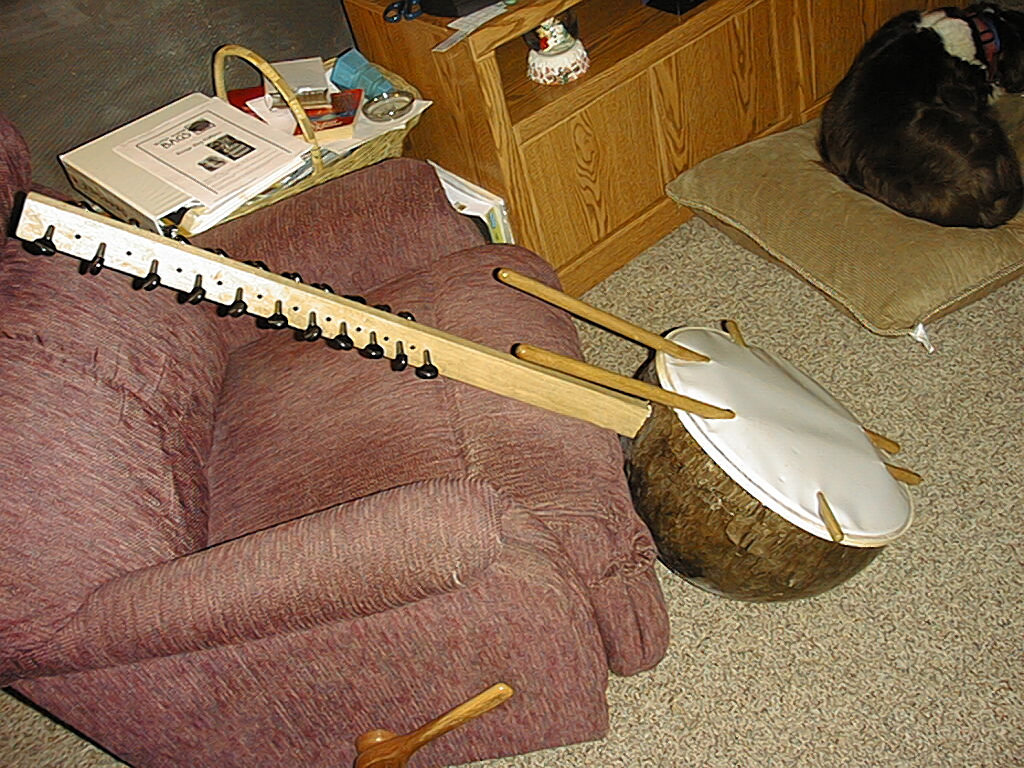
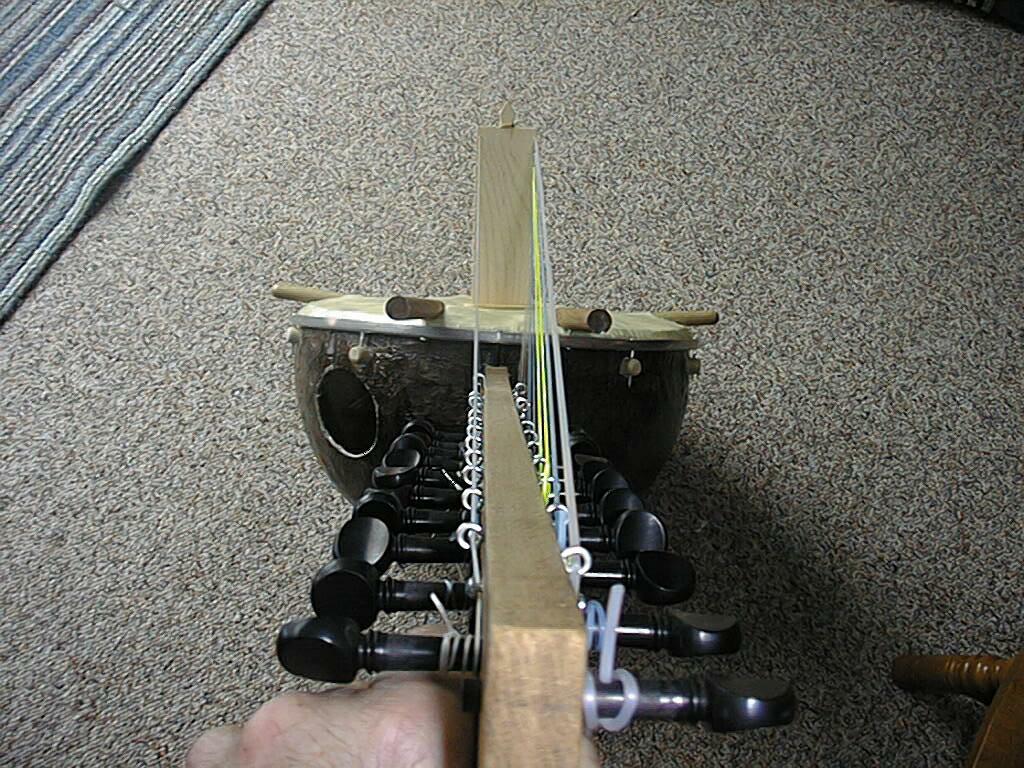
NECK & TUNERS:
The traditional Kora neck is a hardwood stick with 21
leather strips carefully and tightly woven around that
act as string tuners. In Africa nowadays you see a great
many Koras using fiddle-type wooden friction pegs
instead of the leather rings. While I've never used the
rings (imagining that they'd not be the easiest to
maintain and use), I've had great luck using friction
pegs and even guitar type steel tuning gears. For this
instrument I used regular $1.50 apiece fiddle type ebony
friction pegs and recommend this approach highly. I
borrowed a peg-hole reamer, which is quite easy to use.
I am very happy with the whole friction peg approach.
The neck I used was 49-1/8" long by 3/4" thick by 2"
deep piece of clear hard (sugar) maple (any hard wood
should work). Absolute straightness is not at all
important, there being no frets etc.
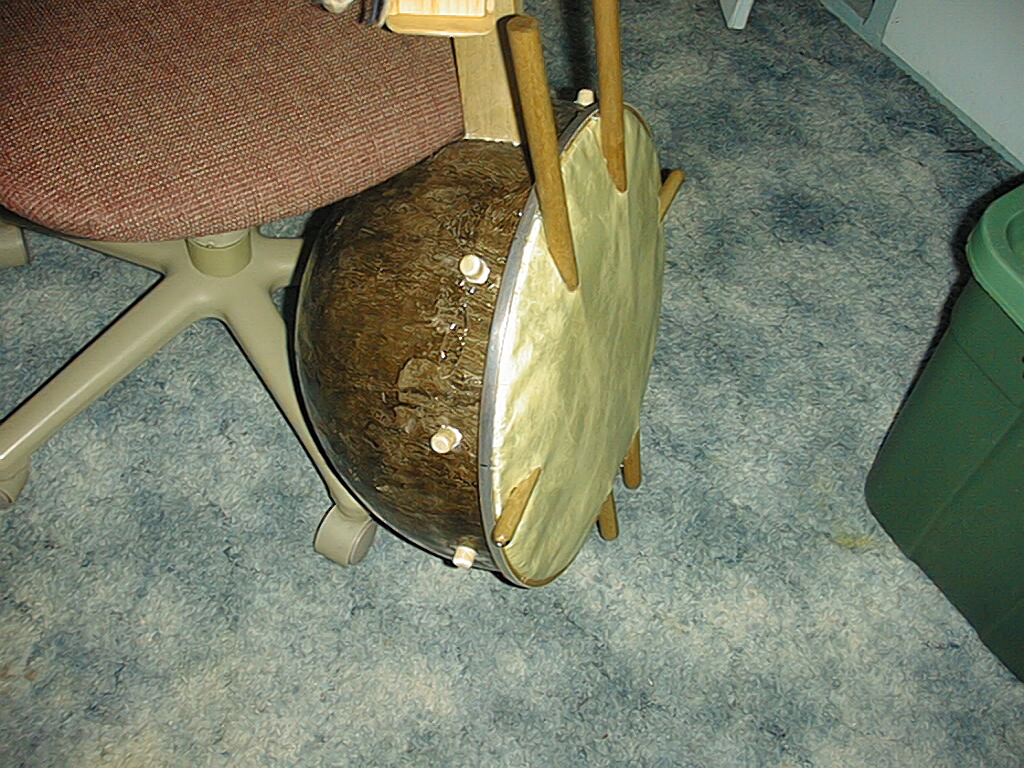
HEAD:
African Koras have an animal skin tightly stretched
across the open end of the gourd -- I used standard
16" diameter fibreskin type (fake animal skin), drum
head & carefully cut the "gourd" so that the drum head
fits nicely over the rim.
I processed the "gourd's" rim by working Titebond glue
into the somewhat rough perimeter edge, leting it dry,
then leveling-off the perimeter edge with a sandpaper-board.
Hand sanding smoothed and slightly rounding the corners
that contact the drum head.
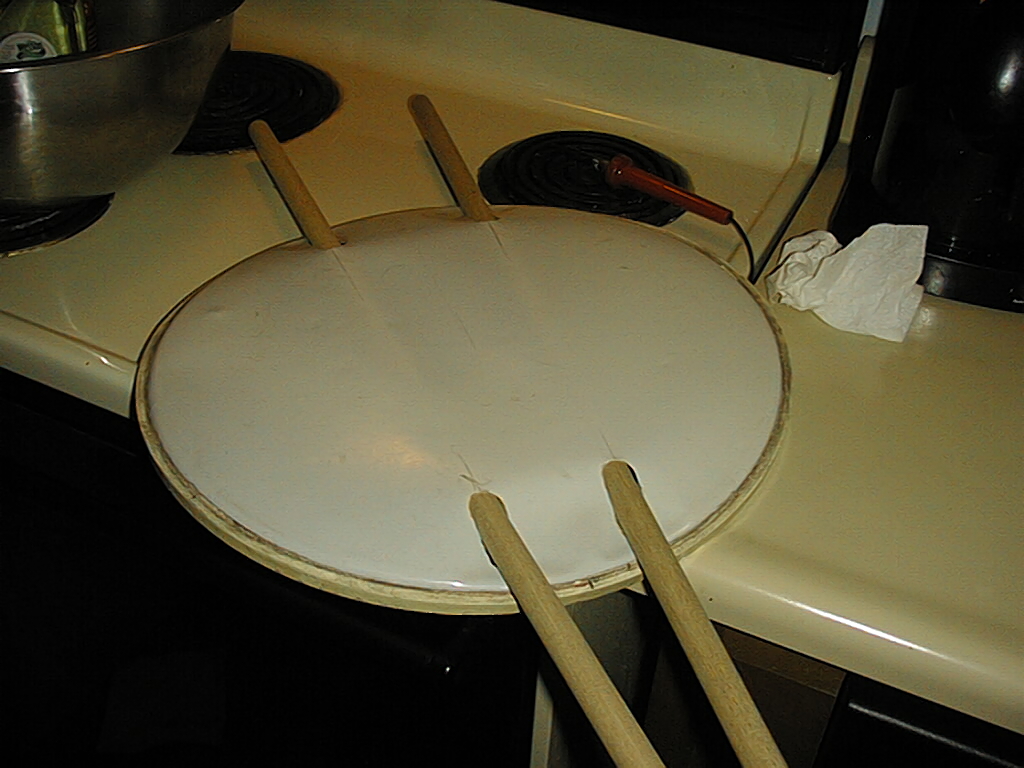
As for modifying the drum head to accept the handle and
brace sticks, the elongated holes in the fiberskin were
made by first plotting their position and then carefully
melting each hole using a small soldering iron. This
worked very nicely and the resultant holes show no sign
at all of tearing once the handles and brace were inserted.
The handle sticks are 11/16" diameter hardwood
dowling, 23-1/4"" long each. The brace stick is of
5/8" dowling, 18" long. Because the commercially made
drum-head is not as pliable as wet cowhide,
I purposely looked for BOWED (not straight) 5/8"
dowling. Our local Home Depot store had quite a
selection of bowed dowel rods to choose from. With
this bowed dowel rod inserted through the holes in
the head and underneath of the two handles, it was
much easier to draw down the head/handle/brace
assembly.
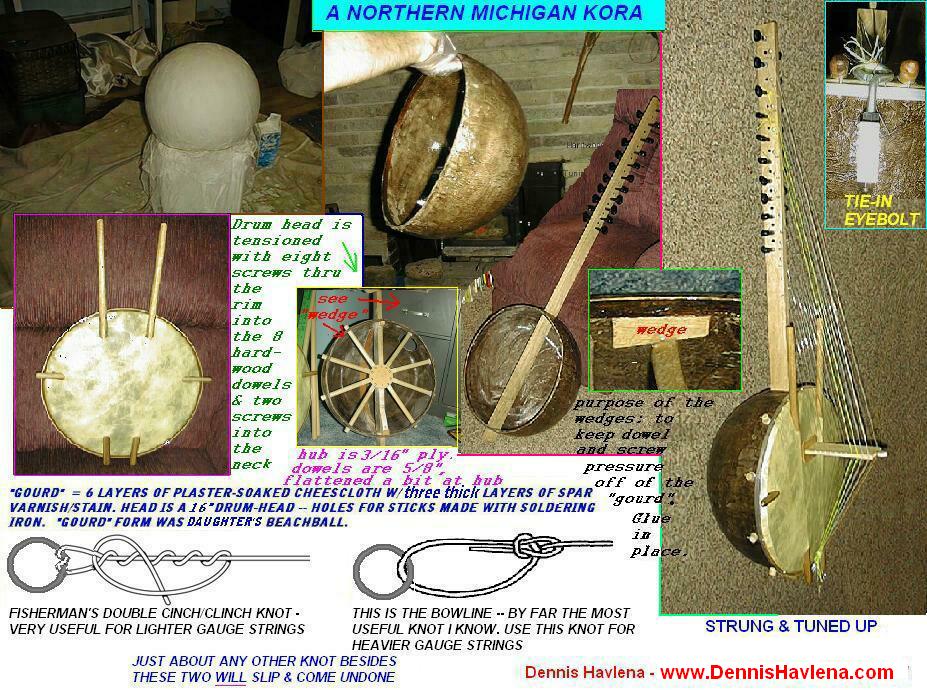
MOUNTING THE DRUM HEAD TO THE "GOURD"
The concern initially was to be able to properly mount
and tension the drum head. In Africa, they use a wet
animal skin that is held in place with a great many
tacks. Once dry, the skin stretches and automatically
tensions the head. Unable to take this approach with
my contraption, I came up with a VERY effective and
simple head mounting and tensioning method.
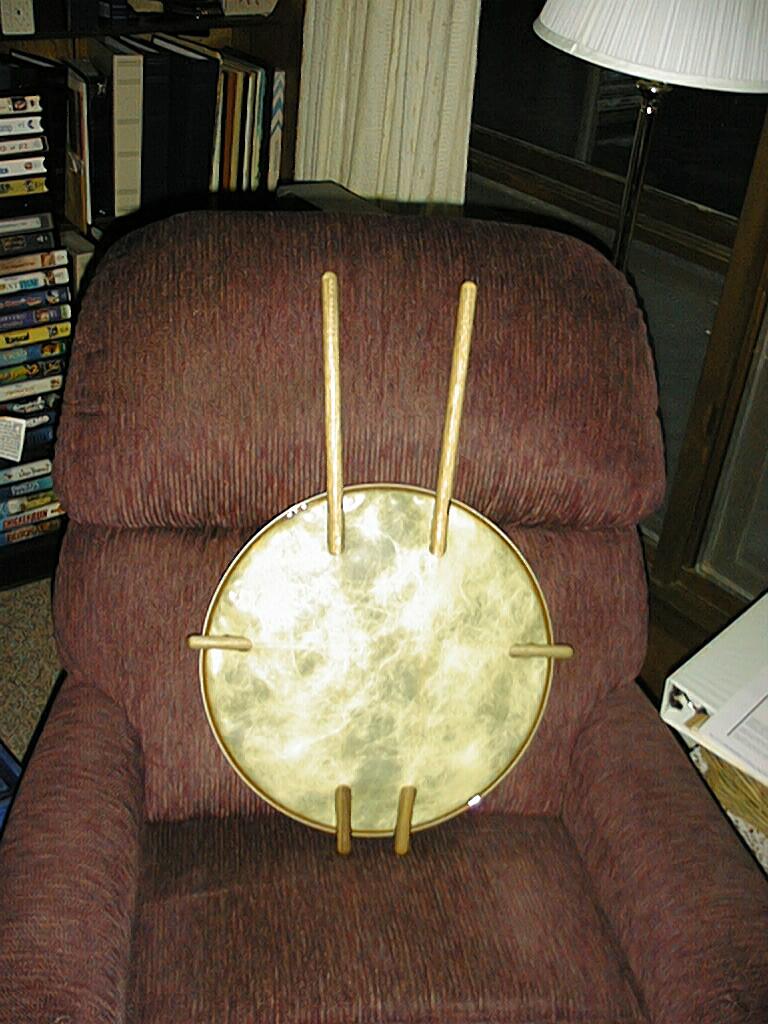
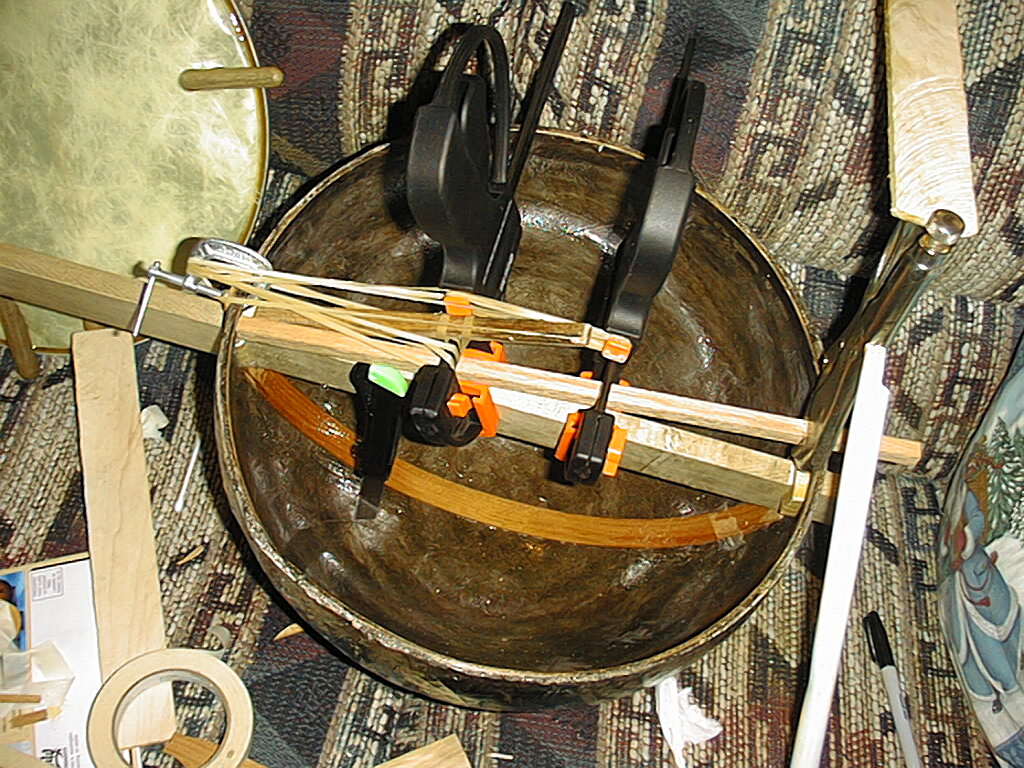
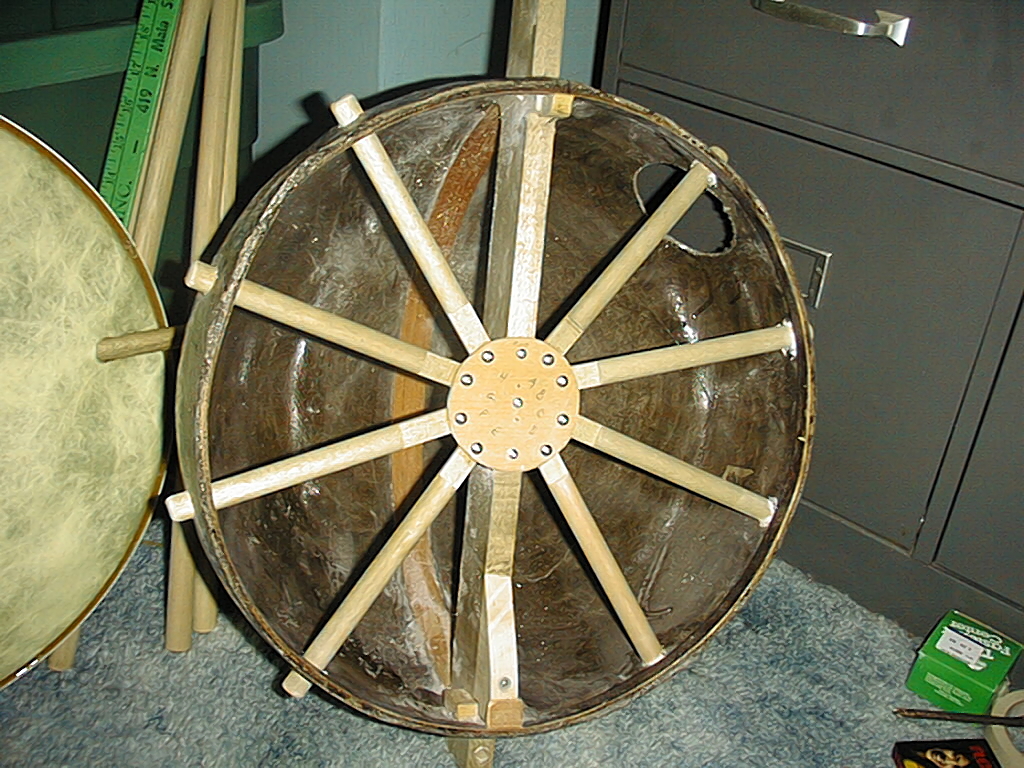
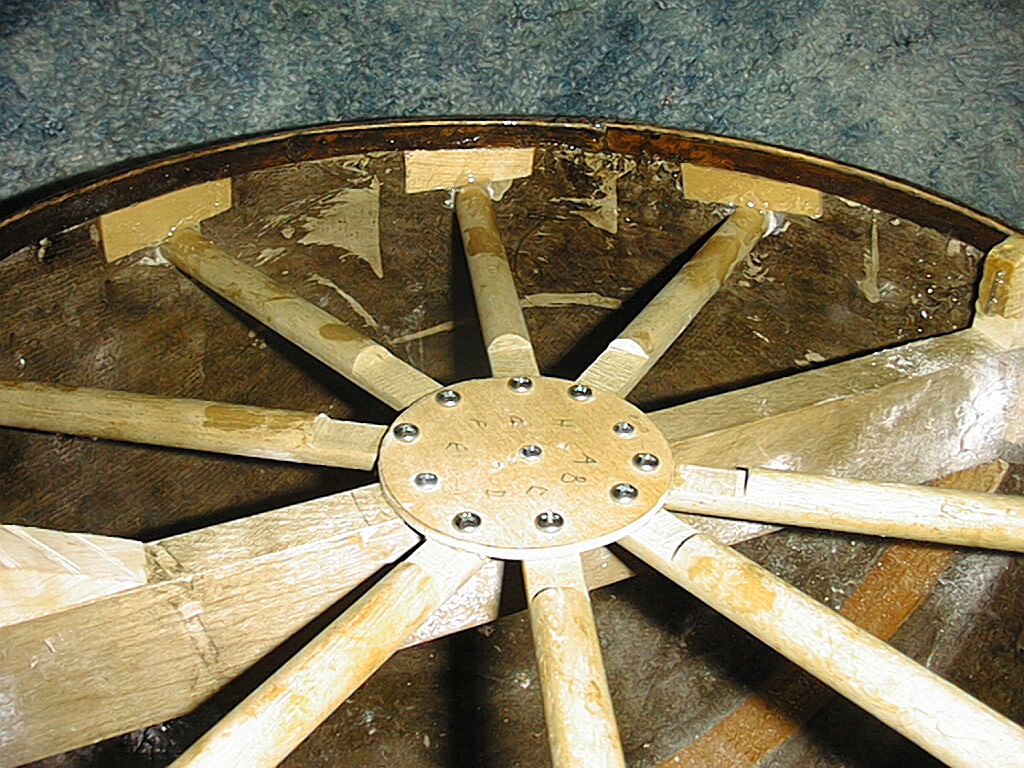
I screwed and glued a 4" diameter disk of 3/16"
plywood to the middle of the top, center of that part
of the hardwood neck that is inside the "gourd" (see
photo above). I cut eight short 5/8" diameter sticks
(from dowling rod) so that when glued and screwed
radially to the plywood disk, their ends protruded
through the "gourd" about 5/8" or so. I used regular
spade bits to drill through the "gourd". This is all
easier to visualize by simply looking at the photo
above. While the radial dowel affair may look heavy
and cumbersome, in reality it is not. This tensioning
system works perfectly.
The idea here was to drill holes in the rim right over
the dowel, then very carefully drill screw-holes into
each dowel. This all worked fine. I took pains that
the guide hole drilled thru each dowel was of a proper
diameter so that there was no threat of the screw
splitting the dowel end.
Besides 8 screws thru the rim and into the ends of the
dowels, I used 2 screws, through the rim and into the
neck wood. This all made for the fiberskin durm head
being solidly pulled down in ten places.
Given that the head has three "bones in it's nose", it
can't be expected to lay perfectly flat & unwrinkled,
even with considerable tension on the rim. Wrinkly is OK
here -- take a look at the many photos of African Koras
on the internet to confirm this.
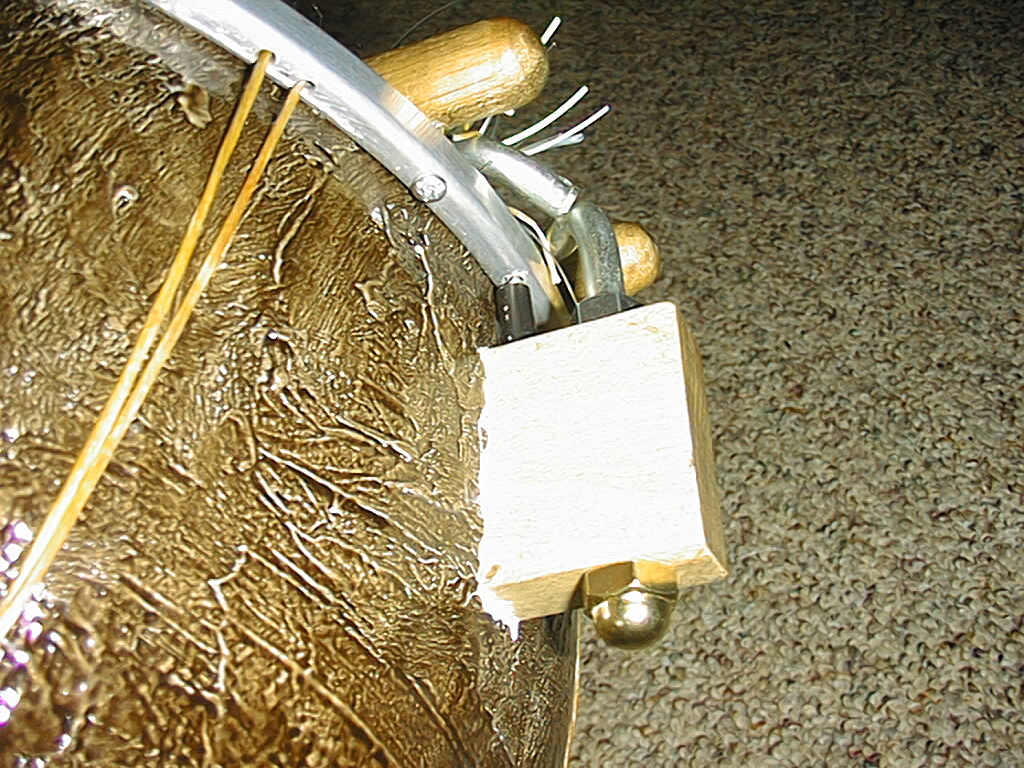
One other important point: Although the Fiberskin (aka
mylar) is very tough (witness the constant torture it
receives from hardwood drumsticks!), it's not a good
idea to secure the handles ONLY by means of their
going through the holes in the head (as is the usual
method in African instruments). I drilled four holes
vertically through the rim of the drum head,
immediately underneath where the handles pass. Then I
drilled four corresponding holes into the underside of
the handles. I screwed four small screws through the
rim holes and into the underside of the handles. This
completely takes any "handle-strain" off of the drum
head itself and makes for a very solid handle mount.
You can just make out two of these screws in the photo
above.
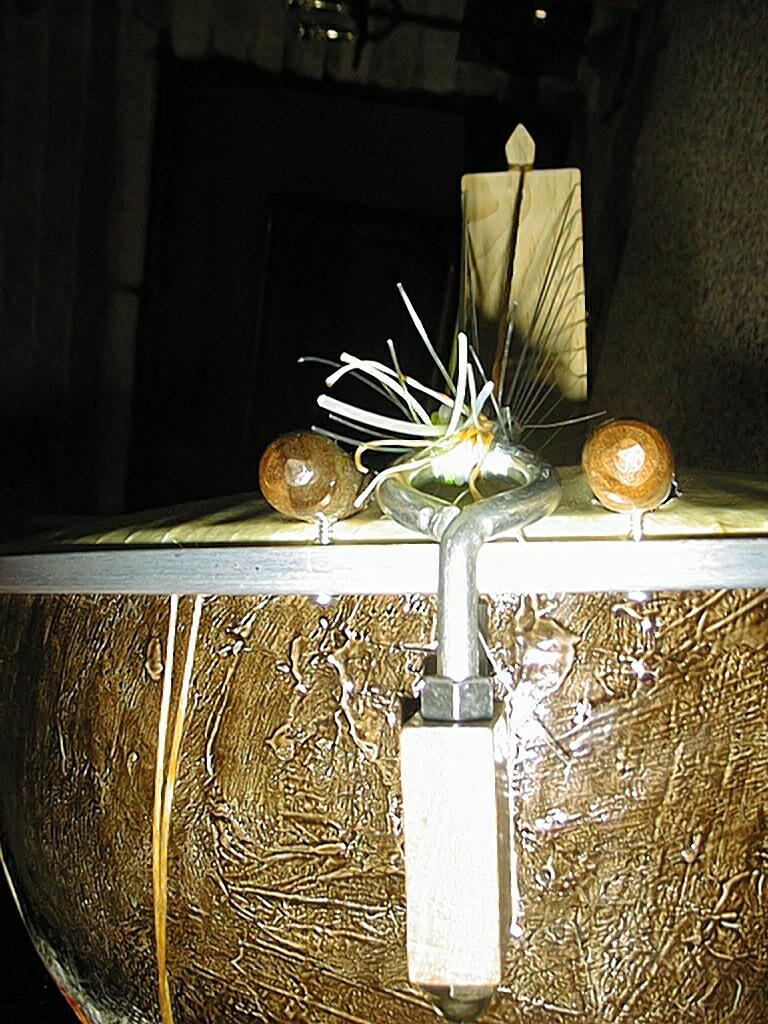
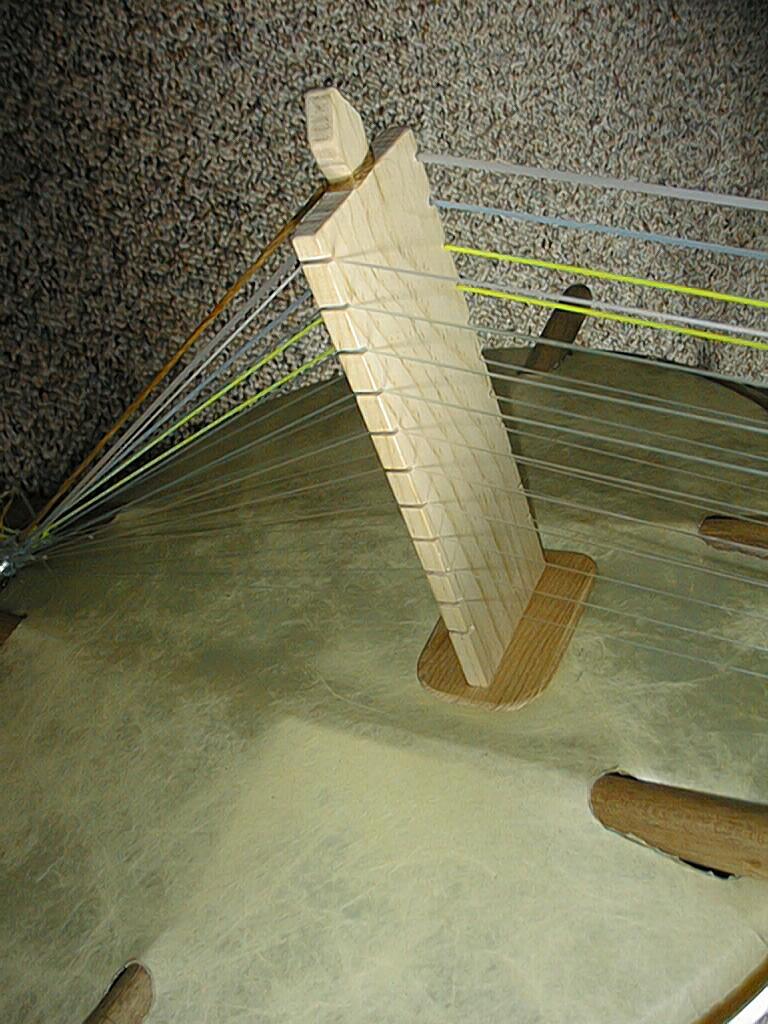
TIE-OFF RING
I very successfully used a 5" long, 3/8" threaded
eye-bolt for the tie-off (see photo above). The
advantage here is that there's no string pressure
exerted on the drum-head. Clamp the shank of the bolt
(protected by two pieces of scrap hardwood) in a vise -
leaving just the eye exposed. Carefully hammer the eye
over, to about a 45 degree angle. I next drilled a hole,
vertically, through that part of the neck that protrudes
through the bottom of the "gourd" to receive the
eye-bolt. When drilling this hole, I made sure that it
was far enough away from the gourd so no part of the
eye-bolt got closer than 1/4" or so from the drum head.
Two nuts secure this eye-bolt.
A cord is tied between the small projection at the top
of the bridge to the tie-off ring. This cord very
nicely keeps the bridge from tipping over.
KNOTS:
For securing the heavier gauge line to the tie-off
ring, I favor the old "Bowline" knot. It is one of
the rare knots that doesn't slip when tying nylon
monofilament line. It is easy to learn to tie and the
only drawbak it has is that it somewhat weakens the
string. During tuning experiments, the most usual
palce I got string breakage is at the knot. This
problem is not unique to the bowline however. With
this in mind, I used a "double cinch/clinch knot"
used by fishermen to secure hooks to their
monofilament fishing line. Fishing websites recommend
lubricating the knot with a small gob of spit to make
it easier to pull tight. The photo above shows these
two knots.
NOTES ABOUT OVERALL PITCH & TUNING:
In Africa, little, if any, attention is paid to
"absolute" or concert" pitch. in addition, I find that
one instrument might be based in the key of F (the
lowest string on each side being tuned to "F"), while
another Kora might be based in the key of C (lowest
strings tuned to "C"). I am by NO means an expert
here, but I prefer the C-based approach, and have used
C on the last few Kora's (& Kora-like instruments) I
have built.
STRING GAUGES AND TUNING:
HIGH-PITCHED END
30 LB (.022 inch) fishing line C#-| |
30 LB (.022 inch) fishing line A--| |--F# 20 LB (.018 inch) fishing line
50 LB (.029 inch) fishing line F#-| |--E 25 LB (.020 inch) fishing line
50 LB (.029 inch) fishing line D--| |--D 25 LB (.020 inch) fishing line
60 LB (.031 inch) fishing line B--| |--B 40 LB (.024 inch) fishing line
60 LB (.031 inch) fishing line G--| |--G 50 LB (.029 inch) fishing line
60 LB (.031 inch) fishing line E--| |--E 50 LB (.029 inch) fishing line
.050 inch weed-whip line C#-| |--C# 60 LB (.031 inch) fishing line
.050 inch weed-whip line B--| |--A 60 LB (.031 inch) fishing line
.065 inch weed-whip line A--| |--F# 60 LB (.031 inch) fishing line
.095 inch weed-whip line D--| |--D .040 inch weed-whip line (or
100 LB fishing line)
LOW-PITCHED END
Regular monofilament fishing line is used for the higher-pitched strings.
Weed-whip (aka weed-whacker) line is used for the lower pitched strings.
Use ROUND, un-serrated weed-whip line. Lately ridged or square line
is being sold - avoid it.
NOTE: IF ANYONE ABSOLUTELY CANNOT FIND A PARTICULAR GAUGE OR TWO,
LET ME KNOW AND I'D BE HAPPY TO MAIL TO YOU.
STRINGS:
In my many years of diddling with the Kora, I have
found that VERY little info is available, on the web
or elsewhere, as to what type and thickness of
monofilament line African players use on their Koras.
After having broken countless strings & conducted
numerous (& ongoing) experiments, I have found the
following gauges/types of string to work nicely on
this Kora. I use a combination of various gauges of
both regular monofilament fish-line as well as
off-the-shelf monofilament weed-whip line. See chart
immediately above.
Fish-line:
"Strengths" (in pounds) of fish-line needed are; 20
LB, 25 LB, 30 LB, 40 LB, 50 LB & 60 LB. This line is
available in a wide variety of strengths (rated in
pounds). Wall-Mart & K-mart carry many gauges.
Cabela's big Sporting Goods catalog carries all of the
required gauges, but I have found that their huge
retail stores do not always carry all gauges. One of
the hardest to find was 40 pound fish line. I finally
did find it at a down-state Cabelas store, in the form
of 40 pound, monofilament "leader" line. Dunhams and
other such sporting goods stores often have what K/Wal
Mart doesn't. It just takes a bit of looking around.
You can always go the Cabelas mailorder route.
Weed-whip line:
Diameters of the weed-whip line needed are:.040",.
050",.065" and.095" K-mart and Wal-mart do (at least
sesonally) carry most of the gauges of weed-whip line
needed. Also, Tru-Value * Ace carry a wide selection
of this line. Try lawn-mower specialty shops. One
caution however is to avoid buying grooved or square
line. While these MAY work, go for the regular round
monofilament line. In the winter, I have been able to
have the people at our local Tru-Value hardware store
go into the basement to get rolls of this stuff for
me. If you simply cannot find a particular gauge
weed-whip or fish-line, just use the next smaller size
& get used to the slight "looseness" & slightly lower
volume.
This chart shows the diameter in inches of various
strengths of monofilament fishing line (note that
different manufacturers make slightly different
diameter line for a claimed strength):
20 LB = .018"
25 LB = .019"
30 LB = .020"
40 LB = .024"
50 LB = .028"
60 LB = .030"
80 LB = .037" (will work in lieu of .040" weed-whip line)
A NOTE ABOUT STRING STRETCHING:
Monofilament nylon line stretches prodigiously - Not
just on a Kora, but on any instrument. This is an
unavoidable but fortunately short-lived situation. It
takes about two or three weeks or so before the things
completely settle down. Once thus settled, the
instrument can go for months without requiring retuning.
It's not only the strings that stretch -- the drum head
does so as well. Also, the bridge settles down into the
head & various other wrinkles will likely appear. This
is all normal and this all settles down in about the
same amount of time that it takes for the strings to
settle.
My procedure is to tune up the instrument right after
it's made. Then keep retuning it a couple of times daily
(it will drop in pitch regularly). After a day or two
it's playable, so long as you realize that strings will
have to be retouched quite often, until it's
completely settled (in a few weeks). It also helps some
manually pull on each string just after they're mounted
to take a bit of the newness out of them.
During this settling-in process, remember to not just
tune the instrument to itself, but tune it up to pitch
(low note on the right side corresponds to middle-C on
the piano). Day by day the thing holds it's tune better.
In a week's time, you scarcely notice that it's going
out of tune & after a couple more weeks, it's all
settled.
There's an up-side to this 2 to 3 weeks of string
stretching/numerous retunings -- during the process,
you'll invariably become quite familiar with the string
layout, pitch, intervals etc. Trust me on this!
MY DIMENSIONS:
NECK: 49-1/8" long by 3/4" thick by 2" deep
"GOURD": 16" diameter at drum head. 10-1/4" deep
SHORTEST STRING LENGTH: 12-1/2"
LONGEST STRING LENGTH: 33-1/4"
HANDLES: 11/16" hardwood dowel, 23-1/4" long. 6-3/8"
protrudes from edge of "gourd"
CROSS BRACE: 5/8" hardwood dowel, 18" long
OUTSIDE DIAMETER OF DRUM HEAD RING: 16-7/8" (although I
am no drummer, it seems that this is what's called
a standard "16 inch" drum head)
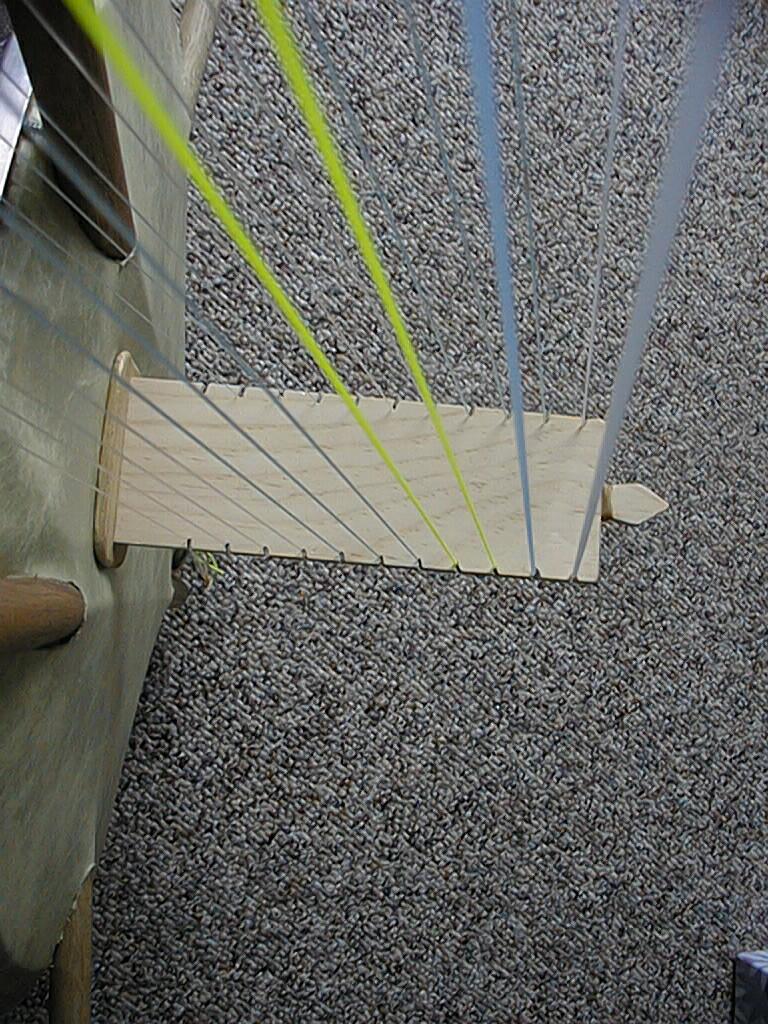
BRIDGE: 5/16" thick, 2-3/8" wide, 6-3/4" tall (less foot)
BRIDGE "FOOT": 1/4" thick, 2" x 3" - bottom corners &
edges liberally rounded off to keep from
puncturing the head
SOUNDHOLE: 3-1/4" diameter
TOTAL WEIGHT: 6 pounds
LOCATION OF THE TUNING PEGS IN THE NECK:
Distance, in millimeters, from point A (end of neck) to
the center of each peg hole:
point A
|
|
|
| 61 118 175 220 268 312 350 330 426 459
|
right| o o o o o o o o o o
pegs | | | | | | | | | | |
.-----------------------------------------------------
| vertical view of part of the neck
'-----------------------------------------------------
left | | | | | | | | | | |
pegs o o o o o o o o o o o
32 85 143 192 241 288 333 371 408 444 480
All but the very last photo is from the CD I used to make available:


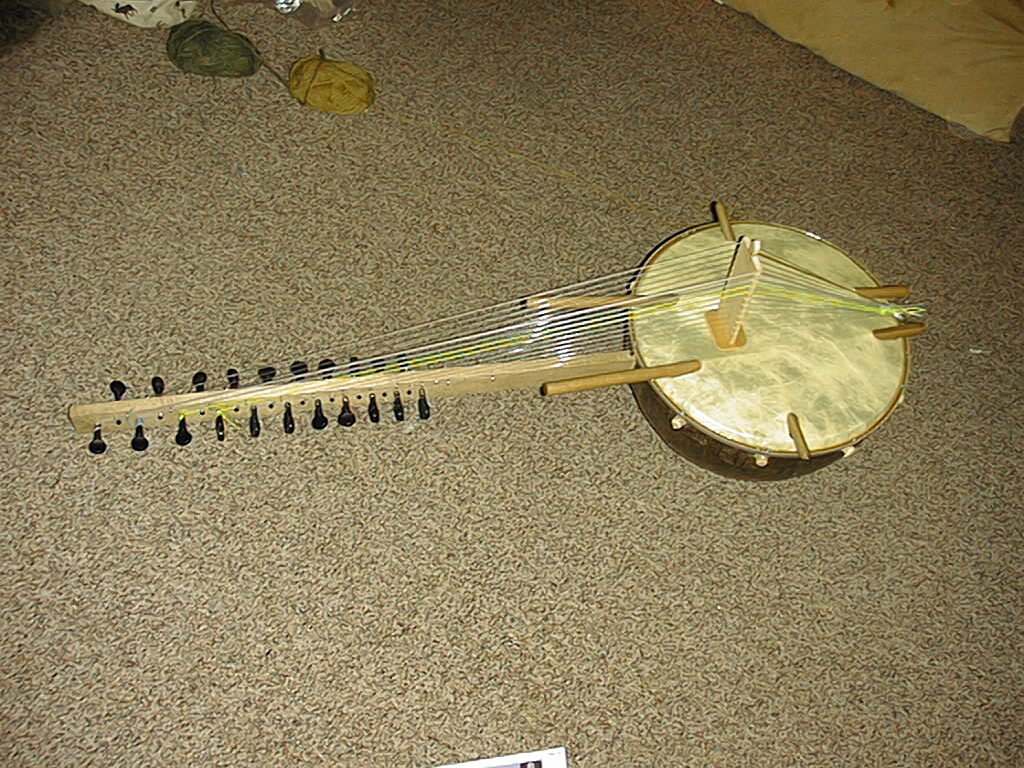
This last photo shows my current home-made Kora - completed 8-11-2012:
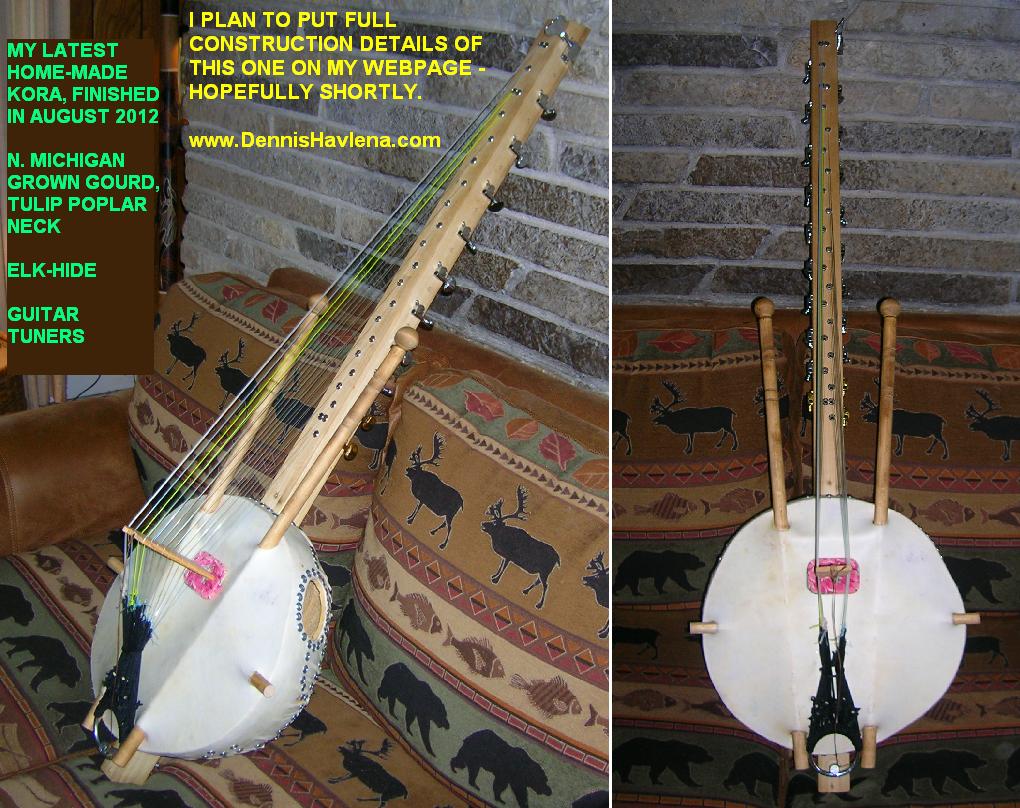
Dennis Havlena W8MI,
dhavlena@gmail.com
Straits of Mackinac, northern Michigan
Key words: build make diy kora west africa gambia senegal construct homemade home made
Click here to return
to my homepage