NOTE: 25 additional photos of this instrument are available. Click here for information.
TURN A GUITAR INTO A FRETLESS, 40" STRING-LENGTH PRACTICE BASS

A few years ago I bought two cheap guitars for $9 at a garage
sale. One was playable as it was but the other's neck was so
badly bowed that there was little hope of getting it playing.

This past weekend I turned the latter guitar into a very
playable and enjoyable fretless practice bass that has the same
40" string-length, pitch and octave as a big stand-up bass.
Click here for an illustration detailing this conversion.
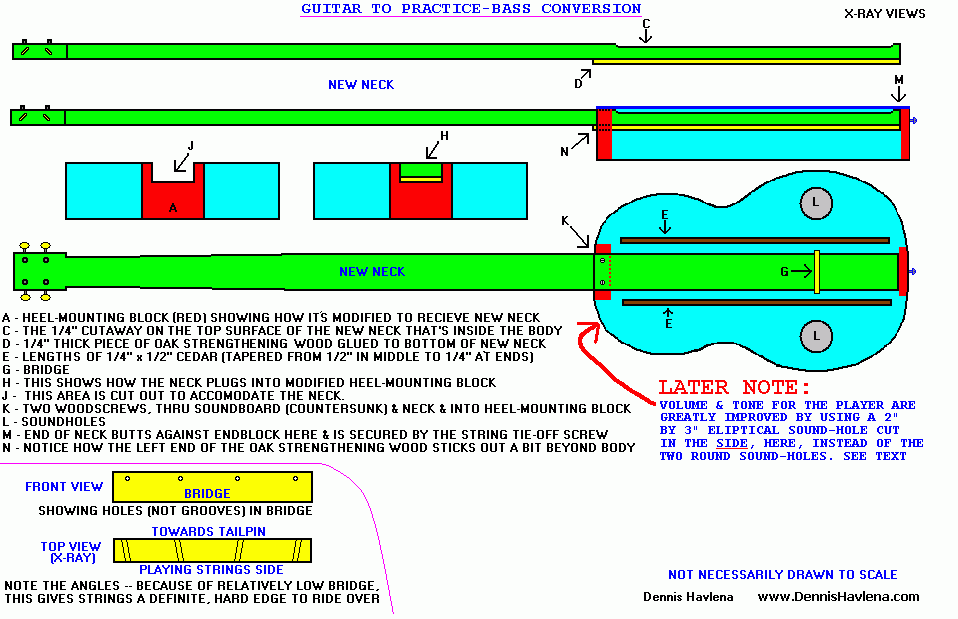
Click here to see the neck-building information in my doodle-bass articleThe neck is basically the same as that used on my "doodle-basses", with a few modifications. The whole project took two days of spare time to complete. It cost me less than 15 dollars. Obviously, use only the cheapest of guitars for this project. This thing is not intended to be real loud -- nor to be used in performance etc, but rather as a personal practicing & diddling instrument. You can use the existing guitar soundboard, but I didn't, for these reasons: - It's much harder to make the necessary neck-mounting modifications to the guitar body with the soundboard on - The soundboard on my junker was badly warped - The existing bridge must be removed anyways to make room for the bass's bridge However, if you get your soundboard off in one piece, there's no reason you can't remove the bridge, rework the braces (see below), remove the fingerboard remnant and glue this old soundboard back on the modified guitar body. Modifying the guitar (refer to the illustration throughout): First, saw through the fingerboard at the exact point where the neck meets the body (remove the fret at this spot first). Remove the soundboard: - Remove the plastic banding along the top of the sides all around the guitar's body. Wiggle an exacto-knife into a"weak spot". Once the banding starts coming up, it's usually a simple matter to pull the rest off. If the band is stubborn, carefully introduced hot water can weaken it's grip. Be carefull that some of the plywood veneer of the guitar's sides doesn't come up with the banding. - Now examine the newly-exposed joint where the soundboard is glued to the sides. Look for a weak spot where you can insert an exacto knife to start breaking the glue seal. Once this break has been established, put away the exacto knife and use a regular, dull table knife (not a steak knife) to worry the soundboard off. Don't force anything -- if a part of the joint is stuck down tightly, apply hot water carefully (wetting the knife helps) then wait a bit and try prying again. As soon as possible, dry off any wet wood. It may take special attention to seperate the soundboard from the reinforcing wood blocks at each end of the guitar body's inside. Try your best not to damage the top of the sides of the guitar body. Remove the neck: - The guitar's neck is attched to the body with a dovetail. I've had good luck removing necks by simply turning the guitar over, firmly bracing the body and then banging on the bottom of the heel carefully, but forcefully using a block of wood and a hammer. If this method doesn't budge the joint, carefully apply a small amount of hot water down the dovetail and along the sides, where the heel meets the body (scratch out any varnish here first and use your exacto knife to enlarge any cracks). Making the bass neck: - This is made just like the neck described in my "doodle-bass" article, but with a few changes to the body-end of the neck.
  These changes are necessary because the new neck here has to be a
  bit longer (bridge is closer to the soundboard's middle) than
  on the doodle-bass and also because I've "cut away" about 1/4"
  of that part of the top surface of the neck that's inside the
  guitar's body -- to allow for adequate clearance between the
  neck and the bottom of the soundboard. This cutting away
  weakens the neck, so what I've done is add a 1/4" thick piece
  of strengthening wood (in my case it was oak, which I had on
  hand) to the bottom of that part of the neck that's inside the
  guitar's body. I made this oak piece long enough to just stick
  out of the "heel" end of the body.


Making the new soundboard:

- I used 1/8" thick plywood I got from the back-side of an old
  chest of drawers. Simply trace out the pattern (allow a bit
  larger & sand down later) then saw out the soundboard.
  Whenever I cut thin plywood, I apply masking tape to both
  sides of the wood and always cut so that the teeth of the saw
  pull down through the finished surface -- otherwise you will
  likely end up with the teeth removing big chips of the plywood
  on the top surface).

- Cut two 2-3/8" diameter soundholes as shown in the illustration.
  I used a hand saber saw - again using lots of masking tape.
  Make sure these holes are not positioned where the braces are
  glued.
  LATER NOTE: after much experimentation, I've found that
  instead of the two soundholes mentioned above, a single,
  3" by 2" eliptical soundhole cut in the body's SIDE, just to
  the left (when body is viewed from the front, with neck up) of
  where the neck attaches GREATLY improves the volume and tone
  of the instrument for the player - in particular, the low E
  string. This is a "personal" instrument - intended to enable
  one to sit or lay back & practice or diddle -- as such, the
  soundhole in the side, facing the player, makes much sense. In
  addition, this improvement is more pronounced WITHOUT the two
  2-3/8" soundholes -- with just the one eliptical side hole.
  The difference is remarkable. Because of the
  "neck-through-the-body" design of this bass, there's very
  little pressure on the body itself & there's no chance that
  the body will collapse because of this side-hole. While
  foreign to guitars, the side hole is used in some African
  instruments, most notably the Kora, whose only soundhole is on
  the side.

- Because conventional type cross braces on the underside of the
  soundboard are not possible with this conversion (they would
  interfere with the neck routing), I used two light
  longitudinal cedar braces, each one spaced about 1/2" outside
  of where the neck will run. They're not that much different
  than bass bars found inside of guitars and may even serve a
  similar purpose (even if there are two of them!)


Modifying the guitar's existing heel-mounting block:

- The idea is to have the top of the neck surface level with the
  top of the sides (aka top of the heel-mounting block), so that
  the flat bottom of the soundboard will mount flush over
  everything. To do this, a rectangular chunk (corresponding to
  the width and thickness of the neck) must be cut from the
  heel-mounting block. The neck "plugs into" this recess.

- Lay the neck in position & scribe two lines on the block's top
  representing the neck's width. Carefully mesure the neck's
  thickness (don't forget to include the thickness of the 1/4"
  strengthening wood described above) and scribe the lines
  showing what must be cut out.

- Carefully saw down along the two vertical lines - keep things
  as square and parallel as possible.

- The horizontal cut is more difficult. I used a hand saber saw
  (with a guide-hole drilled first). It's better to cut smaller
  than bigger -- I had to do a bit of filing and sanding to make
  the neck "plug in" nicely.


Using this "through-the-body" neck, the only string pressure
that is on the body itself is that small amount exerted by the
downward pressure of the strings on the bridge/soundboard.
Unlike with conventional acoustic guitars, all of the pull of
the strings is borne by the neck, not by the guitar body. The
body is only used for it's resonating properties - not for
bearing the string's pulling tension.


Misc. construction details:

- The far end of the neck is secured with the same wood screw
  that the strings are tied off to (tailpiece). Where the neck
  is plugged into the modified heel-mounting block, I installed
  two wood screws through the soundboard, through the neck and
  into the heel-mounting block. I countersunk the screw heads.
  This joint could be glued instead of screwed, but I wanted the
  option of easily removing the neck if need be (Although the
  pine fingerboard/neck works and holds up very nicely, I may
  experiment with a hardwood neck and a seperate, hardwood
  fingerboard - if I get the time).

- I glued on a thin piece of veneer to hide the wounded area
  that had been covered by the heel of the original guitar neck.

- Not many actual dimensions are shown here (other than for the
  neck - in the Doodle-bass article). The reason for this is
  that with so many different size guitars, it's easier to just
  go with what you've got. Not much is critical. Just make sure
  the cedar soundboard braces clear the neck. The "cutaway" on
  the top surface of the neck (where it passes inside the body)
  need only start about an inch and a half from the body's ends.

- On my instrument, a 5/8" tall bridge provides great action
  (strings are 5/8" off the soundboard). I prefer bridges with
  holes drilled through them for the strings rather than the
  more conventional string grooves. This takes a bit more
  planning, but I believe is worth it.

About holding the instrument. The long neck makes it a bit of a
challenge to hold while playing. A strap from just behind the
nut to the tailpiece anchor works nicely but my favorite
position is a lazy and relaxed one --- I lay back on the sofa,
my head on the sofa's left armrest, bass body sitting on the
floor to my right. This position is great -- low and high neck
positions can easily be reached with the left hand.


Concerning stringing the instrument:

Until I can get the time to write the following information into
this article, details on stringing the four nylon weed-whip-line
strings (etc) can be found in my article on building the
"doodle-bass".

This is how I have my instrument strung:
Follow the stringing instructions for "Doodle-bass #2", which is
tuned E-A-D-G - low to high --- exactly the same pitch and octave
as a big stand-up bass. String gauges used: .105" .095" .080" .065"
monofilament nylon weed-whip line.
Click here to access my "Doodle-bass" article & stringing information.
Experiments continue!

Dennis Havlena
Click here to access my webpage.